Building Swift projects
Gradle uses a convention-over-configuration approach to building native projects. If you are coming from another native build system, these concepts may be unfamiliar at first, but they serve a purpose to simplify build script authoring.
We will look at Swift projects in detail in this chapter, but most of the topics will apply to other supported native languages as well.
Introduction
The simplest build script for a Swift project applies the Swift application plugin or the Swift library plugin and optionally sets the project version:
plugins {
    `swift-application` // or `swift-library`
}

version = "1.2.1"plugins {
id 'swift-application' // or 'swift-library'
}
version = '1.2.1'By applying either of the Swift plugins, you get a whole host of features:
-
compileDebugSwiftandcompileReleaseSwifttasks that compiles the Swift source files under src/main/swift for the well-known debug and release build types, respectively. -
linkDebugandlinkReleasetasks that link the compiled Swift object files into an executable for applications or shared library for libraries with shared linkage for the debug and release build types. -
createDebugandcreateReleasetasks that assemble the compiled Swift object files into a static library for libraries with static linkage for the debug and release build types.
For any non-trivial Swift project, you’ll probably have some file dependencies and additional configuration specific to your project.
The Swift plugins also integrates the above tasks into the standard lifecycle tasks.
The task that produces the development binary is attached to assemble.
By default, the development binary is the debug variant.
The rest of the chapter explains the different ways to customize the build to your requirements when building libraries and applications.
Introducing build variants
Native projects can typically produce several different binaries, such as debug or release ones, or ones that target particular platforms and processor architectures. Gradle manages this through the concepts of dimensions and variants.
A dimension is simply a category, where each category is orthogonal to the rest. For example, the "build type" dimension is a category that includes debug and release. The "architecture" dimension covers processor architectures like x86-64 and x86.
A variant is a combination of values for these dimensions, consisting of exactly one value for each dimension. You might have a "debug x86-64" or a "release x86" variant.
Gradle has built-in support for several dimensions and several values within each dimension. You can find a list of them in the native plugin reference chapter.
Declaring your source files
Gradle’s Swift support uses a ConfigurableFileCollection directly from the application or library script block to configure the set of sources to compile.
Libraries make a distinction between private (implementation details) and public (exported to consumer) headers.
You can also configure sources for each binary build for those cases where sources are compiled only on certain target machines.
Managing your dependencies
The vast majority of projects rely on other projects, so managing your project’s dependencies is an important part of building any project. Dependency management is a big topic, so we will only focus on the basics for Swift projects here. If you’d like to dive into the details, check out the introduction to dependency management.
Gradle provides support for consuming pre-built binaries from Maven repositories published by Gradle [1].
We will cover how to add dependencies between projects within a multi-build project.
Specifying dependencies for your Swift project requires two pieces of information:
-
Identifying information for the dependency (project path, Maven GAV)
-
What it’s needed for, e.g. compilation, linking, runtime or all of the above.
This information is specified in a dependencies {} block of the Swift application or library script block.
For example, to tell Gradle that your project requires library common to compile and link your production code, you can use the following fragment:
application {
    dependencies {
        implementation(project(":common"))
    }
}application {
dependencies {
implementation project(':common')
}
}The Gradle terminology for the three elements is as follows:
-
Configuration (ex:
implementation) - a named collection of dependencies, grouped together for a specific goal such as compiling or linking a module -
Project reference (ex:
project(':common')) - the project referenced by the specified path
As far as configurations go, the main ones of interest are:
-
implementation- used for compilation, linking and runtime -
swiftCompileVariant- for dependencies that are necessary to compile your production code but shouldn’t be part of the linking or runtime process -
nativeLinkVariant- for dependencies that are necessary to link your code but shouldn’t be part of the compilation or runtime process -
nativeRuntimeVariant- for dependencies that are necessary to run your component but shouldn’t be part of the compilation or linking process
You can learn more about these and how they relate to one another in the native plugin reference chapter.
Be aware that the Swift Library Plugin creates an additional configuration — api — for dependencies that are required for compiling and linking both the module and any modules that depend on it.
We have only scratched the surface here, so we recommend that you read the dedicated dependency management chapters once you’re comfortable with the basics of building Swift projects with Gradle.
Some common scenarios that require further reading include:
-
Defining a custom Maven-compatible repository
-
Declaring dependencies with changing (e.g. SNAPSHOT) and dynamic (range) versions
-
Declaring a sibling project as a dependency
-
Testing your fixes to 3rd-party dependency via composite builds (a better alternative to publishing to and consuming from Maven Local)
You’ll discover that Gradle has a rich API for working with dependencies — one that takes time to master, but is straightforward to use for common scenarios.
Compiling and linking your code
Compiling both your code can be trivially easy if you follow the conventions:
-
Put your source code under the src/main/swift directory
-
Declare your compile dependencies in the
implementationconfigurations (see the previous section) -
Run the
assembletask
We recommend that you follow these conventions wherever possible, but you don’t have to.
There are several options for customization, as you’ll see next.
| All SwiftCompile tasks are incremental and cacheable. |
Supported tool chain
Gradle support the official Swift tool chain for macOS and Linux. When you build a native binary, Gradle will attempt to locate a tool chain installed on your machine that can build the binary. Gradle select the first tool chain that can build for the target operating system, architecture and Swift language support.
| For Linux users, Gradle will discover the tool chain using the system PATH. |
Customizing file and directory locations
Imagine you are migrating a library project that follows the Swift Package Manager layout (e.g. Sources/ModuleName_ directory for the production code).
The conventional directory structure won’t work, so you need to tell Gradle where to find the source files.
You do that via the application or library script block.
Each component script block, as well as each binary, defines where it’s source code resides. You can override the convention values by using the following syntax:
extensions.configure<SwiftLibrary> {
    source.from(file("Sources/Common"))
}library {
source.from file('src')
}Now Gradle will only search directly in Sources/Common for the source.
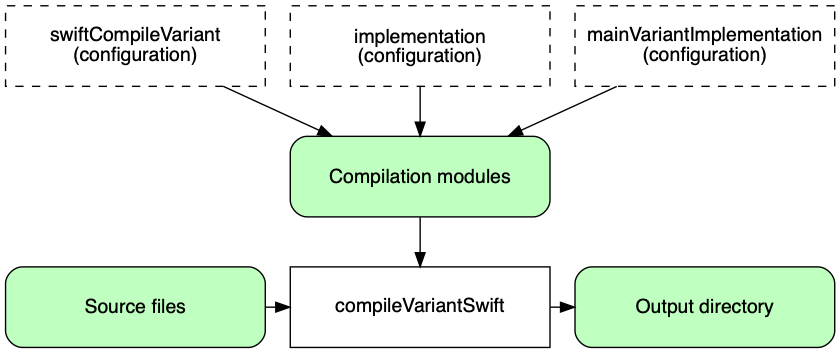
Changing compiler and linker options
Most of the compiler and linker options are accessible through the corresponding task, such as compileVariantSwift, linkVariant and createVariant.
These tasks are of type SwiftCompile, LinkSharedLibrary and CreateStaticLibrary respectively.
Read the task reference for an up-to-date and comprehensive list of the options.
For example, if you want to change the warning level generated by the compiler for all variants, you can use this configuration:
tasks.withType(SwiftCompile::class.java).configureEach {
    // Define a preprocessor macro for every binary
    macros.add("NDEBUG")

    // Define a compiler options
    compilerArgs.add("-O")
}tasks.withType(SwiftCompile).configureEach {
// Define a preprocessor macro for every binary
macros.add("NDEBUG")
// Define a compiler options
compilerArgs.add '-O'
}It’s also possible to find the instance for a specific variant through the BinaryCollection on the application or library script block:
application {
    binaries.configureEach(SwiftStaticLibrary::class.java) {
        // Define a preprocessor macro for every binary
        compileTask.get().macros.add("NDEBUG")

        // Define a compiler options
        compileTask.get().compilerArgs.add("-O")
    }
}application {
binaries.configureEach(SwiftStaticLibrary) {
// Define a preprocessor macro for every binary
compileTask.get().macros.add("NDEBUG")
// Define a compiler options
compileTask.get().compilerArgs.add '-O'
}
}Selecting target machines
By default, Gradle will attempt to create a Swift binary variant for the host operating system and architecture.
It is possible to override this by specifying the set of TargetMachine on the application or library script block:
application {
    targetMachines = listOf(machines.linux.x86_64, machines.macOS.x86_64)
}application {
targetMachines = [
machines.linux.x86_64,
machines.macOS.x86_64
]
}Packaging and publishing
How you package and potentially publish your Swift project varies greatly in the native world. Gradle comes with defaults, but custom packaging can be implemented without any issues.
-
Executable files are published directly to Maven repositories.
-
Shared and static library files are published directly to Maven repositories along with a zip of the public headers.
-
For applications, Gradle also supports installing and running the executable with all of its shared library dependencies in a known location.
Cleaning the build
The Swift Application and Library Plugins add a clean task to you project by using the base plugin.
This task simply deletes everything in the layout.buildDirectory directory, hence why you should always put files generated by the build in there.
The task is an instance of Delete and you can change what directory it deletes by setting its dir property.
Building Swift libraries
The unique aspect of library projects is that they are used (or "consumed") by other Swift projects. That means the dependency metadata published with the binaries and headers — in the form of Gradle Module Metadata — is crucial. In particular, consumers of your library should be able to distinguish between two different types of dependencies: those that are only required to compile your library and those that are also required to compile the consumer.
Gradle manages this distinction via the Swift Library Plugin, which introduces an api configuration in addition to the implementation once covered in this chapter. If the types from a dependency appear as unresolved symbols of the static library or within the public headers then that dependency is exposed via your library’s public API and should, therefore, be added to the api configuration. Otherwise, the dependency is an internal implementation detail and should be added to implementation.
If you’re unsure of the difference between an API and implementation dependency, the Swift Library Plugin chapter has a detailed explanation.
Building Swift applications
See the Swift Application Plugin chapter for more details, but here’s a quick summary of what you get:
-
installcreate a directory containing everything needed to run it -
Shell and Windows Batch scripts to start the application