Improve the Performance of Gradle Builds
- 0. Inspect your Build
- 1. Update Versions
- 2. Enable Parallel Execution
- 3. Re-enable the Gradle Daemon
- 4. Enable the Build Cache
- 5. Enable the Configuration Cache
- 6. Enable Incremental Build for Custom Tasks
- 7. Create Builds for Specific Developer Workflows
- 8. Increase the Heap Size
- 9. Optimize Configuration
- 10. Optimize dependency resolution
- 11. Optimize Java projects
- 12. Optimize Android Projects
- 13. Improve the performance of older Gradle releases
Build performance is essential to productivity. The longer a build takes, the more it disrupts your development flow. Since builds run many times a day, even small delays add up. The same applies to Continuous Integration (CI).
Investing in build speed pays off. This section explores ways to optimize performance, highlights common pitfalls, and explains how to avoid them.
| # | Recommendation |
|---|---|
1 |
|
2 |
|
3 |
|
4 |
|
5 |
|
6 |
|
7 |
|
8 |
|
9 |
|
10 |
|
11 |
|
12 |
|
13 |
0. Inspect your Build
Before making any changes, inspect your build with a Build Scan or profile report. A thorough inspection helps you understand:
-
Total build time
-
Which parts of the build are slow
This provides a baseline to measure the impact of optimizations.
To get the most value from this page:
-
Inspect your build.
-
Apply a change.
-
Inspect your build again.
If the change improves build times, keep it. If it doesn’t, revert the change and try another approach.
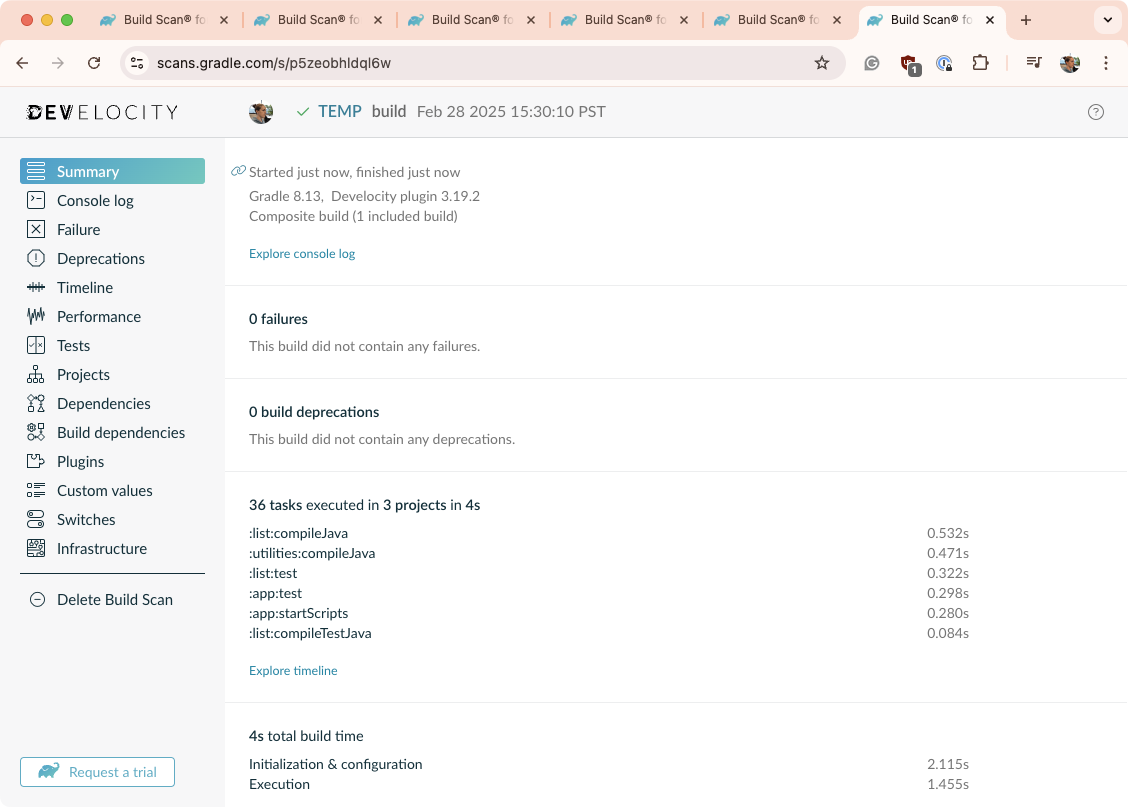
For reference, the following Build Scan snapshot is a build of a project created using gradle init.
It is a Java (JDK 21) Application and library project using Kotlin build files:
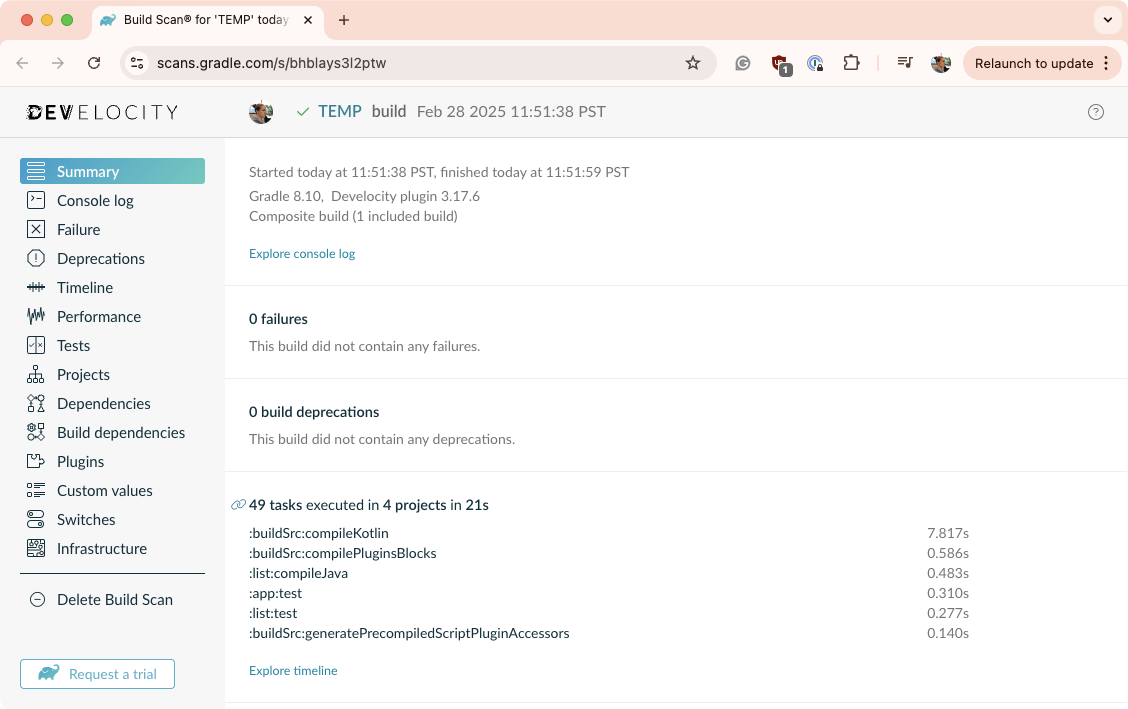
It builds in 21 seconds using Gradle 8.10.
1. Update Versions
Gradle
Each Gradle release brings performance improvements. Using an outdated version means missing out on these gains. Upgrading is low-risk since Gradle maintains backward compatibility between minor versions. Staying up to date also makes major version upgrades smoother by providing early deprecation warnings.
You can use the Gradle Wrapper to update the version of Gradle by running gradle :wrapper --gradle-version X.X where X.X is the desired version.
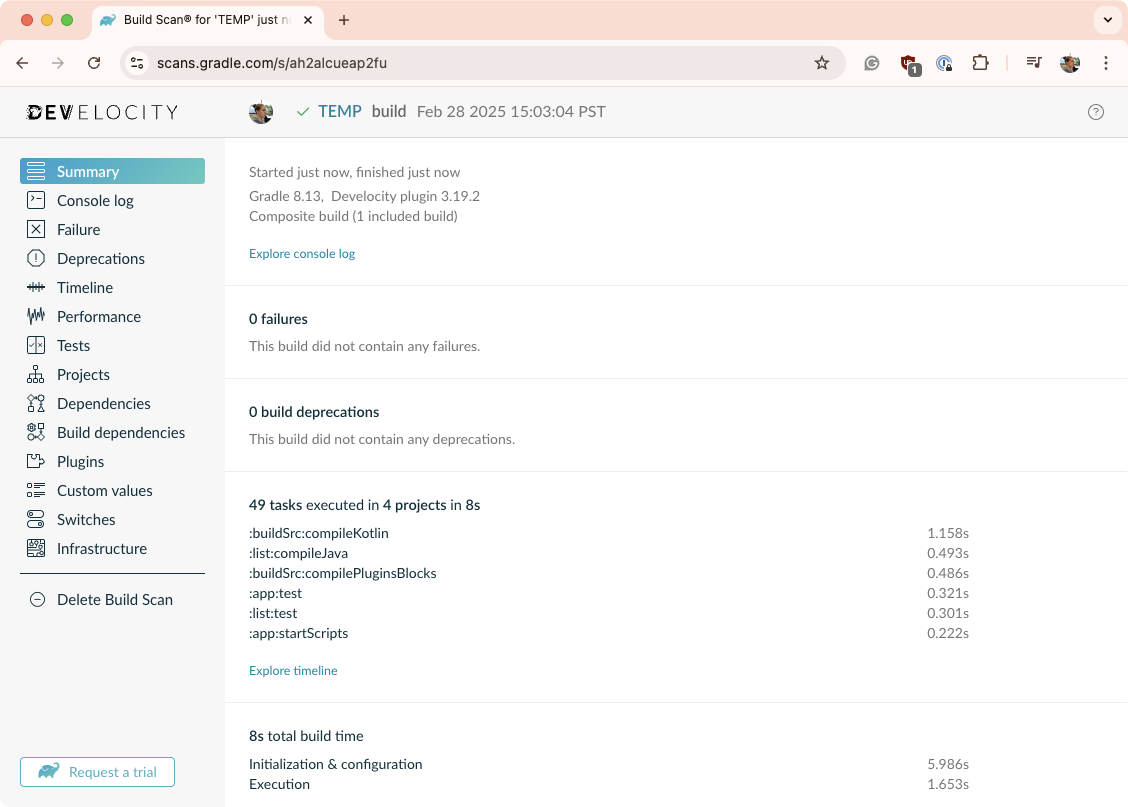
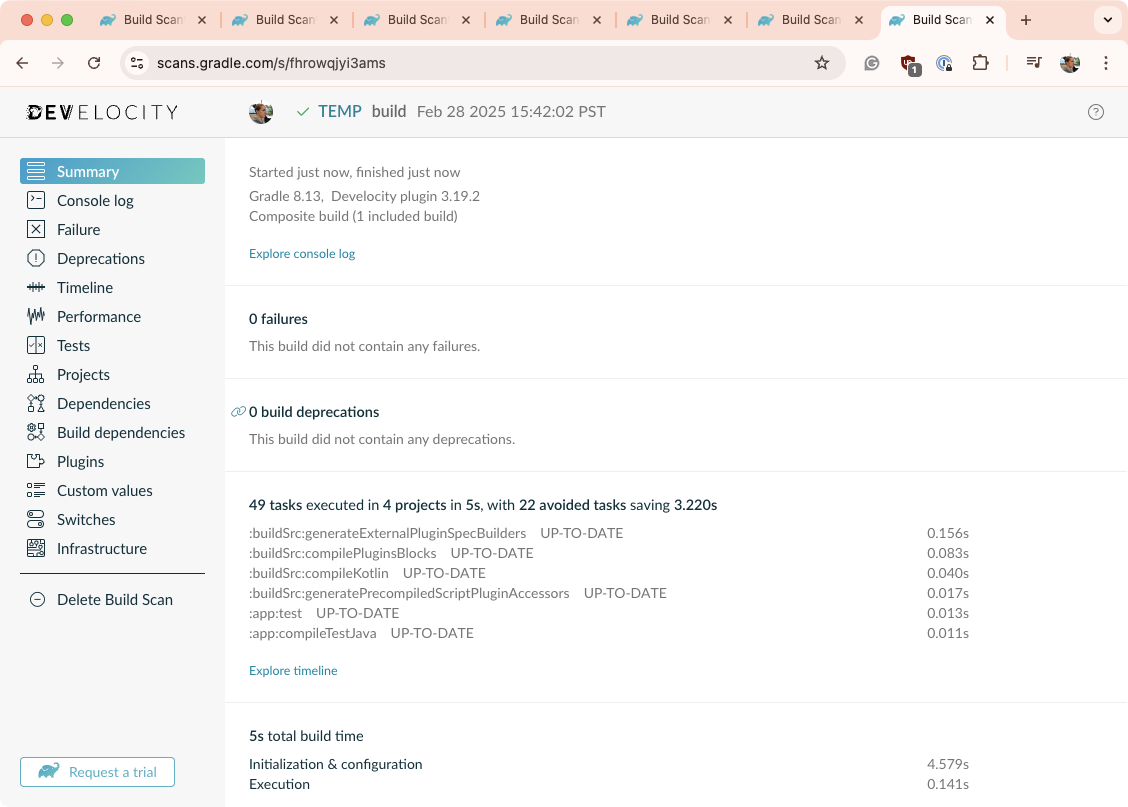
When our reference project is updated to use Gradle 8.13, the build (./gradlew clean build) takes 8 seconds:
Java
Gradle runs on the Java Virtual Machine (JVM), and Java updates often enhance performance. To get the best Gradle performance, use the latest Java version.
| Don’t forget to check out compatibility guide to make sure your version of Java is compatible with your version of Gradle. |
Plugins
Plugins play a key role in build performance. Outdated plugins can slow down your build, while newer versions often include optimizations. This is especially true for the Android, Java, and Kotlin plugins. Keep them up to date for the best performance.
Simply look at all the declared plugins in your project and check if a newer version is available:
plugins {
    id("org.jlleitschuh.gradle.ktlint") version "12.0.0" // A newer version is available on the Gradle Plugin Portal
}
2. Enable Parallel Execution
Most projects consist of multiple subprojects, some of which are independent. However, by default, Gradle runs only one task at a time.
To execute tasks from different subprojects in parallel, use the --parallel flag:
$ gradle <task> --parallelTo enable parallel execution by default, add this setting to gradle.properties in the project root or your Gradle home directory:
org.gradle.parallel=trueParallel builds can significantly improve build times, but the impact depends on your project’s structure and inter-subproject dependencies. If a single subproject dominates execution time or there are many dependencies between subprojects, the benefits will be minimal. However, most multi-project builds see a noticeable reduction in build time.
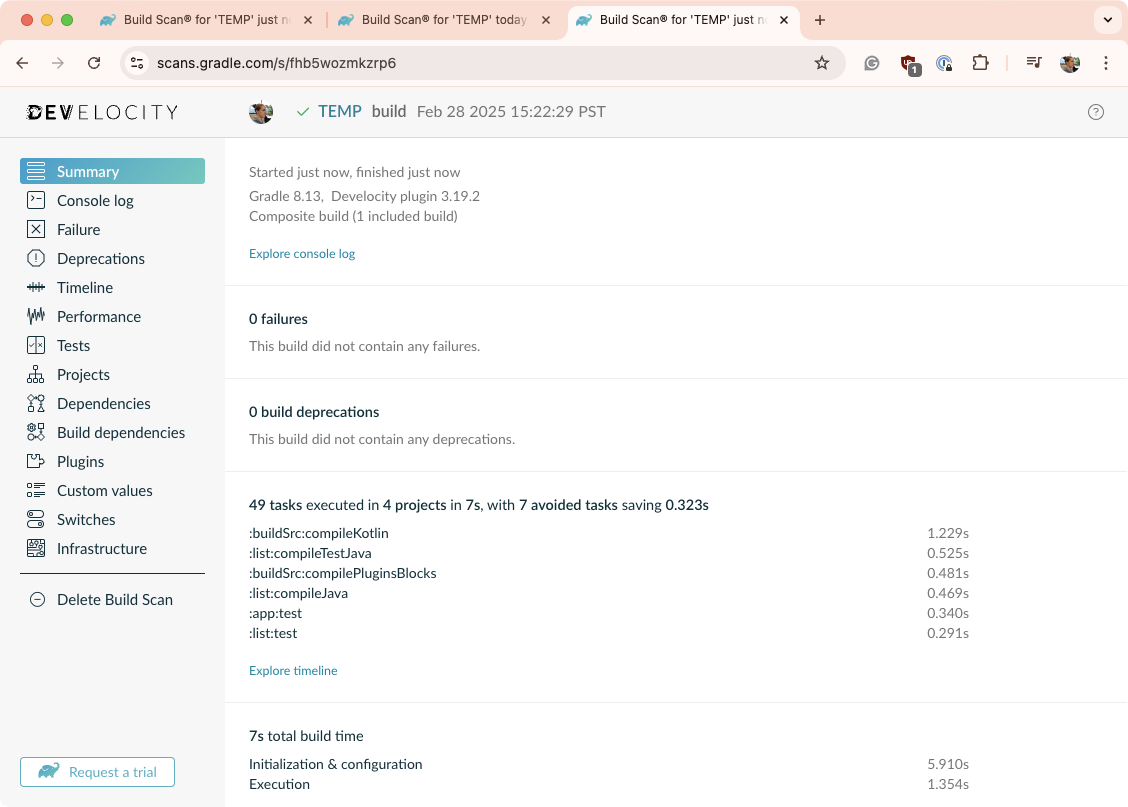
When the parallel flag is used on our reference project, the build (./gradlew clean build --parallel) time is 7 seconds:
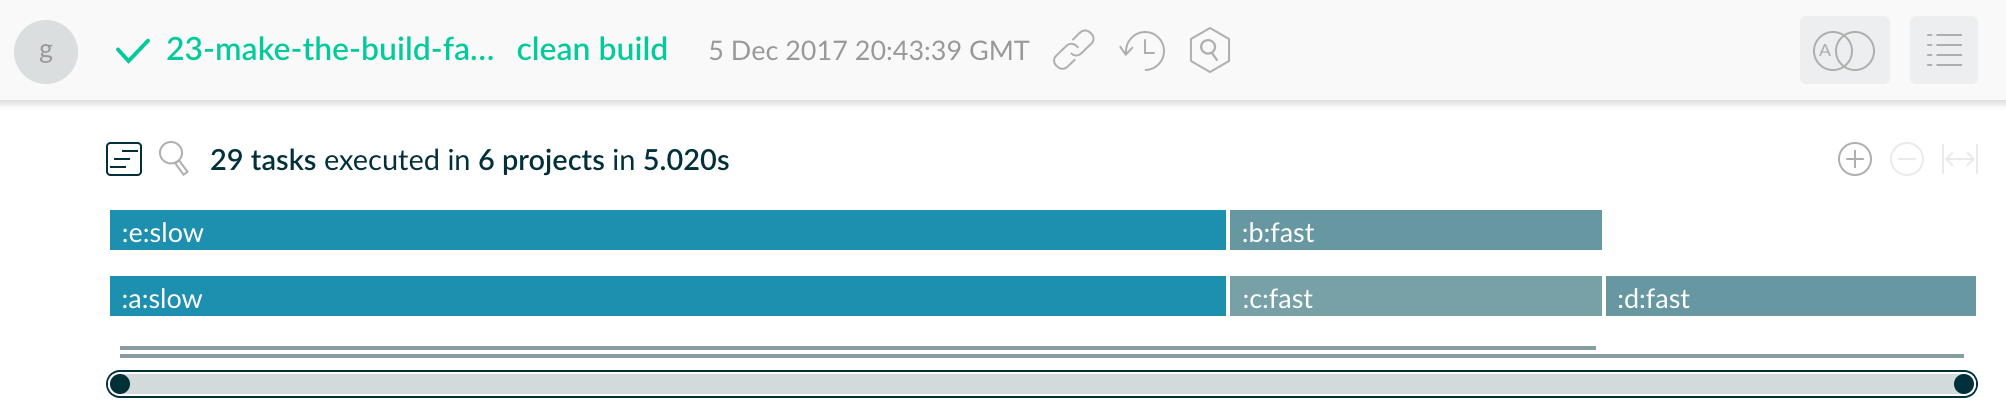
Visualize Parallelism with Build Scan
A Build Scan provides a visual timeline of task execution in the "Timeline" tab.
In the example below, the build initially has long-running tasks at the beginning and end, creating a bottleneck:
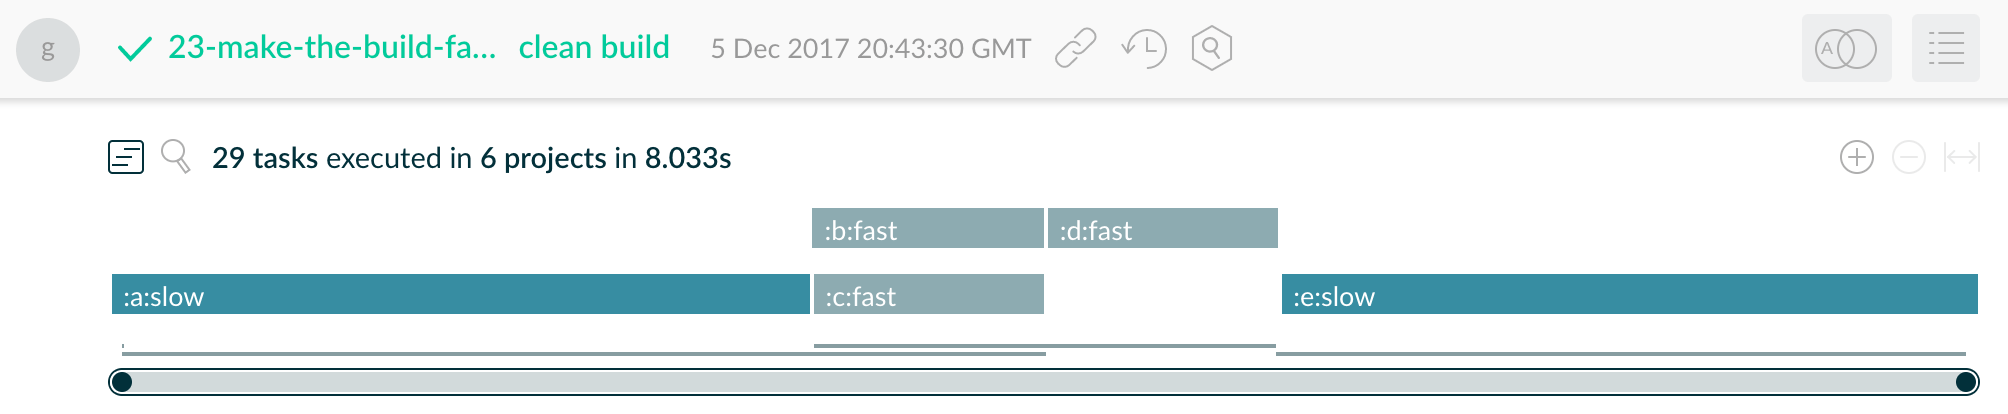
By adjusting the build configuration to run these two slow tasks earlier and in parallel, the overall build time is reduced from 8 seconds to 5 seconds:
Configure Tooling API actions parallelism
By enabling Parallel Execution, you also allow parallelism for Tooling API actions. This means that Tooling API clients, such as IDEs, can do some of their work faster. In practice, this improves the speed of scenarios like IDE sync.
However, enabling Parallel Execution may not work for all builds. In some cases, the additional parallelism may lead to instability if tasks access shared mutable state across project boundaries. In other cases, the parallel Tooling API actions might misbehave for similar reasons.
If you observe such problems after enabling Parallel Execution, you should consider disabling it to preserve the reliability of the build results. At the same time, it is rare for builds to have problems with tasks and Tooling API actions at the same time.
Since Gradle 9.4.0, there is an additional option org.gradle.tooling.parallel
that allows controlling parallelism of Tooling API actions independently of task execution parallelism.
For instance, you can enable Tooling parallelism without task parallelism:
org.gradle.tooling.parallel=trueAlternatively, you can keep task parallelism, but disable Tooling parallelism:
org.gradle.parallel=true
org.gradle.tooling.parallel=false
3. Re-enable the Gradle Daemon
The Gradle Daemon significantly reduces build times by:
-
Caching project information across builds
-
Running in the background to avoid JVM startup delays
-
Benefiting from continuous JVM runtime optimizations
-
Watching the file system to determine what needs to be rebuilt
Gradle enables the Daemon by default, but some builds override this setting. If your build disables it, enabling the Daemon can lead to substantial performance improvements.
To enable the Daemon at build time, use:
$ gradle <task> --daemonFor older Gradle versions, enable it permanently by adding this to gradle.properties:
org.gradle.daemon=trueOn developer machines, enabling the Daemon improves performance. On CI machines, long-lived agents benefit, but short-lived ones may not. Since Gradle 3.0, Daemons automatically shut down under memory pressure, making it safe to keep the Daemon enabled.
When the daemon is used on our reference project, the build (./gradlew clean build --daemon) time is 3 seconds:

4. Enable the Build Cache
The Gradle Build Cache optimizes performance by storing task outputs for specific inputs. If a task runs again with the same inputs, Gradle retrieves the cached output instead of re-executing the task.
By default, Gradle does not use the Build Cache. To enable it at build time, use:
$ gradle <task> --build-cacheTo enable it permanently, add this to gradle.properties:
org.gradle.caching=trueYou can use:
-
A local Build Cache to speed up repeated builds on the same machine.
-
A shared Build Cache to accelerate builds across multiple machines.
-
Develocity provides a shared Cache solution for CI and developer builds.
-
When the build cache flag is used on our reference project, the build (./gradlew clean build --build-cache) time is 5 seconds:
For more information about the Build Cache, check out the Build Cache documentation.
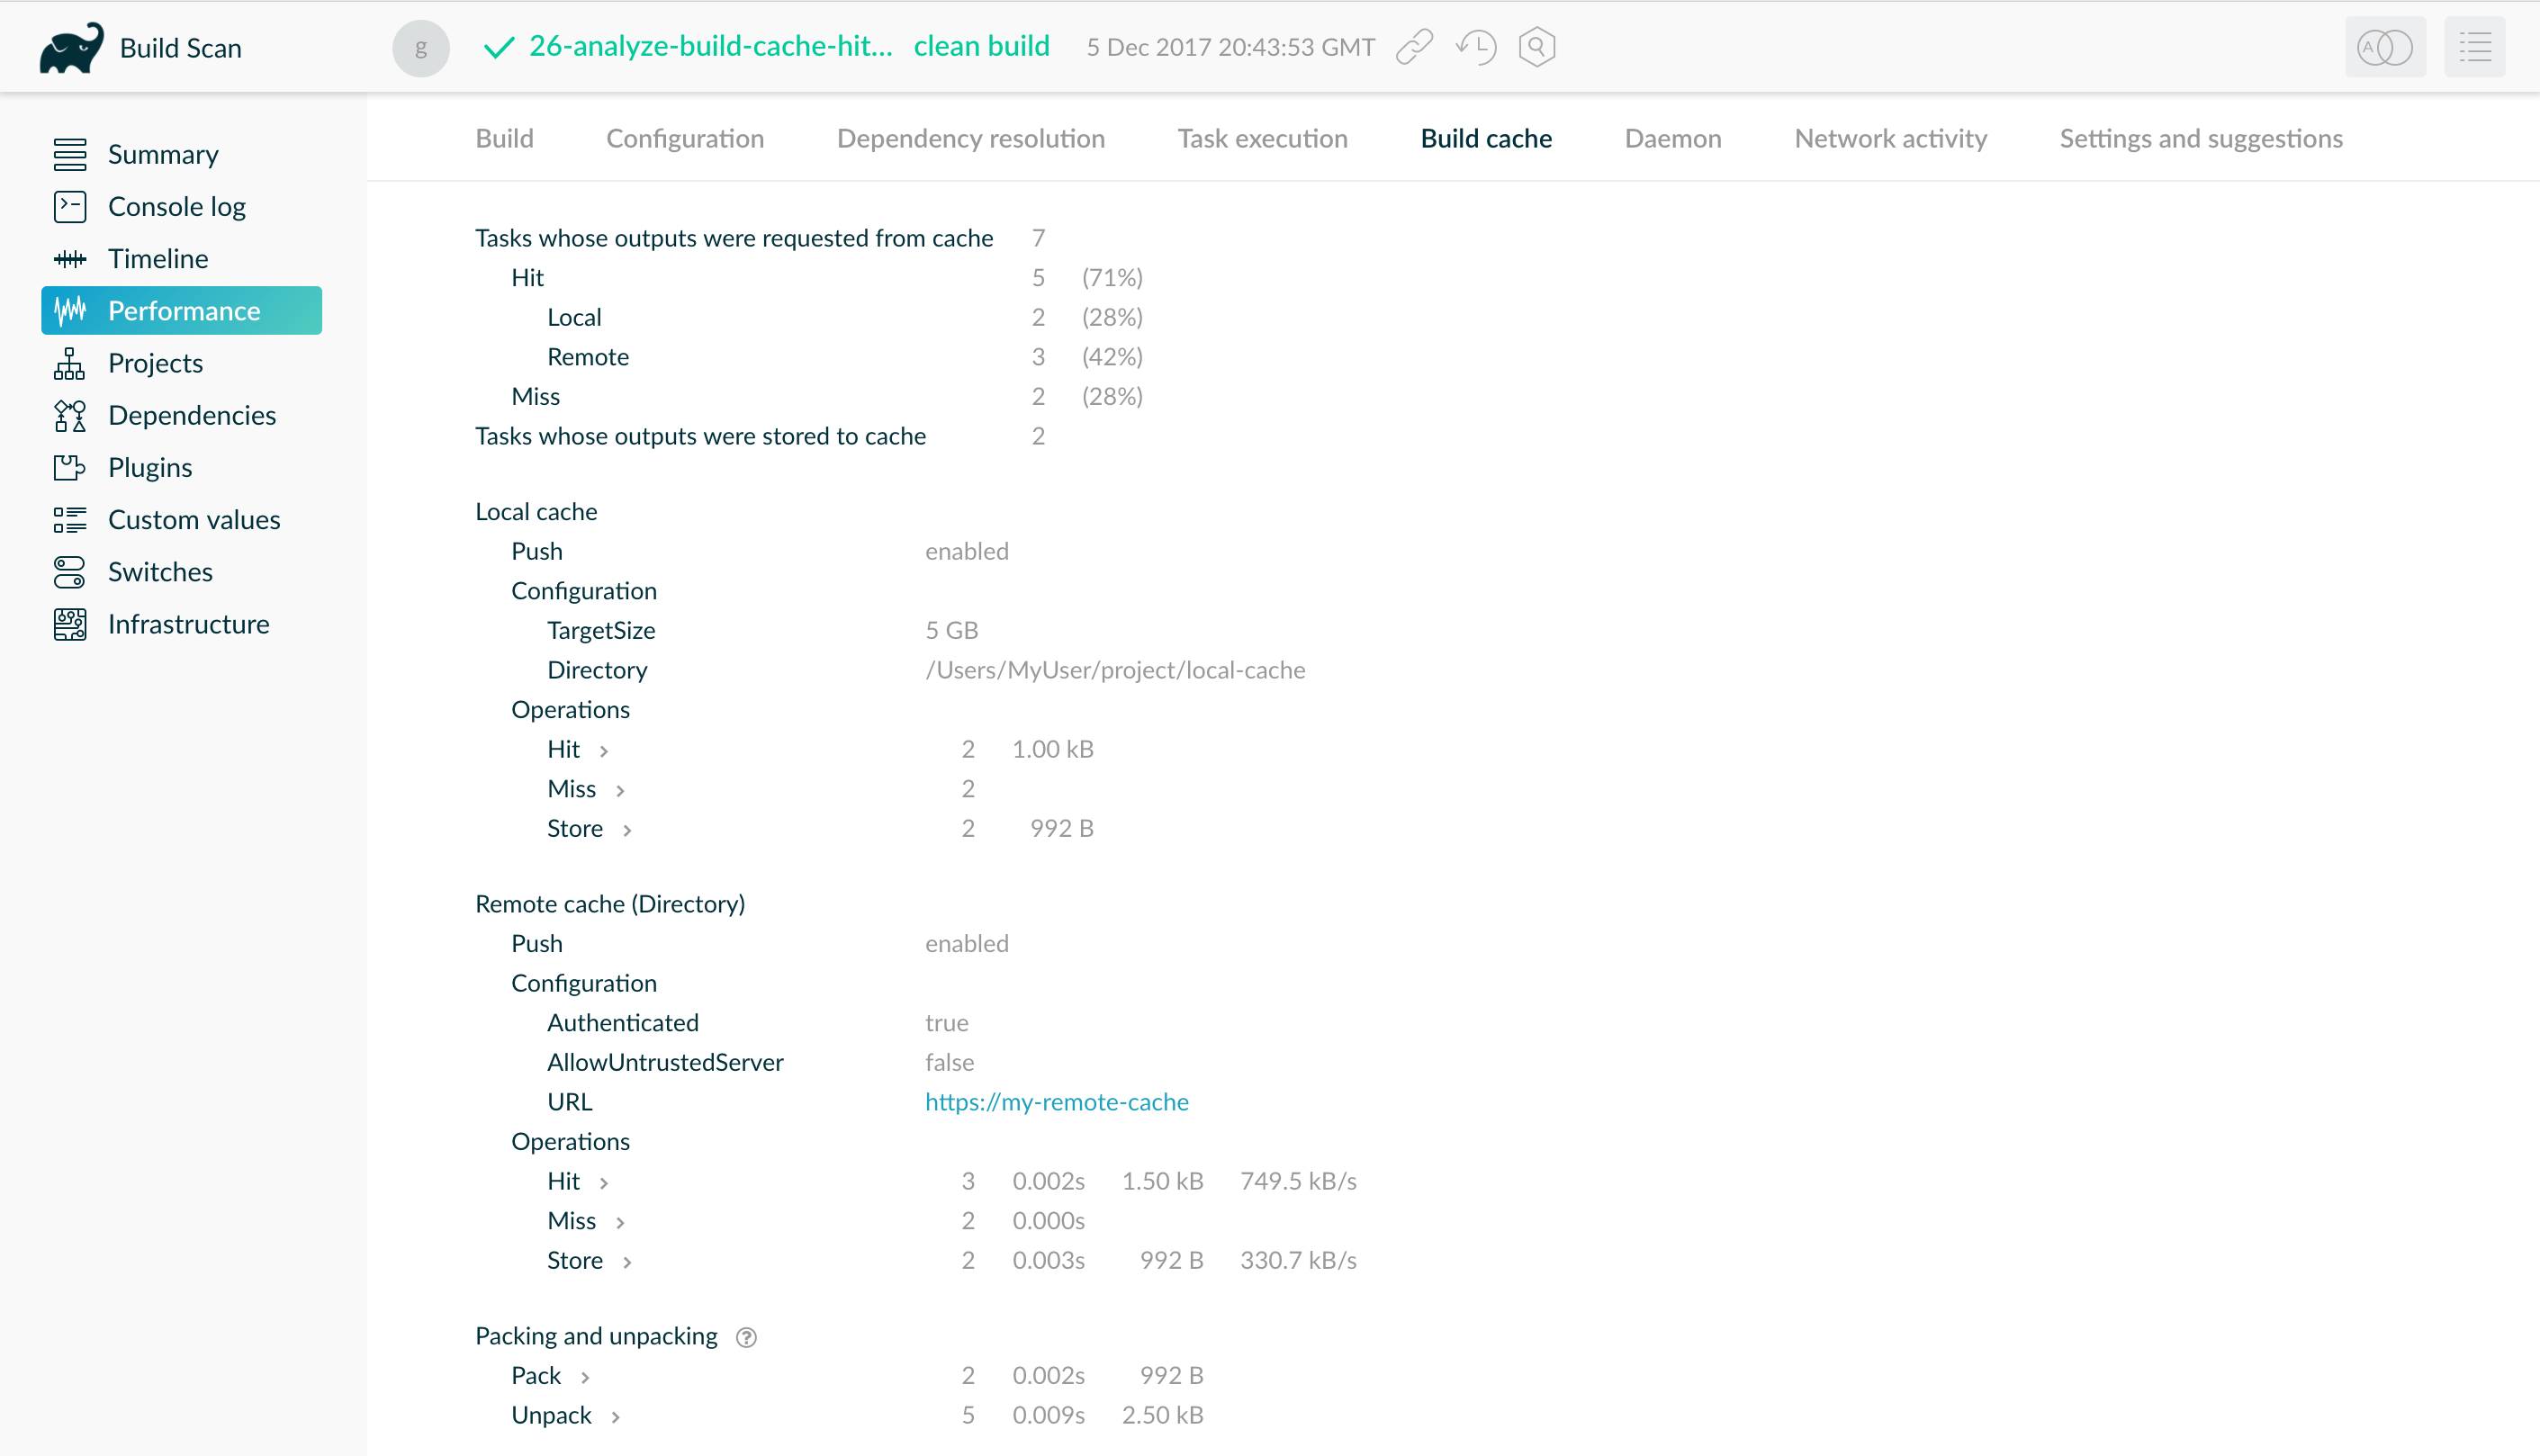
Visualize the Build Cache with Build Scan
A Build Scan helps you analyze Build Cache effectiveness through the "Build Cache" tab in the "Performance" page. This tab provides key statistics, including:
-
The number of tasks that interacted with a cache
-
Which cache was used
-
Transfer and pack/unpack rates for cached entries
The "Task Execution" tab offers insights into task cacheability. Clicking on a category reveals a timeline highlighting tasks in that category:
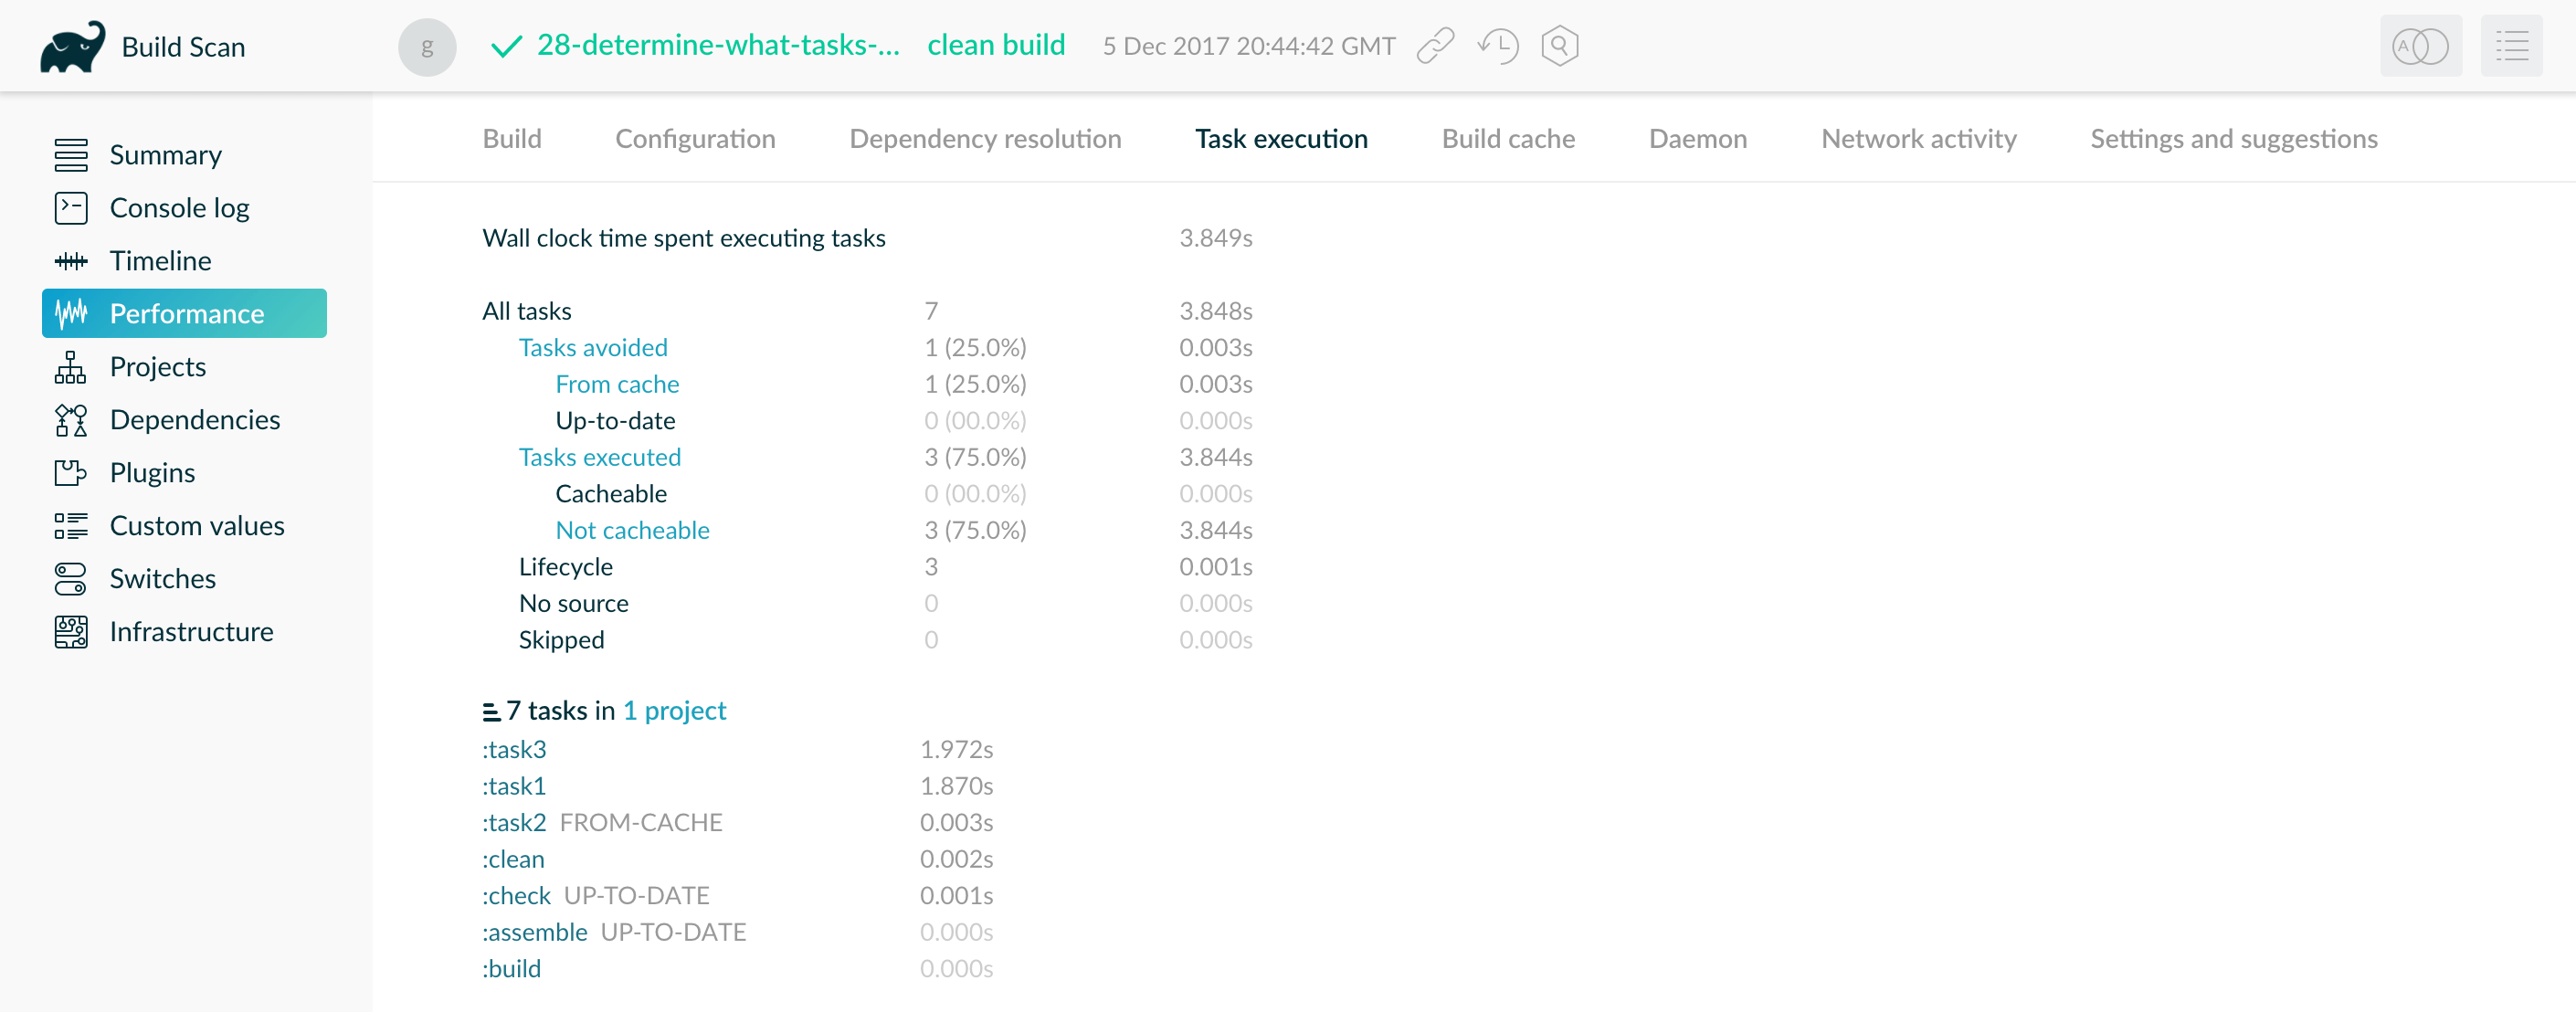

To identify optimization opportunities, sort tasks by duration in the timeline view.
The Build Scan above reveals that :task1 and :task3 could be improved and made cacheable, while also explaining why Gradle didn’t cache them.
5. Enable the Configuration Cache
|
This feature has the following limitations:
|
The configuration cache speeds up builds by caching the results of the configuration phase. When build configuration inputs remain unchanged, Gradle can skip this phase entirely.
Enabling the configuration cache provides further performance benefits. When enabled, Gradle:
-
Executes all tasks in parallel, even within the same subproject.
-
Caches dependency resolution results to avoid redundant computations.
Build configuration inputs include:
-
Init scripts
-
Settings scripts
-
Build scripts
-
System and Gradle properties used during configuration
-
Environment variables used during configuration
-
Configuration files accessed via value suppliers (
providers) -
buildSrcinputs, including configuration files and source files
By default, Gradle does not use the configuration cache. To enable it at build time, use:
$ gradle <task> --configuration-cacheTo enable it permanently, add this setting to the gradle.properties file:
org.gradle.configuration-cache=trueWhen the configuration cache flag is used on our reference project, the build (./gradlew clean build --build-cache) time is 4 seconds:
For more details, see the Configuration Cache documentation.
6. Enable Incremental Build for Custom Tasks
Incremental build is a Gradle optimization that skips tasks that have already executed with the same inputs. If a task’s inputs and outputs have not changed since the last execution, Gradle will skip that task.
Most built-in Gradle tasks support incremental builds. To make a custom task compatible, you must specify its inputs and outputs:
tasks.register("processTemplatesAdHoc") {
    inputs.property("engine", TemplateEngineType.FREEMARKER)
    inputs.files(fileTree("src/templates"))
        .withPropertyName("sourceFiles")
        .withPathSensitivity(PathSensitivity.RELATIVE)
    inputs.property("templateData.name", "docs")
    inputs.property("templateData.variables", mapOf("year" to "2013"))
    outputs.dir(layout.buildDirectory.dir("genOutput2"))
        .withPropertyName("outputDir")

    doLast {
        // Process the templates here
    }
}tasks.register('processTemplatesAdHoc') {
inputs.property('engine', TemplateEngineType.FREEMARKER)
inputs.files(fileTree('src/templates'))
.withPropertyName('sourceFiles')
.withPathSensitivity(PathSensitivity.RELATIVE)
inputs.property('templateData.name', 'docs')
inputs.property('templateData.variables', [year: '2013'])
outputs.dir(layout.buildDirectory.dir('genOutput2'))
.withPropertyName('outputDir')
doLast {
// Process the templates here
}
}For more details, see the incremental build documentation and the writing tasks tutorial.
When leveraging incremental builds on our reference project, the build (./gradlew clean build build) time is 5 seconds:
Visualize Incremental Builds with Build Scan Timelines
Look at the Build Scan "Timeline" view to identify tasks that could benefit from incremental builds. This helps you understand why tasks execute when you expect Gradle to skip them.
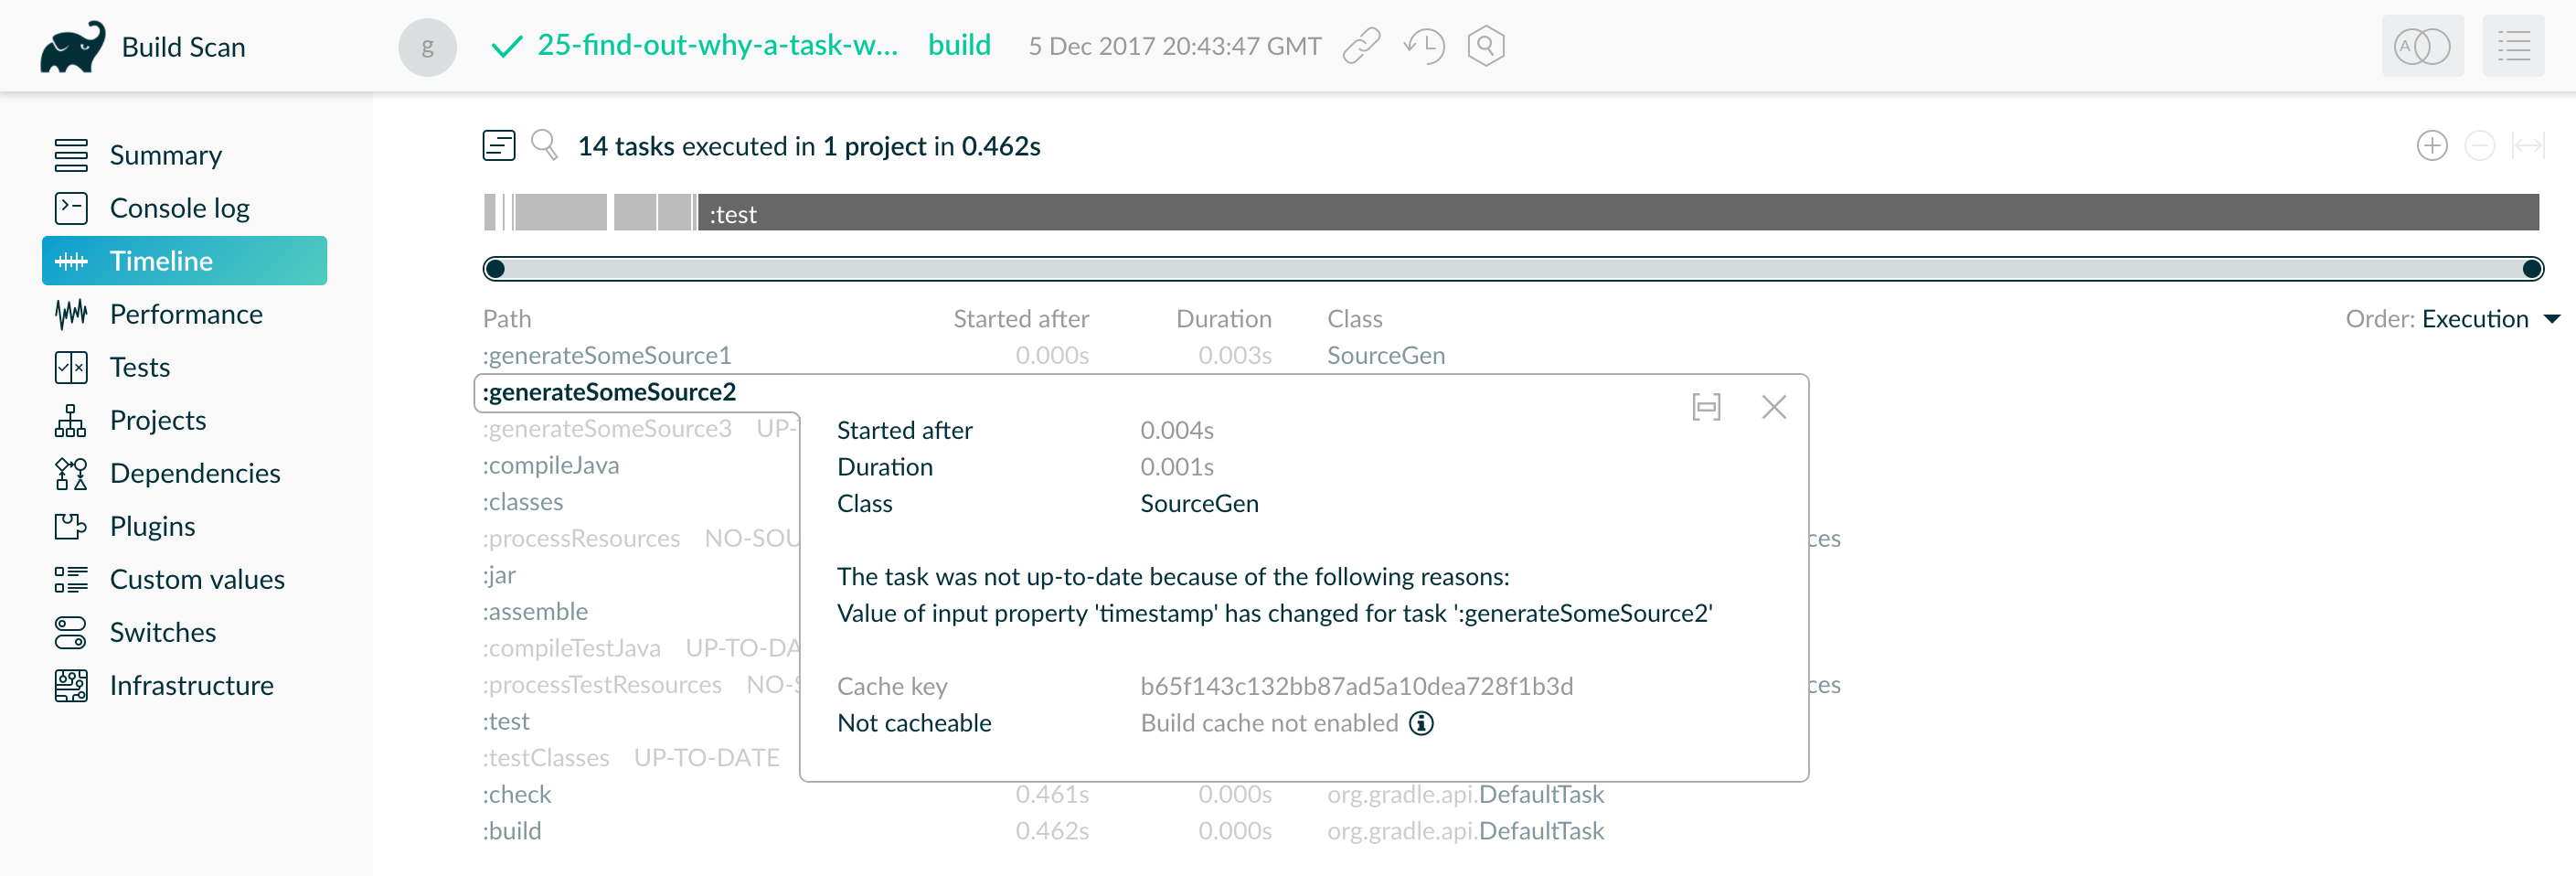
In the example above, the task was not up-to-date because one of its inputs ("timestamp") changed, forcing it to re-run.
To optimize your build, sort tasks by duration to identify the slowest tasks in your project.
7. Create Builds for Specific Developer Workflows
The fastest task is one that doesn’t run. By skipping unnecessary tasks, you can significantly improve build performance.
If your build includes multiple subprojects, define tasks that build them independently. This maximizes caching efficiency and prevents changes in one subproject from triggering unnecessary rebuilds in others. It also helps teams working on different subprojects avoid redundant builds—for example:
-
Front-end developers don’t need to build back-end subprojects every time they modify the front-end.
-
Documentation writers don’t need to build front-end or back-end code, even if the documentation is in the same project.
Instead, create developer-specific tasks while maintaining a single task graph for the entire project. Each group of users requires a subset of tasks—convert that subset into a Gradle workflow that excludes unnecessary tasks.
Gradle provides several features to create efficient workflows:
-
Assign tasks to appropriate groups.
-
Create lifecycle tasks—tasks with no action that depend on other tasks (e.g.,
assemble). -
Defer configuration using
gradle.taskGraph.whenReady()to execute verification only when necessary.
8. Increase the Heap Size
By default, Gradle reserves 512MB of heap space for your build, which is sufficient for most projects.
However, very large builds may require more memory to store Gradle’s model and caches.
If needed, you can increase the heap size by specifying the following property in the gradle.properties file in your project root or your Gradle home directory:
org.gradle.jvmargs=-Xmx2048MFor more details, see the JVM Memory Configuration documentation.
9. Optimize Configuration
As described in the build lifecycle chapter, a Gradle build goes through three phases: initialization, configuration, and execution.
The configuration phase always executes, regardless of which tasks run.
Any expensive operations during this phase slow down every build, including simple commands like gradle help and gradle tasks.
The following sections introduce techniques to reduce time spent in the configuration phase.
| You can also enable the configuration cache to minimize the impact of a slow configuration phase. However, even with caching, the configuration phase still runs occasionally. Optimizing it remains crucial. |
Avoid Expensive or Blocking Work
Time-consuming work should be avoided in the configuration phase. However, it can sometimes sneak in unexpectedly.
While encrypting data or making remote service calls is obvious when done in a build script, such logic is often hidden inside plugins or custom task classes.
Expensive operations in a plugin’s apply() method or a task’s constructor are a red flag:
class ExpensivePlugin : Plugin<Project> {
    override fun apply(project: Project) {
        // BAD: Makes an expensive network call at configuration time
        val response = URL("https://example.com/dependencies.json").readText()
        val dependencies = groovy.json.JsonSlurper().parseText(response) as List<*>

        dependencies.forEach { dep ->
            project.dependencies.add("implementation", dep!!)
        }
    }
}class ExpensivePlugin implements Plugin<Project> {
@Override
void apply(Project project) {
// BAD: Makes an expensive network call at configuration time
def response = new URL("https://example.com/dependencies.json").text
def dependencies = new groovy.json.JsonSlurper().parseText(response)
dependencies.each { dep ->
project.dependencies.add("implementation", dep)
}
}
}Instead:
class OptimizedPlugin : Plugin<Project> {
    override fun apply(project: Project) {
        project.tasks.register("fetchDependencies") {
            doLast {
                // GOOD: Runs only when the task is executed
                val response = URL("https://example.com/dependencies.json").readText()
                val dependencies = groovy.json.JsonSlurper().parseText(response) as List<*>

                dependencies.forEach { dep ->
                    project.dependencies.add("implementation", dep!!)
                }
            }
        }
    }
}class OptimizedPlugin implements Plugin<Project> {
@Override
void apply(Project project) {
project.tasks.register("fetchDependencies") {
doLast {
// GOOD: Runs only when the task is executed
def response = new URL("https://example.com/dependencies.json").text
def dependencies = new groovy.json.JsonSlurper().parseText(response)
dependencies.each { dep ->
project.dependencies.add("implementation", dep)
}
}
}
}
}Only Apply Plugins where they’re needed
Each applied plugin or script adds to configuration time, with some plugins having a larger impact than others.
Rather than avoiding plugins altogether, ensure they are applied only where necessary.
For example, using allprojects {} or subprojects {} can apply plugins to all subprojects, even if not all need them.
In the example below, the root build script applies script-a.gradle to three subprojects:
subprojects {
    apply from: "$rootDir/script-a.gradle"  // Applied to all subprojects unnecessarily
}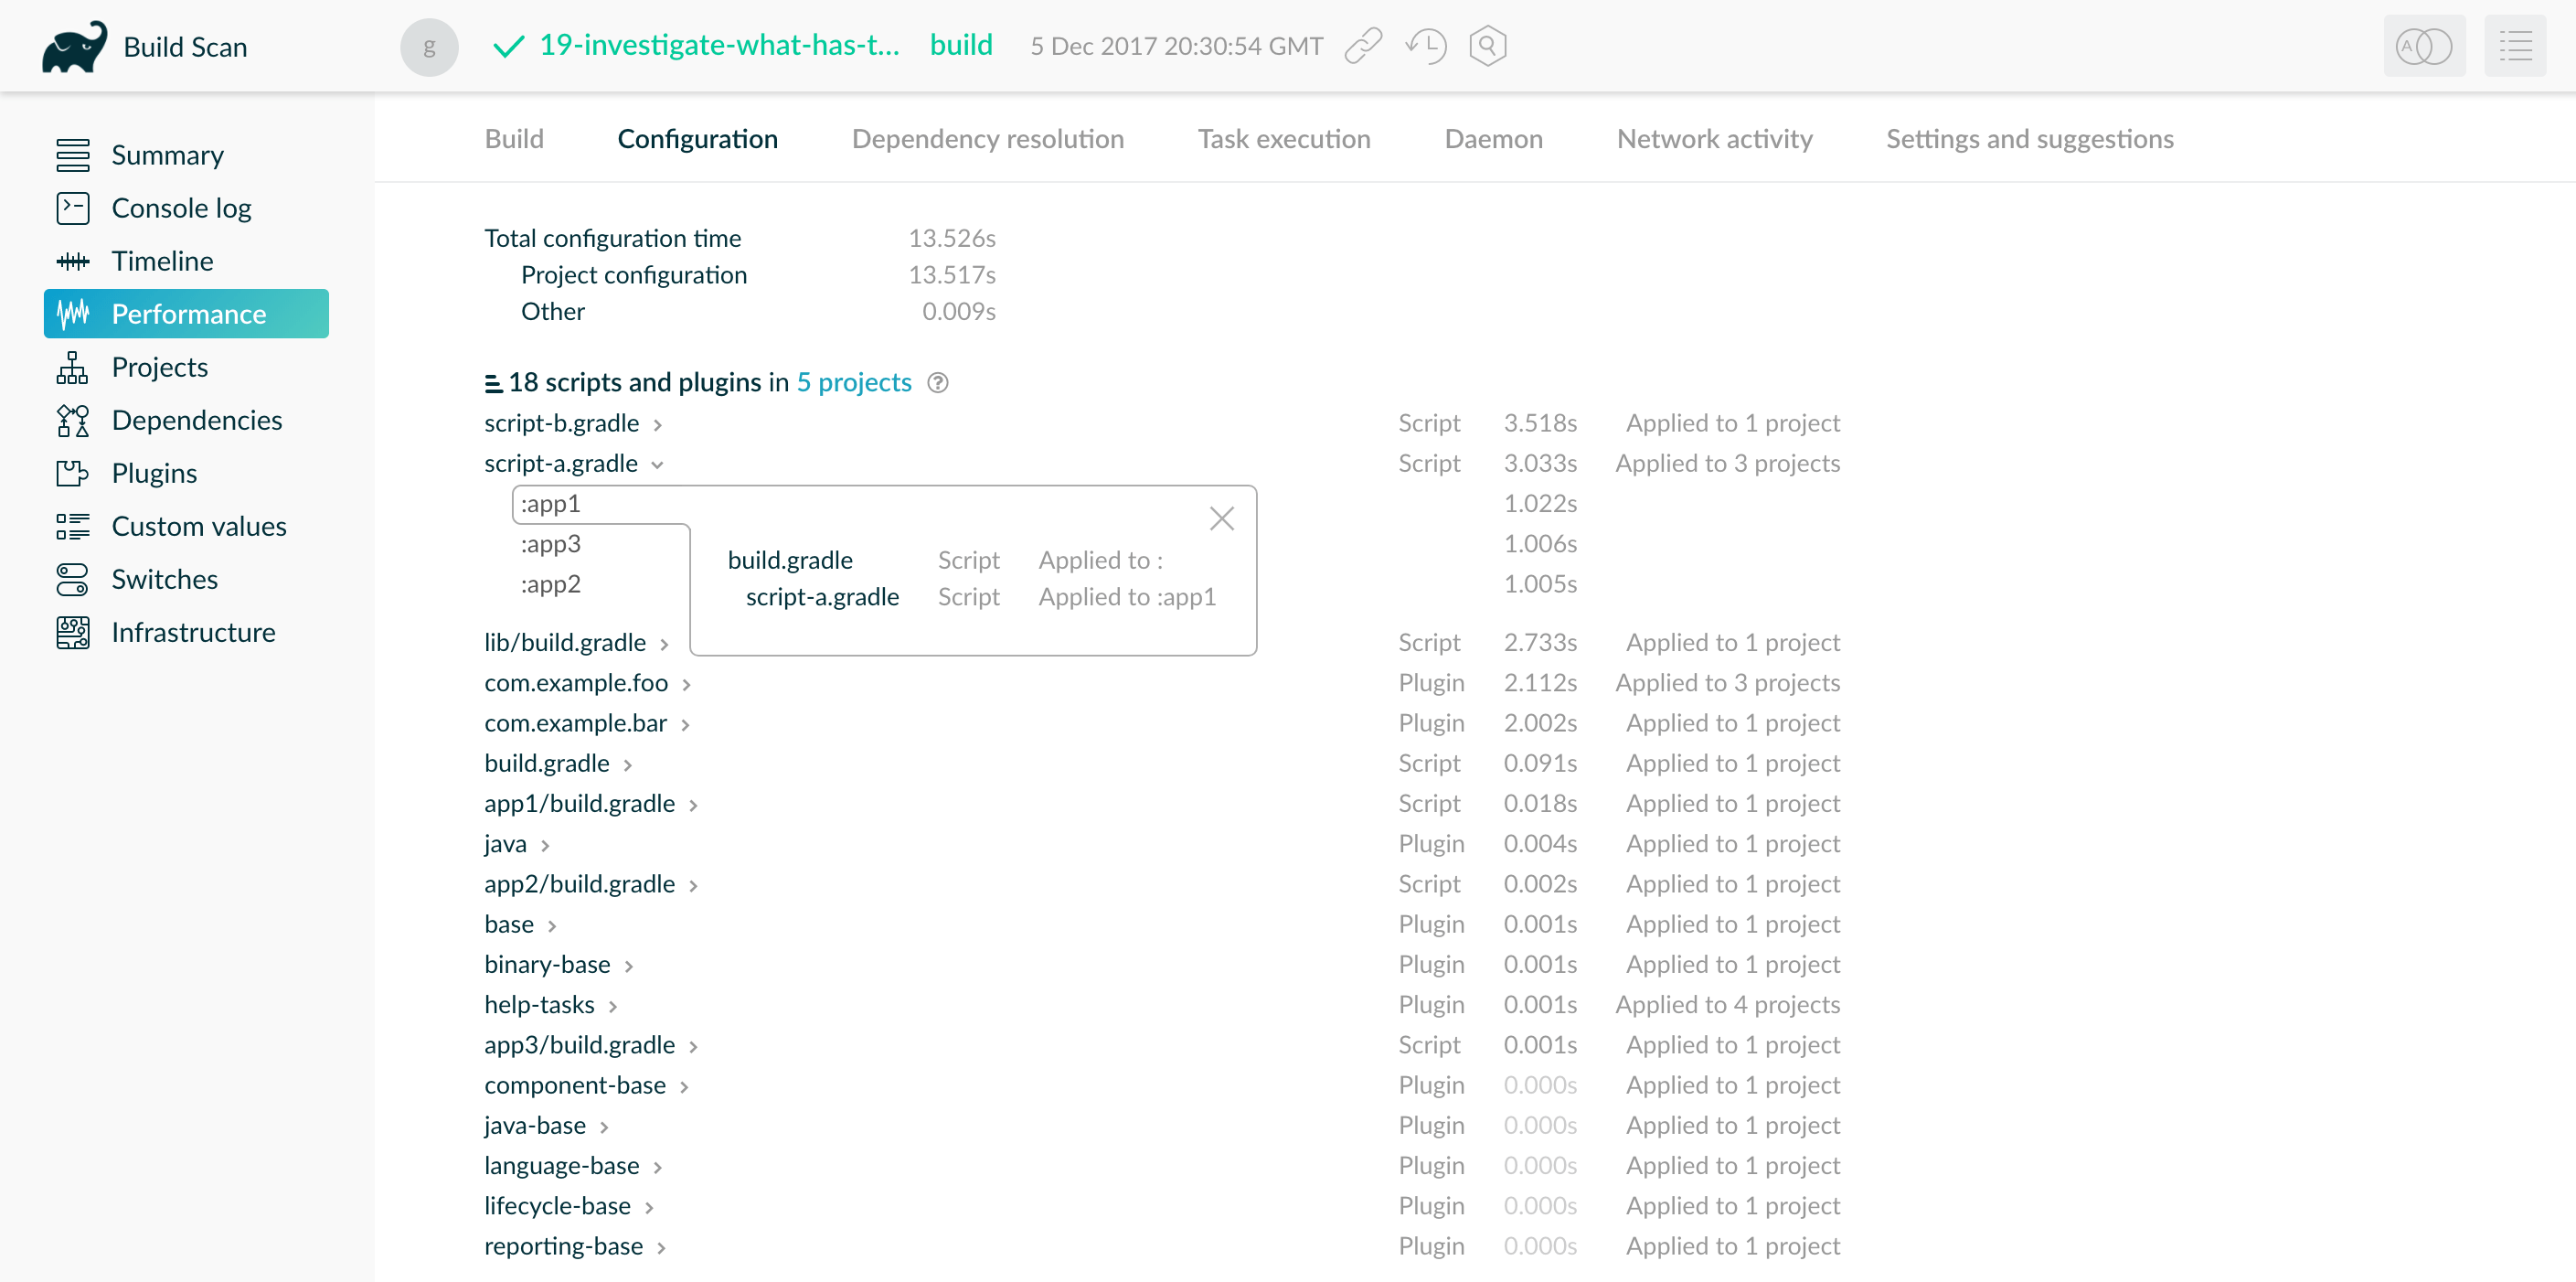
This script takes 1 second to run per subproject, delaying the configuration phase by 3 seconds in total. To optimize this:
-
If only one subproject requires the script, remove it from the others, reducing the configuration delay by 2 seconds.
build.gradle.ktsproject(":subproject1") { apply(from = "$rootDir/script-a.gradle") // Applied only where needed } project(":subproject2") { apply(from = "$rootDir/script-a.gradle") }build.gradleproject(":subproject1") { apply from: "$rootDir/script-a.gradle" // Applied only where needed } project(":subproject2") { apply from: "$rootDir/script-a.gradle" } -
If multiple—but not all—subprojects use the script, refactor it into a custom plugin inside
buildSrcand apply it only to the relevant subprojects. This reduces configuration time and avoids code duplication.build.gradle.ktsproject(":subproject1") { apply(plugin = "com.example.my-custom-plugin") // Apply only where needed } project(":subproject2") { apply(plugin = "com.example.my-custom-plugin") }build.gradleproject(":subproject1") { apply plugin: 'com.example.my-custom-plugin' // Apply only where needed } project(":subproject2") { apply plugin: 'com.example.my-custom-plugin' }
Statically Compile Tasks and Plugins
Many Gradle plugins and tasks are written in Groovy due to its concise syntax, functional APIs, and powerful extensions. However, Groovy’s dynamic interpretation makes method calls slower than in Java or Kotlin.
You can reduce this cost by using static Groovy compilation.
Add the @CompileStatic annotation to Groovy classes where dynamic features are unnecessary.
If a method requires dynamic behavior, use @CompileDynamic on that method.
Alternatively, consider writing plugins and tasks in Java or Kotlin, which are statically compiled by default.
| Gradle’s Groovy DSL relies on Groovy’s dynamic features. To use static compilation in plugins, adopt a more Java-like syntax. |
The example below defines a task that copies files without dynamic features:
project.tasks.register('copyFiles', Copy) { Task t ->
    t.into(project.layout.buildDirectory.dir('output'))
    t.from(project.configurations.getByName('compile'))
}
This example uses register() and getByName(), available on all Gradle domain object containers, such as tasks, configurations, dependencies, and extensions.
Some containers, like TaskContainer, have specialized methods such as create, which accepts a task type.
Using static compilation improves IDE support by enabling:
-
Faster detection of unrecognized types, properties, and methods
-
More reliable auto-completion for method names
10. Optimize dependency resolution
Dependency resolution simplifies integrating third-party libraries into your projects. Gradle contacts remote servers to discover and download dependencies. You can optimize how dependencies are referenced to minimize these remote calls.
Avoid Unnecessary and Unused Dependencies
Managing third-party libraries and their transitive dependencies adds significant maintenance and build time costs. Unused dependencies often remain after refactors.
If you only use a small portion of a library, consider: - Implementing the required functionality yourself. - Copying the necessary code (with attribution) if the library is open source.
Optimize Repository Order
Gradle searches repositories in the order they are declared. To speed up resolution, list the repository hosting most dependencies first, reducing unnecessary network requests.
repositories {
    mavenCentral()  // Declared first, but most dependencies are in example.com/repo
    maven { url "https://example.com/repo" }
}
Minimize Repository Count
Limit the number of repositories to the minimum required.
If using a custom repository, create a virtual repository that aggregates multiple repositories, then add only that repository to your build.
repositories {
    maven { url "https://example.com/virtual-repo" } // Uses an aggregated repository
}
Minimize Dynamic and Snapshot Versions
Dynamic ("2.+“) and snapshot versions (”-SNAPSHOT") cause Gradle to check remote repositories frequently.
By default, Gradle caches dynamic versions for 24 hours, but this can be configured with the cacheDynamicVersionsFor and cacheChangingModulesFor properties:
configurations.all {
    resolutionStrategy {
        cacheDynamicVersionsFor(4, "hours")
        cacheChangingModulesFor(10, "minutes")
    }
}configurations.all {
resolutionStrategy {
cacheDynamicVersionsFor 4, 'hours'
cacheChangingModulesFor 10, 'minutes'
}
}If a build file or initialization script lowers these values, Gradle queries repositories more often. When you don’t need the absolute latest release of a dependency every time you build, consider removing the custom values for these settings.
Note that when cached dynamic versions expire, this will invalidate Configuration Cache entries including these confgurations, as Gradle will need to re-run the configuration phase and re-resolve the dependencies.
When this happens it is indicated with a message in the build output:
Calculating task graph as configuration cache cannot be reused because cached version information for org.test:projectA:1.+ has expired.Find dynamic and changing versions with Build Scan
To locate dynamic dependencies, use a Build Scan:
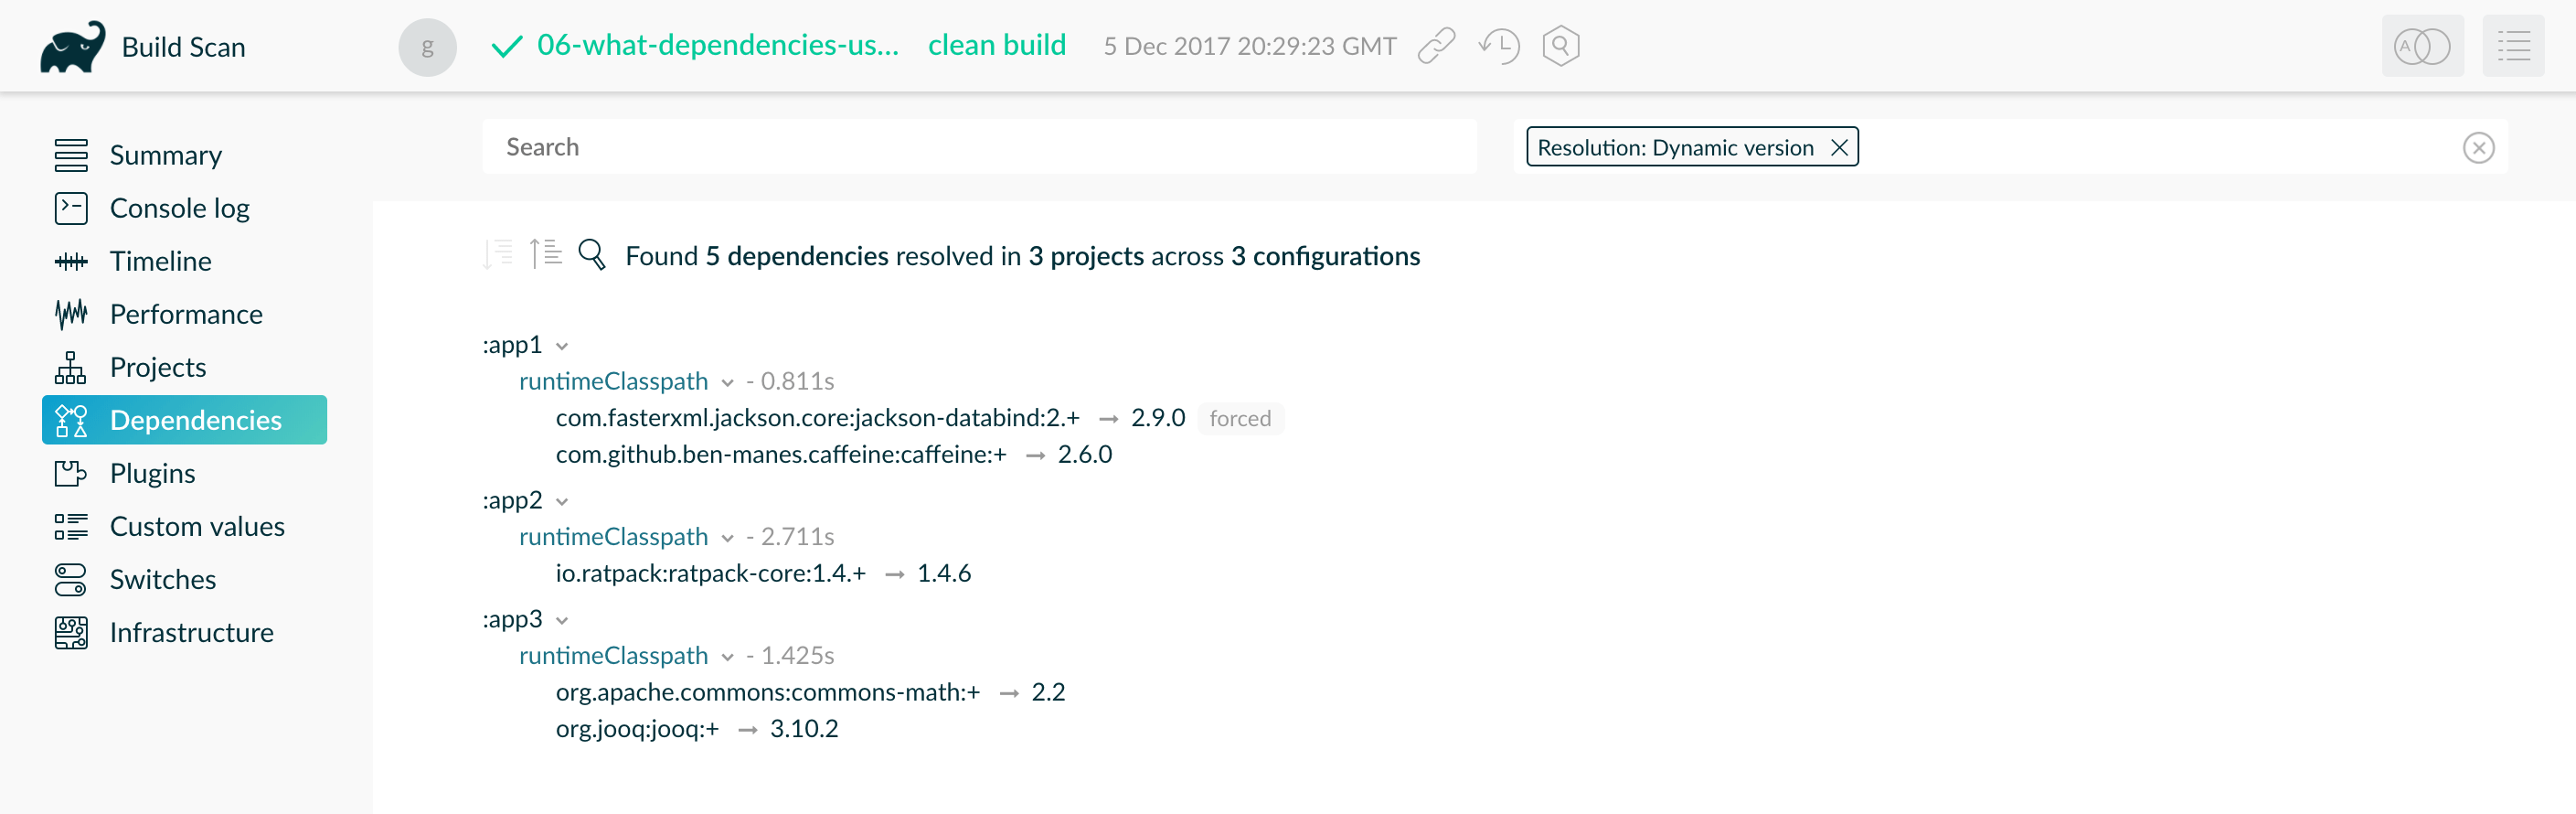
Where possible, replace dynamic versions with fixed versions like "1.2" or "3.0.3.GA" for better caching.
Avoid dependency resolution during configuration
Dependency resolution is an I/O-intensive process. Gradle caches results, but triggering resolution in the configuration phase adds unnecessary overhead to every build.
This code forces dependency resolution during configuration, slowing down every build:
tasks.register("printDeps") {
    doFirst {
        configurations.getByName("compileClasspath").files.forEach { println(it) } // Deferring Dependency Resolution
    }
    doLast {
        configurations.getByName("compileClasspath").files.forEach { println(it) } // Resolving Dependencies During Configuration
    }
}task printDeps {
doFirst {
configurations.compileClasspath.files.each { println it } // Deferring Dependency Resolution
}
doLast {
configurations.compileClasspath.files.each { println it } // Resolving Dependencies During Configuration
}
}Switch to declarative syntax
Evaluating a configuration file during the configuration phase forces Gradle to resolve dependencies too early, increasing build times. Normally, tasks should resolve dependencies only when they need them during execution.
Consider a debugging scenario where you want to print all files in a configuration. A common mistake is to print them directly in the build script:
tasks.register<Copy>("copyFiles") {
    println(">> Compilation deps: ${configurations.compileClasspath.get().files.map { it.name }}")
    into(layout.buildDirectory.dir("output"))
    from(configurations.compileClasspath)
}tasks.register('copyFiles', Copy) {
println ">> Compilation deps: ${configurations.compileClasspath.files.name}"
into(layout.buildDirectory.dir('output'))
from(configurations.compileClasspath)
}The files property triggers dependency resolution immediately, even if printDeps is never executed.
Since the configuration phase runs on every build, this slows down all builds.
By using doFirst(), Gradle defers dependency resolution until the task actually runs, preventing unnecessary work in the configuration phase:
tasks.register<Copy>("copyFiles") {
    into(layout.buildDirectory.dir("output"))
    // Store the configuration into a variable because referencing the project from the task action
    // is not compatible with the configuration cache.
    val compileClasspath: FileCollection = configurations.compileClasspath.get()
    from(compileClasspath)
    doFirst {
        println(">> Compilation deps: ${compileClasspath.files.map { it.name }}")
    }
}tasks.register('copyFiles', Copy) {
into(layout.buildDirectory.dir('output'))
// Store the configuration into a variable because referencing the project from the task action
// is not compatible with the configuration cache.
FileCollection compileClasspath = configurations.compileClasspath
from(compileClasspath)
doFirst {
println ">> Compilation deps: ${compileClasspath.files.name}"
}
}The from() method in Gradle’s Copy task does not trigger immediate dependency resolution because it references the dependency configuration, not the resolved files.
This ensures that dependencies are resolved only when the Copy task executes.
Visualize dependency resolution with Build Scan
The "Dependency resolution" tab on the performance page of a Build Scan shows dependency resolution time during the configuration and execution phases:
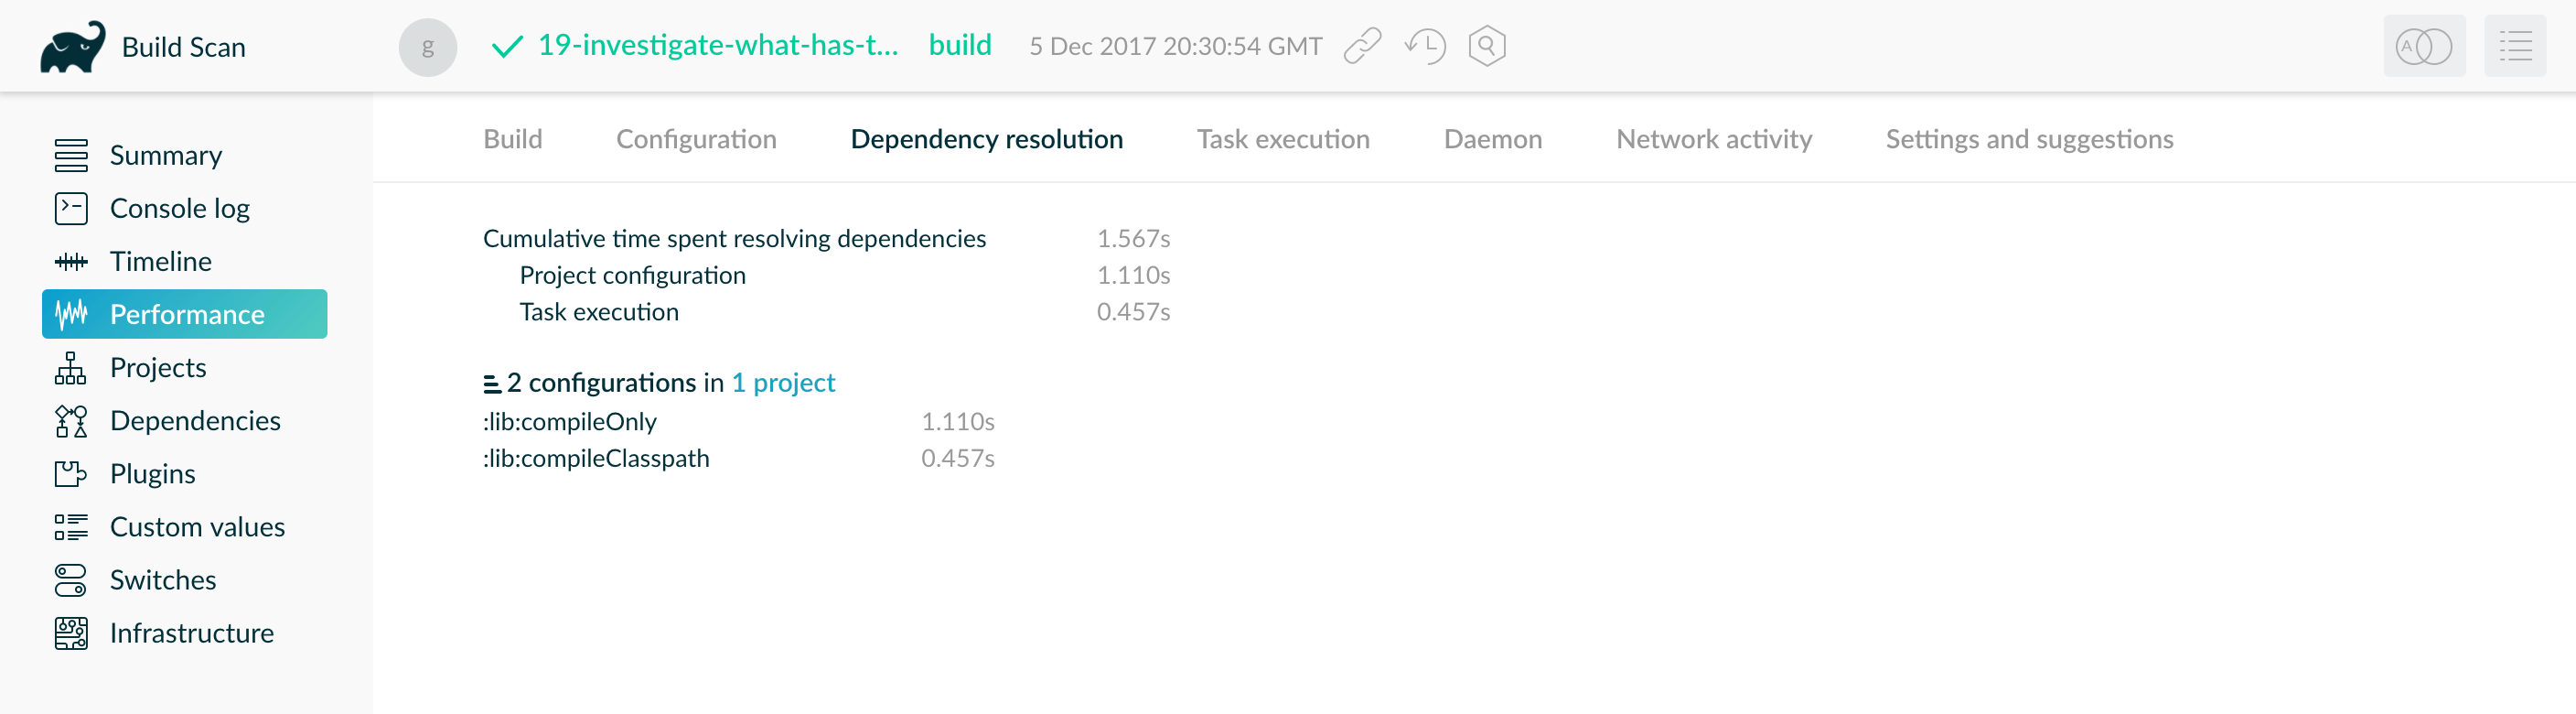
A Build Scan provides another means of identifying this issue. Your build should spend 0 seconds resolving dependencies during "project configuration". This example shows the build resolves dependencies too early in the lifecycle. You can also find a "Settings and suggestions" tab on the "Performance" page. This shows dependencies resolved during the configuration phase.
Remove or improve custom dependency resolution logic
Gradle allows users to model dependency resolution in a flexible way. Simple customizations, such as forcing specific versions or substituting dependencies, have minimal impact on resolution times. However, complex custom logic—such as downloading and parsing POM files manually—can significantly slow down dependency resolution.
Use Build Scan or profile reports to ensure custom dependency resolution logic is not causing performance issues. This logic may exist in your build scripts or as part of a third-party plugin.
This example forces a custom dependency version but also introduces expensive logic that slows down resolution:
configurations.all {
    resolutionStrategy.eachDependency {
        if (requested.group == "com.example" && requested.name == "library") {
            val versionInfo = URL("https://example.com/version-check").readText()  // Remote call during resolution
            useVersion(versionInfo.trim())  // Dynamically setting a version based on an HTTP response
        }
    }
}configurations.all {
resolutionStrategy.eachDependency { details ->
if (details.requested.group == "com.example" && details.requested.name == "library") {
def versionInfo = new URL("https://example.com/version-check").text // Remote call during resolution
details.useVersion(versionInfo.trim()) // Dynamically setting a version based on an HTTP response
}
}
}Instead of fetching dependency versions dynamically, define them in a version catalog:
dependencies {
    implementation "com.example:library:${versions.libraryVersion}"
}
Remove slow or unexpected dependency downloads
Slow dependency downloads can significantly impact build performance. Common causes include:
-
Slow internet connections
-
Overloaded or distant repository servers
-
Unexpected downloads caused by dynamic versions (
2.+) or snapshot versions (-SNAPSHOT)
The Performance tab in a Build Scan includes a Network Activity section with: - Total time spent downloading dependencies - Download transfer rates - A list of dependencies sorted by download time
In the example below, two slow downloads took 20 seconds and 40 seconds, impacting the overall build time:
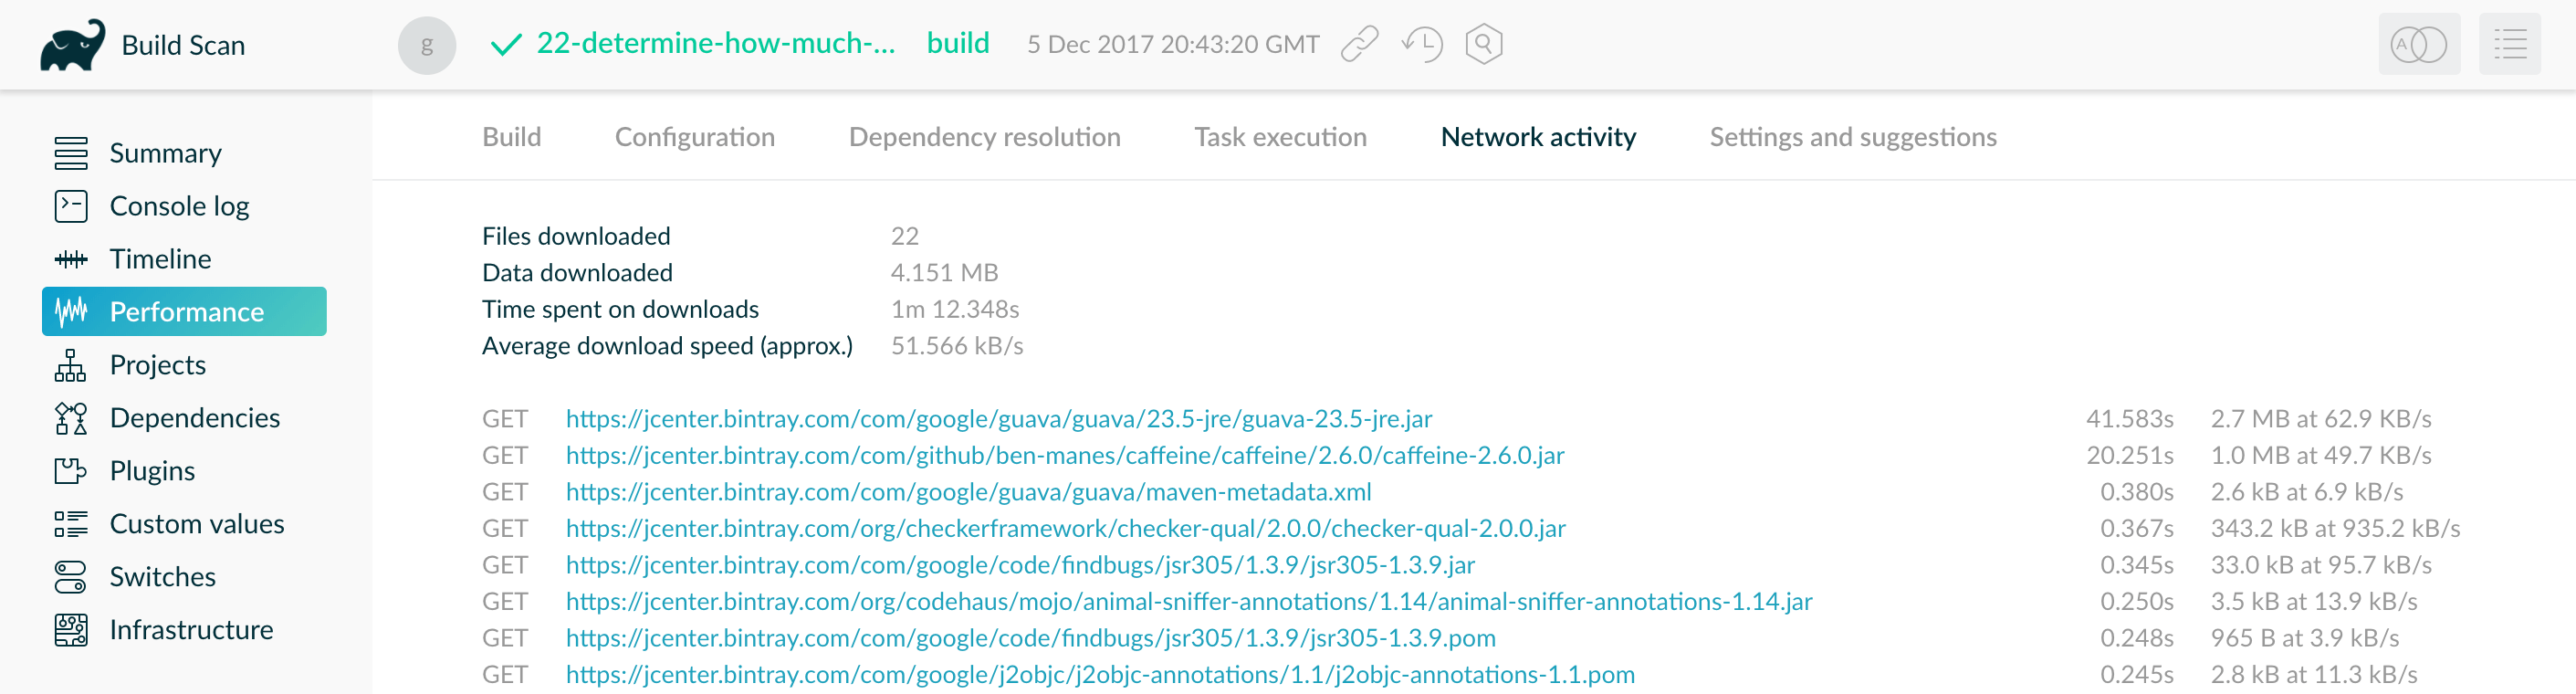
Examine the list of downloaded dependencies for unexpected ones.
For example, a dynamic version (1.+) may be triggering frequent remote lookups.
To eliminate unnecessary downloads:
-
Use a closer or faster repository If downloads are slow from Maven Central, consider a geographically closer mirror or an internal repository proxy.
-
Switch from dynamic versions to fixed versions
dependencies {
    implementation "com.example:library:1.+" // Bad
    implementation "com.example:library:1.2.3" // Good
}
11. Optimize Java projects
The following sections apply to projects that use the java plugin or other JVM languages.
Optimize test execution
Tests often account for a significant portion of build time. These may include both unit and integration tests, with integration tests typically taking longer to run.
A Build Scan can help you identify the slowest tests and prioritize performance improvements accordingly.
The image above shows the interactive test report from a Build Scan, sorted by test duration.
Gradle offers several strategies to speed up test execution:
-
A. Run tests in parallel
-
B. Fork tests into multiple processes
-
C. Disable test reports when not needed
Let’s take a closer look at each option.
A. Run tests in parallel
Gradle can run multiple test classes or methods in parallel.
To enable parallel execution, set the maxParallelForks property on your Test tasks.
A good default is the number of available CPU cores or slightly fewer:
tasks.withType<Test>().configureEach {
    maxParallelForks = (Runtime.getRuntime().availableProcessors() / 2).coerceAtLeast(1)
}tasks.withType(Test).configureEach {
maxParallelForks = Runtime.runtime.availableProcessors().intdiv(2) ?: 1
}Parallel test execution assumes that tests are isolated. Avoid shared resources such as file systems, databases, or external services. Tests that share state or resources may fail intermittently due to race conditions or resource conflicts.
B. Fork tests into multiple processes
By default, Gradle runs all tests in a single forked JVM process. This is efficient for small test suites, but large or memory-intensive test suites can suffer from long execution times and GC pauses.
You can reduce memory pressure and isolate problematic tests by forking a new JVM after a specified number of tests using the forkEvery setting:
tasks.withType<Test>().configureEach {
    forkEvery = 100
}tasks.withType(Test).configureEach {
forkEvery = 100
}
Forking a JVM is an expensive operation. Setting forkEvery too low can increase test time due to excessive process startup overhead.
|
C. Disable test reports
Gradle generates HTML and JUnit XML test reports by default, even if you don’t intend to view them. Report generation adds overhead, particularly in large test suites.
You can disable report generation entirely if:
-
You only need to know whether the tests passed.
-
You use a Build Scan, which provide richer test insights.
To disable reports, set reports.html.required and reports.junitXml.required to false:
tasks.withType<Test>().configureEach {
    reports.html.required = false
    reports.junitXml.required = false
}tasks.withType(Test).configureEach {
reports.html.required = false
reports.junitXml.required = false
}Conditionally enable reports
If you occasionally need reports without modifying the build file, you can make report generation conditional on a project property.
This example disables reports unless the createReports property is present:
tasks.withType<Test>().configureEach {
    if (!project.hasProperty("createReports")) {
        reports.html.required = false
        reports.junitXml.required = false
    }
}tasks.withType(Test).configureEach {
if (!project.hasProperty("createReports")) {
reports.html.required = false
reports.junitXml.required = false
}
}To generate reports, pass the property via the command line:
$ gradle <task> -PcreateReportsOr define the property in the gradle.properties file located in the project root or your Gradle User Home:
createReports=trueOptimize the compiler
The Java compiler is fast, but in large projects with hundreds or thousands of classes, compilation time can still become significant.
Gradle offers several ways to optimize Java compilation:
-
A. Run the compiler in a separate process
-
B. Use
implementationvisibility for internal dependencies
A. Run the compiler as a separate process
By default, Gradle runs compilation in the same process as the build logic.
You can offload Java compilation to a separate process using the fork option:
<task>.options.isFork = true<task>.options.fork = trueTo apply this setting to all JavaCompile tasks, use configureEach:
tasks.withType<JavaCompile>().configureEach {
    options.isFork = true
}tasks.withType(JavaCompile).configureEach {
options.fork = true
}Gradle reuses the forked process for the duration of the build, so the startup cost is low. Running compilation in its own JVM helps reduce garbage collection in the main Gradle process, which can speed up the rest of your build — especially when used alongside parallel execution.
Forking compilation has little effect on small builds but can help significantly when a single task compiles more than a thousand source files.
B. Use implementation for internal dependencies
In Gradle 3.4 and later, you can use api for dependencies that should be exposed to downstream projects and implementation for internal dependencies.
This distinction reduces unnecessary recompilation in large multi-project builds.
Only projects that apply the java-library plugin can use the api and implementation configurations. Projects using only the java plugin cannot declare api dependencies.
|
When an implementation dependency changes, Gradle does not recompile downstream consumers — only when api dependencies change.
This helps reduce cascading recompilations:
dependencies {
   api(project("my-utils"))
   implementation("com.google.guava:guava:21.0")
}
dependencies {
api project('my-utils')
implementation 'com.google.guava:guava:21.0'
}Switching to implementation for internal-only dependencies is one of the most impactful changes you can make to improve build performance in large, modular codebases.
12. Optimize Android Projects
All the performance strategies described in this guide also apply to Android builds, since Android projects use Gradle under the hood.
However, Android introduces its own unique challenges and opportunities for optimization — especially around resource processing, APK creation, and build variants.
For additional tips specific to Android, check out the official resources from the Android team:
13. Improve the performance of older Gradle releases
We recommend using the latest Gradle version to benefit from the latest performance improvements, bug fixes, and features. However, we understand that some projects — especially long-lived or legacy codebases — may not be able to upgrade easily.
If you’re using an older version of Gradle, consider the following optimizations to improve build performance.
Enable the Daemon
The Gradle Daemon significantly improves build performance by avoiding JVM startup costs between builds. The Daemon has been enabled by default since Gradle 3.0.
If you’re using an older version, consider upgrading Gradle. If upgrading isn’t an option, you can enable the Daemon manually.
Enable Incremental Compilation
Gradle can analyze class dependencies and recompile only the parts of your code affected by a change.
Incremental compilation is enabled by default in Gradle 4.10 and later.
To enable it manually in older versions, add the following configuration to your build.gradle file:
tasks.withType<JavaCompile>().configureEach {
    options.isIncremental = true
}
tasks.withType(JavaCompile).configureEach {
options.incremental = true
}Use Compile Avoidance
Many code changes, such as edits to method bodies, are ABI-compatible — they do not affect a class’s public API. Gradle 3.4 and newer can detect these changes and avoid recompiling downstream projects, significantly reducing build times in large multi-project builds.
To benefit from compile avoidance, upgrade to Gradle 3.4 or later.
|
If your project uses annotation processors, you must explicitly declare them to take full advantage of compile avoidance. See the compile avoidance documentation for more details. |