Testing Plugins
Testing plays a crucial role in the development process by ensuring reliable and high-quality software. This principle applies to build code, including Gradle plugins.
The sample project
This section revolves around a sample project called the "URL verifier plugin".
This plugin creates a task named verifyUrl that checks whether a given URL can be resolved via HTTP GET.
The end user can provide the URL via an extension named verification.
The following build script assumes that the plugin JAR file has been published to a binary repository. The script demonstrates how to apply the plugin to the project and configure its exposed extension:
plugins {
    id("org.myorg.url-verifier")        (1)
}

verification {
    url = "https://www.google.com/"  (2)
}plugins {
id 'org.myorg.url-verifier' (1)
}
verification {
url = 'https://www.google.com/' (2)
}| 1 | Applies the plugin to the project |
| 2 | Configures the URL to be verified through the exposed extension |
Executing the verifyUrl task renders a success message if the HTTP GET call to the configured URL returns with a 200 response code:
$ ./gradlew verifyUrl> Task :verifyUrl
Successfully resolved URL 'https://www.google.com/'
BUILD SUCCESSFUL in 0s
5 actionable tasks: 5 executedBefore diving into the code, let’s first revisit the different types of tests and the tooling that supports implementing them.
The importance of testing
Testing is a crucial part of the software development life cycle, ensuring that software functions correctly and meets quality standards before release. Automated testing allows developers to refactor and improve code with confidence.
The testing pyramid
- Manual Testing
-
While manual testing is straightforward, it is error-prone and requires human effort. For Gradle plugins, manual testing involves using the plugin in a build script.
- Automated Testing
-
Automated testing includes unit, integration, and functional testing.
The testing pyramid introduced by Mike Cohen in his book Succeeding with Agile: Software Development Using Scrum describes three types of automated tests:
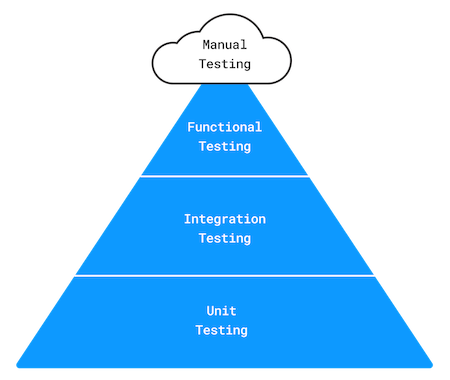
-
Unit Testing: Verifies the smallest units of code, typically methods, in isolation. It uses Stubs or Mocks to isolate code from external dependencies.
-
Integration Testing: Validates that multiple units or components work together, often with external systems like file I/O or HTTP.
-
Functional Testing: Tests the system from the end user’s perspective, ensuring correct functionality. End-to-end tests for Gradle plugins simulate a build, apply the plugin, and execute specific tasks to verify functionality.
Tooling support
Testing Gradle plugins, both manually and automatically, is simplified with the appropriate tools. The table below provides a summary of each testing approach. You can choose any test framework you’re comfortable with.
For detailed explanations and code examples, refer to the specific sections below:
| Test type | Tooling support |
|---|---|
Any JVM-based test framework + |
|
Any JVM-based test framework |
|
Any JVM-based test framework + Gradle TestKit ( |
Setting up manual tests
The composite builds feature of Gradle makes it easy to test a plugin manually. The standalone plugin project and the consuming project can be combined into a single unit, making it straightforward to try out or debug changes without re-publishing the binary file:
.
├── include-plugin-build   (1)
│   ├── build.gradle
│   └── settings.gradle
└── url-verifier-plugin    (2)
    ├── build.gradle
    ├── settings.gradle
└── src| 1 | Consuming project that includes the plugin project |
| 2 | The plugin project |
There are two ways to include a plugin project in a consuming project:
-
By using the command line option
--include-build. -
By using the method
includeBuildinsettings.gradle.
The following code snippet demonstrates the use of the settings file:
pluginManagement {
    includeBuild("../url-verifier-plugin")
}pluginManagement {
includeBuild '../url-verifier-plugin'
}The command line output of the verifyUrl task from the project include-plugin-build looks exactly the same as shown in the introduction, except that it now executes as part of a composite build.
Manual testing has its place in the development process, but it is not a replacement for automated testing.
Setting up automated tests
Setting up a suite of tests early on is crucial to the success of your plugin. Automated tests become an invaluable safety net when upgrading the plugin to a new Gradle version or enhancing/refactoring the code.
Organizing test source code
We recommend implementing a good distribution of unit, integration, and functional tests to cover the most important use cases. Separating the source code for each test type automatically results in a project that is more maintainable and manageable.
By default, the Java project creates a convention for organizing unit tests in the directory src/test/java.
Additionally, if you apply the Groovy plugin, source code under the directory src/test/groovy is considered for compilation (with the same standard for Kotlin under the directory src/test/kotlin).
Consequently, source code directories for other test types should follow a similar pattern:
.
└── src
    ├── functionalTest
    │   └── groovy      (1)
    ├── integrationTest
    │   └── groovy      (2)
    ├── main
    │   ├── java        (3)
    └── test
└── groovy (4)| 1 | Source directory containing functional tests |
| 2 | Source directory containing integration tests |
| 3 | Source directory containing production source code |
| 4 | Source directory containing unit tests |
The directories src/integrationTest/groovy and src/functionalTest/groovy are not based on an existing standard convention for Gradle projects.
You are free to choose any project layout that works best for you.
|
You can configure the source directories for compilation and test execution.
The Test Suite plugin provides a DSL and API to model multiple groups of automated tests into test suites in JVM-based projects. You can also rely on third-party plugins for convenience, such as the Nebula Facet plugin or the TestSets plugin.
Modeling test types
In Gradle, source code directories are represented using the concept of source sets. A source set is configured to point to one or more directories containing source code. When you define a source set, Gradle automatically sets up compilation tasks for the specified directories.
A pre-configured source set can be created with one line of build script code. The source set automatically registers configurations to define dependencies for the sources of the source set:
// Define a source set named 'test' for test sources
sourceSets {
    test {
        java {
            setSrcDirs(listOf("src/test/java"))
        }
    }
}
// Specify a test implementation dependency on JUnit
dependencies {
    testImplementation("junit:junit:4.12")
}// Define a source set named 'test' for test sources
sourceSets {
test {
java {
srcDirs = ['src/test/java']
}
}
}
// Specify a test implementation dependency on JUnit
dependencies {
testImplementation 'junit:junit:4.12'
}We use that to define an integrationTestImplementation dependency to the project itself, which represents the "main" variant of our project (i.e., the compiled plugin code):
val integrationTest = sourceSets.create("integrationTest")

dependencies {
    "integrationTestImplementation"(project())
}def integrationTest = sourceSets.create("integrationTest")
dependencies {
integrationTestImplementation(project())
}Source sets are responsible for compiling source code, but they do not deal with executing the bytecode. For test execution, a corresponding task of type Test needs to be established. The following setup shows the execution of integration tests, referencing the classes and runtime classpath of the integration test source set:
val integrationTestTask = tasks.register<Test>("integrationTest") {
    description = "Runs the integration tests."
    group = "verification"
    testClassesDirs = integrationTest.output.classesDirs
    classpath = integrationTest.runtimeClasspath
    mustRunAfter(tasks.test)
}
tasks.check {
    dependsOn(integrationTestTask)
}def integrationTestTask = tasks.register("integrationTest", Test) {
description = 'Runs the integration tests.'
group = "verification"
testClassesDirs = integrationTest.output.classesDirs
classpath = integrationTest.runtimeClasspath
mustRunAfter(tasks.named('test'))
}
tasks.named('check') {
dependsOn(integrationTestTask)
}Configuring a test framework
Gradle does not dictate the use of a specific test framework. Popular choices include JUnit, TestNG and Spock. Once you choose an option, you have to add its dependency to the compile classpath for your tests.
The following code snippet shows how to use Spock for implementing tests:
repositories {
    mavenCentral()
}

dependencies {
    testImplementation(platform("org.spockframework:spock-bom:2.4-groovy-4.0"))
    testImplementation("org.spockframework:spock-core")
    testRuntimeOnly("org.junit.platform:junit-platform-launcher")

    "integrationTestImplementation"(platform("org.spockframework:spock-bom:2.4-groovy-4.0"))
    "integrationTestImplementation"("org.spockframework:spock-core")
    "integrationTestRuntimeOnly"("org.junit.platform:junit-platform-launcher")

    "functionalTestImplementation"(platform("org.spockframework:spock-bom:2.4-groovy-4.0"))
    "functionalTestImplementation"("org.spockframework:spock-core")
    "functionalTestRuntimeOnly"("org.junit.platform:junit-platform-launcher")
}

tasks.withType<Test>().configureEach {
    // Using JUnitPlatform for running tests
    useJUnitPlatform()
}repositories {
mavenCentral()
}
dependencies {
testImplementation platform("org.spockframework:spock-bom:2.4-groovy-4.0")
testImplementation 'org.spockframework:spock-core'
testRuntimeOnly 'org.junit.platform:junit-platform-launcher'
integrationTestImplementation platform("org.spockframework:spock-bom:2.4-groovy-4.0")
integrationTestImplementation 'org.spockframework:spock-core'
integrationTestRuntimeOnly 'org.junit.platform:junit-platform-launcher'
functionalTestImplementation platform("org.spockframework:spock-bom:2.4-groovy-4.0")
functionalTestImplementation 'org.spockframework:spock-core'
functionalTestRuntimeOnly 'org.junit.platform:junit-platform-launcher'
}
tasks.withType(Test).configureEach {
// Using JUnitPlatform for running tests
useJUnitPlatform()
}| Spock is a Groovy-based BDD test framework that even includes APIs for creating Stubs and Mocks. The Gradle team prefers Spock over other options for its expressiveness and conciseness. |
Implementing automated tests
This section discusses representative implementation examples for unit, integration, and functional tests.
Implementing unit tests
The URL verifier plugin emits HTTP GET calls to check if a URL can be resolved successfully.
The method DefaultHttpCaller.get(String) is responsible for calling a given URL and returns an instance of type HttpResponse. HttpResponse is a POJO containing information about the HTTP response code and message:
package org.myorg.http;

public class HttpResponse {
    private int code;
    private String message;

    public HttpResponse(int code, String message) {
        this.code = code;
        this.message = message;
    }

    public int getCode() {
        return code;
    }

    public String getMessage() {
        return message;
    }

    @Override
    public String toString() {
        return "HTTP " + code + ", Reason: " + message;
    }
}
The class HttpResponse represents a good candidate for a unit test.
It does not reach out to any other classes nor does it use the Gradle API.
package org.myorg.http

import spock.lang.Specification

class HttpResponseTest extends Specification {

    private static final int OK_HTTP_CODE = 200
    private static final String OK_HTTP_MESSAGE = 'OK'

    def "can access information"() {
        when:
        def httpResponse = new HttpResponse(OK_HTTP_CODE, OK_HTTP_MESSAGE)

        then:
        httpResponse.code == OK_HTTP_CODE
        httpResponse.message == OK_HTTP_MESSAGE
    }

    def "can get String representation"() {
        when:
        def httpResponse = new HttpResponse(OK_HTTP_CODE, OK_HTTP_MESSAGE)

        then:
        httpResponse.toString() == "HTTP $OK_HTTP_CODE, Reason: $OK_HTTP_MESSAGE"
    }
}| When writing unit tests, it’s important to test boundary conditions and various forms of invalid input. Try to extract as much logic as possible from classes that use the Gradle API to make it testable as unit tests. It will result in maintainable code and faster test execution. |
Unit tests for Gradle plugins typically use the ProjectBuilder API.
This allows you to create an in-memory Project instance, apply your plugin, and verify that it registers extensions or tasks correctly.
ProjectBuilder does not execute tasks — it is only suitable for verifying configuration logic.
Here is a simple example:
public class GreetingPluginTest {
    @Test
    public void greeterPluginAddsGreetingTaskToProject() {
        Project project = ProjectBuilder.builder().build();
        project.getPluginManager().apply("org.example.greeting");

        assertTrue(project.getTasks().getByName("hello") instanceof GreetingTask);
    }
}
Implementing integration tests
Let’s look at a class that reaches out to another system, the piece of code that emits the HTTP calls.
At the time of executing a test for the class DefaultHttpCaller, the runtime environment needs to be able to reach out to the internet:
package org.myorg.http;

import java.io.IOException;
import java.net.HttpURLConnection;
import java.net.URI;
import java.net.URISyntaxException;

public class DefaultHttpCaller implements HttpCaller {
    @Override
    public HttpResponse get(String url) {
        try {
            HttpURLConnection connection = (HttpURLConnection) new URI(url).toURL().openConnection();
            connection.setConnectTimeout(5000);
            connection.setRequestMethod("GET");
            connection.connect();

            int code = connection.getResponseCode();
            String message = connection.getResponseMessage();
            return new HttpResponse(code, message);
        } catch (IOException e) {
            throw new HttpCallException(String.format("Failed to call URL '%s' via HTTP GET", url), e);
        } catch (URISyntaxException e) {
            throw new RuntimeException(e);
        }
    }
}
Implementing an integration test for DefaultHttpCaller doesn’t look much different from the unit test shown in the previous section:
package org.myorg.http

import spock.lang.Specification
import spock.lang.Subject

class DefaultHttpCallerIntegrationTest extends Specification {
    @Subject HttpCaller httpCaller = new DefaultHttpCaller()

    def "can make successful HTTP GET call"() {
        when:
        def httpResponse = httpCaller.get('https://www.google.com/')

        then:
        httpResponse.code == 200
        httpResponse.message == 'OK'
    }

    def "throws exception when calling unknown host via HTTP GET"() {
        when:
        httpCaller.get('https://www.example.invalid/')

        then:
        def t = thrown(HttpCallException)
        t.message == "Failed to call URL 'https://www.example.invalid/' via HTTP GET"
        t.cause instanceof UnknownHostException
    }
}
Implementing functional tests
Functional tests verify the correctness of the plugin end-to-end.
In practice, this means applying, configuring, and executing the functionality of the plugin implementation.
The UrlVerifierPlugin class exposes an extension and a task instance that uses the URL value configured by the end user:
package org.myorg;

import org.gradle.api.Plugin;
import org.gradle.api.Project;
import org.myorg.tasks.UrlVerify;

public class UrlVerifierPlugin implements Plugin<Project> {
    @Override
    public void apply(Project project) {
        UrlVerifierExtension extension = project.getExtensions().create("verification", UrlVerifierExtension.class);
        UrlVerify verifyUrlTask = project.getTasks().create("verifyUrl", UrlVerify.class);
        verifyUrlTask.getUrl().set(extension.getUrl());
    }
}
Every Gradle plugin project should apply the plugin development plugin to reduce boilerplate code. By applying the plugin development plugin, the test source set is preconfigured for the use with TestKit. If we want to use a custom source set for functional tests and leave the default test source set for only unit tests, we can configure the plugin development plugin to look for TestKit tests elsewhere.
gradlePlugin {
    testSourceSets(functionalTest)
}gradlePlugin {
testSourceSets(sourceSets.functionalTest)
}Functional tests for Gradle plugins use an instance of GradleRunner to execute the build under test.
GradleRunner is an API provided by TestKit, which internally uses the Tooling API to execute the build.
Unlike ProjectBuilder, which is limited to configuration, GradleRunner runs actual builds.
This makes it possible to assert that tasks succeed, fail, or produce expected output.
The following example applies the plugin to the build script under test, configures the extension and executes the build with the task verifyUrl.
Please see the TestKit documentation to get more familiar with the functionality of TestKit.
package org.myorg

import org.gradle.testkit.runner.GradleRunner
import spock.lang.Specification
import spock.lang.TempDir

import static org.gradle.testkit.runner.TaskOutcome.SUCCESS

class UrlVerifierPluginFunctionalTest extends Specification {
    @TempDir File testProjectDir
    File buildFile

    def setup() {
        buildFile = new File(testProjectDir, 'build.gradle')
        buildFile << """
            plugins {
                id 'org.myorg.url-verifier'
            }
        """
    }

    def "can successfully configure URL through extension and verify it"() {
        buildFile << """
            verification {
                url = 'https://www.google.com/'
            }
        """

        when:
        def result = GradleRunner.create()
            .withProjectDir(testProjectDir)
            .withArguments('verifyUrl')
            .withPluginClasspath()
            .build()

        then:
        result.output.contains("Successfully resolved URL 'https://www.google.com/'")
        result.task(":verifyUrl").outcome == SUCCESS
    }
}
IDE integration
TestKit determines the plugin classpath by running a specific Gradle task.
You will need to execute the assemble task to initially generate the plugin classpath or to reflect changes to it even when running TestKit-based functional tests from the IDE.
Example of a unit test
The following is an example of a unit test of the Greeting plugin from Binary Plugins:
package org.example

import org.gradle.api.Project
import org.gradle.testfixtures.ProjectBuilder
import org.junit.jupiter.api.Test
import kotlin.test.assertEquals
import kotlin.test.assertNotNull

class GreetingPluginTest {

    @Test
    fun `plugin registers greet task`() {
        // Create an in-memory project and apply the plugin
        val project: Project = ProjectBuilder.builder().build()
        project.plugins.apply("org.example.greeting")

        // Verify the task is registered
        assertNotNull(project.tasks.findByName("greet"))
    }

    @Test
    fun `extension has sensible defaults`() {
        val project: Project = ProjectBuilder.builder().build()
        project.plugins.apply("org.example.greeting")

        val ext = project.extensions.getByType(GreetingExtension::class.java)

        // Defaults from the plugin:
        assertEquals("Hello from plugin", ext.message.get())
        // Default output file is build/greeting.txt
        val defaultFile = ext.outputFile.get().asFile
        assertEquals(project.layout.buildDirectory.file("greeting.txt").get().asFile, defaultFile)
    }
}package org.example
import org.gradle.api.Project
import org.gradle.testfixtures.ProjectBuilder
import org.junit.jupiter.api.Test
import static org.junit.jupiter.api.Assertions.assertEquals
import static org.junit.jupiter.api.Assertions.assertNotNull
class GreetingPluginTest {
@Test
void 'plugin registers greet task'() {
// Create an in-memory project and apply the plugin
Project project = ProjectBuilder.builder().build()
project.plugins.apply("org.example.greeting")
// Verify the task is registered
assertNotNull(project.tasks.findByName("greet"))
}
@Test
void 'extension has sensible defaults'() {
Project project = ProjectBuilder.builder().build()
project.plugins.apply("org.example.greeting")
def ext = project.extensions.getByType(GreetingExtension)
// Defaults from the plugin:
assertEquals("Hello from plugin", ext.message.get())
// Default output file is build/greeting.txt
def defaultFile = ext.outputFile.get().asFile
assertEquals(project.layout.buildDirectory.file("greeting.txt").get().asFile, defaultFile)
}
}Example of a functional test
The following is an example of a functional test of the Greeting plugin from Binary Plugins:
package org.example

import java.io.File
import kotlin.test.assertTrue
import org.gradle.testkit.runner.GradleRunner
import org.gradle.testkit.runner.TaskOutcome
import org.junit.jupiter.api.Test
import org.junit.jupiter.api.io.TempDir

class GreetingPluginFunctionalTest {

    @field:TempDir
    lateinit var projectDir: File

    private val settingsFile by lazy { projectDir.resolve("settings.gradle.kts") }
    private val buildFile by lazy { projectDir.resolve("build.gradle.kts") }

    @Test
    fun `can run greeting task`() {
        // Arrange: write a tiny build that applies the plugin
        settingsFile.writeText("") // single-project build
        buildFile.writeText(
            """
            plugins {
                id("org.example.greeting")
            }
            """.trimIndent()
        )

        // Act: execute the task in an isolated Gradle build
        val result = GradleRunner.create()
            .withProjectDir(projectDir)
            .withPluginClasspath()      // picks up your plugin-under-test from the test classpath
            .withArguments("greet")
            .forwardOutput()
            .build()

        // Assert: verify console output and successful task outcome
        assertTrue(result.task(":greet")?.outcome == TaskOutcome.SUCCESS)
    }
}package org.example
import java.io.File
import static org.junit.jupiter.api.Assertions.assertTrue
import org.gradle.testkit.runner.GradleRunner
import org.gradle.testkit.runner.TaskOutcome
import org.junit.jupiter.api.Test
import org.junit.jupiter.api.io.TempDir
class GreetingPluginFunctionalTest {
@TempDir
File projectDir
private File getSettingsFile() {
return new File(projectDir, "settings.gradle")
}
private File getBuildFile() {
return new File(projectDir, "build.gradle")
}
@Test
void 'can run greeting task'() {
// Arrange: write a tiny build that applies the plugin
settingsFile.write("") // single-project build
buildFile.write("""
plugins {
id 'org.example.greeting'
}
""".stripIndent())
// Act: execute the task in an isolated Gradle build
def result = GradleRunner.create()
.withProjectDir(projectDir)
.withPluginClasspath() // picks up your plugin-under-test from the test classpath
.withArguments("greet")
.forwardOutput()
.build()
// Assert: verify console output and successful task outcome
assertTrue(result.task(":greet")?.outcome == TaskOutcome.SUCCESS)
}
}