Migrating Builds From Apache Ant
Apache Ant is a build tool with a long history in the Java world that is still widely used, albeit by a decreasing number of teams. While flexible, it lacks conventions and many of the powerful features that Gradle provides. Migrating to Gradle is worthwhile so that your builds can become slimmer, simpler, and faster, while still retaining the flexibility you enjoy with Ant. You will also benefit from robust support for multi-project builds and easy-to-use, flexible dependency management.
The biggest challenge in migrating from Ant to Gradle is that there is no such thing as a standard Ant build. That makes it difficult to provide specific instructions. Fortunately, Gradle has some great integration features with Ant that can make the process relatively smooth. Migrating from Ivy-based dependency management isn’t difficult because Gradle has a similar model based on dependency configurations that works with Ivy-compatible repositories.
We will start by outlining the things you should consider when migrating a build from Ant to Gradle and offer some general guidelines on how to proceed.
General guidelines
When you migrate a build from Ant to Gradle, you should keep in mind the nature of what you already have and where you would like to end up. Do you want a Gradle build that mirrors the structure of the existing Ant build? Or do you want to move to something that is more idiomatic to Gradle? What are the main benefits you are looking for?
To better understand, consider the following opposing scenarios:
-
An imported build via
ant.importBuild()This approach is quick, simple, and works for many Ant-based builds. You end up with a build that is effectively identical to the original Ant build, except your Ant targets become Gradle tasks. Even the dependencies between targets are retained.
The downside is that you’re still using the Ant build, which you must continue to maintain. You also lose the advantages of Gradle’s conventions, many of its plugins, its dependency management, and so on. You can still enhance the build with incremental build information, but it’s more effort than would be the case for a normal Gradle build.
-
An idiomatic Gradle build
If you want to future proof your build, this is where you want to end up. Making use of Gradle’s conventions and plugins will result in a smaller, easier-to-maintain build, with a structure that is familiar to many Java developers. You will also find it easier to take advantage of Gradle’s power features to improve build performance.
The main downside is the extra work required to perform the migration, particularly if the existing build is complex and has many inter-project dependencies. However, these builds often benefit the most from a switch to idiomatic Gradle. In addition, Gradle provides many features that can ease the migration, such as the ability to use core and custom Ant tasks directly from a Gradle build.
You ideally want to end up somewhere close to the second option in the long term, but you don’t have to get there in one fell swoop.
What follows is a series of steps to help you decide the approach you want to take and how to go about it:
-
Keep the old Ant build and new Gradle build side by side.
You know the Ant build works, so you should keep it until you are confident that the Gradle build produces all the same artifacts and otherwise does what you need. This also means that users can try the Gradle build without creating a new copy of the source tree.
Don’t try to change the directory and file structure of the build until after you’re ready to make the switch.
-
Develop a mechanism to verify that the two builds produce the same artifacts.
This is a vitally important step to ensure that your deployments and tests don’t break. Even small changes, such as the contents of a manifest file in a JAR, can cause problems. If your Gradle build produces the same output as the Ant build, this will give you and others confidence in switching over and make it easier to implement the big changes that will provide the greatest benefits.
-
Decide whether you have a multi-project build or not.
Multi-project builds are generally harder to migrate and require more work than single-project ones. We have provided some dedicated advice to help with the process in the Migrating multi-project builds section.
-
Work out what plugins to use for each project.
We expect that the vast majority of Ant builds are for JVM-based projects, for which there are a wealth of plugins that provide a lot of the functionality you need. Gradle plugins include core plugins that come packaged with Gradle and useful community plugins on the Plugin Portal.
Even if the Java Plugin or one of its derivatives (such as the Java Library Plugin) aren’t a good match for your build, you should at least consider the Base Plugin for its lifecycle tasks.
-
Import the Ant build or create a Gradle build from scratch.
This step very much depends on the requirements of your build. If a selection of Gradle plugins can do the vast majority of the work your Ant build does, then it probably makes sense to create a fresh Gradle build script that doesn’t depend on the Ant build. You can either implement the missing pieces yourself or use existing Ant tasks.
The alternative approach is to import the Ant build into the Gradle build script and gradually replace the Ant build functionality. This allows you to have a working Gradle build at each stage, but it requires a bit of work to get the Gradle tasks working properly with the Ant ones. You can learn more about this in Working with an imported build.
-
Configure your build for the existing directory and file structure
Gradle makes use of conventions to eliminate much of the boilerplate associated with older builds and to make it easier for users to work with new builds once they are familiar with those conventions. But that doesn’t mean you have to follow them.
Gradle provides many configuration options that allow for a good degree of customization. Those options are typically made available through the plugins that provide the conventions. For example, the standard source directory structure for production Java code —
src/main/java— is provided by the Java Plugin, which allows you to configure a different source path. Many paths can be modified via properties on the Project object. -
Migrate to standard Gradle conventions if you wish
Once you’re confident that the Gradle build is producing the same artifacts and other resources as the Ant build, you can consider migrating to the standard conventions, such as for source directory paths. Doing so will allow you to remove the extra configuration that was required to override those conventions. New team members will also find it easier to work with the build after the change.
It’s up to you to decide whether this step is worth the effort and potential disruption, which in turn depends on your specific build and team.
The rest of the chapter covers some common scenarios you will likely deal with during the migration, such as dependency management and working with Ant tasks.
Working with an imported build
| Importing an Ant build is not supported with the configuration cache. You need to complete the conversion to Gradle to get the benefits of caching. |
The first step of many migrations will involve importing an Ant build using ant.importBuild().
Then how do you then move towards a standard Gradle build without replacing everything at once?
The important thing to remember is that the Ant targets become real Gradle tasks, meaning you can do things like modify their task dependencies, attach extra task actions, and so on. This allows you to substitute native Gradle tasks for the equivalent Ant ones, maintaining any links to other existing tasks.
As an example, imagine that you have a Java library project that you want to migrate from Ant to Gradle.
The Gradle build script has the line that imports the Ant build and now want to use the standard Gradle mechanism for compiling the Java source files.
However, you want to keep using the existing package task that creates the library’s JAR file.
In diagram form, the scenario looks like the following, where each box represents a target/task:
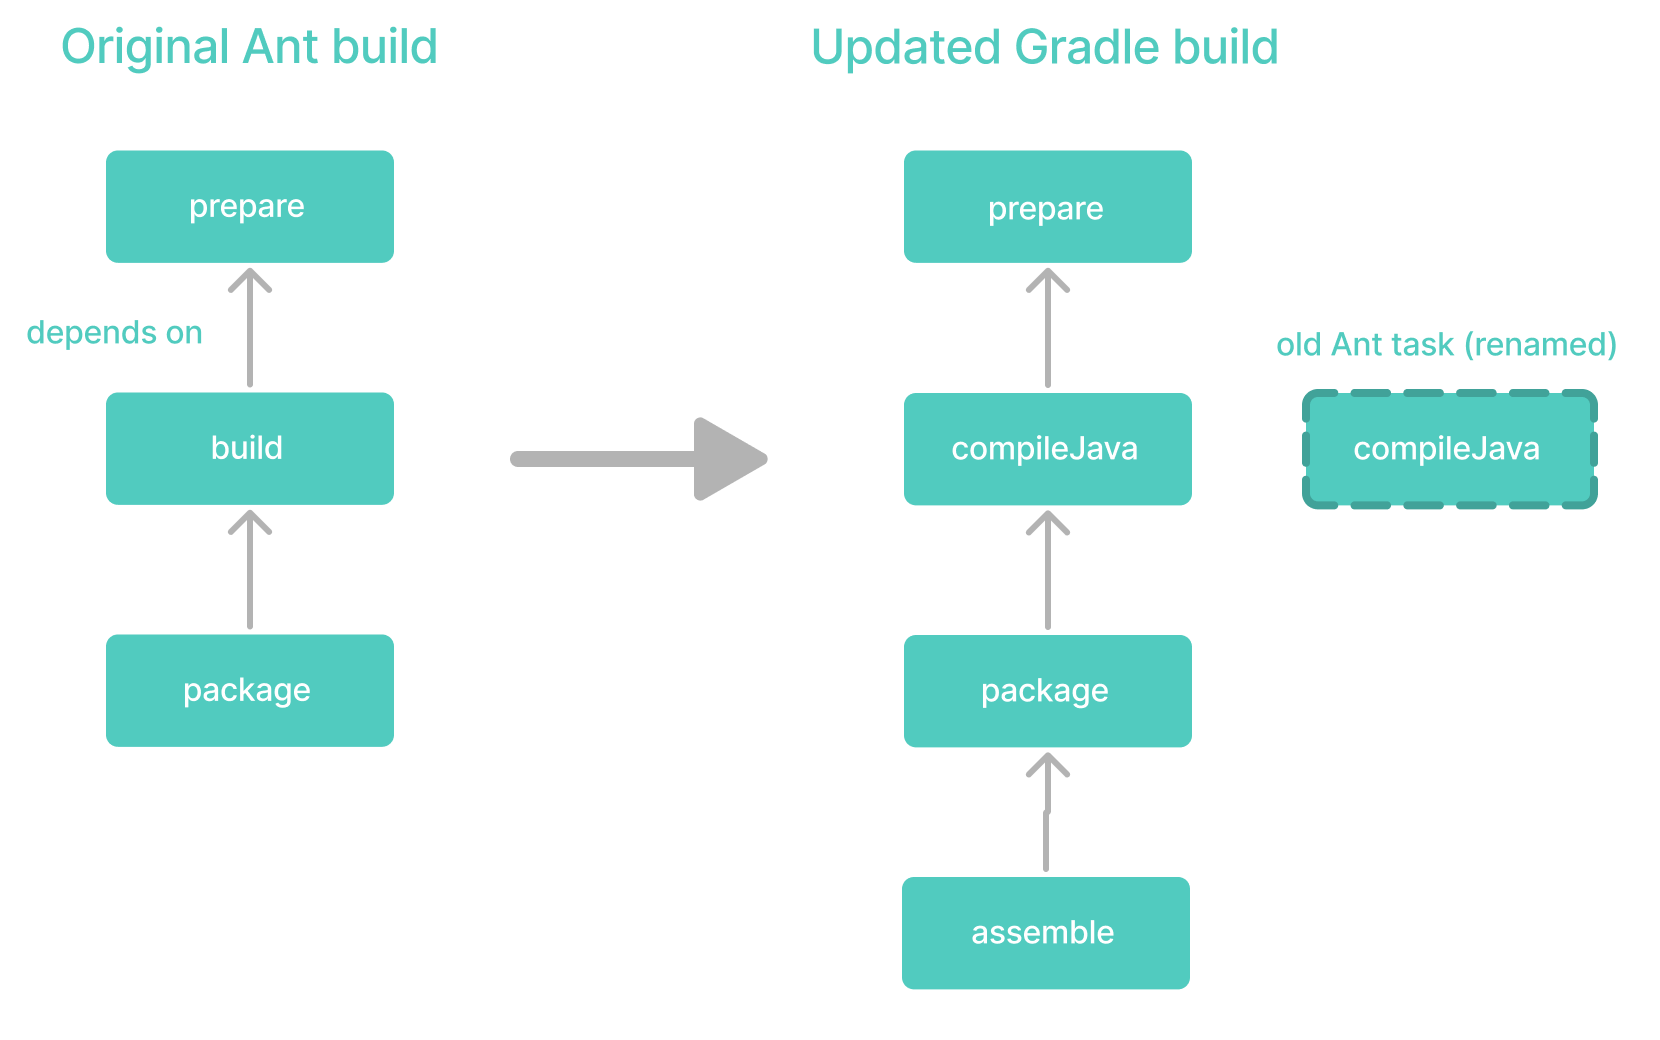
The idea is to substitute the standard Gradle compileJava task for the Ant build task.
There are several steps involved in this substitution:
-
Applying the Java Library Plugin.
This provides the
compileJavatask shown in the diagram. -
Renaming the old
buildtask.The name
buildconflicts with the standardbuildtask provided by the Base Plugin (via the Java Library Plugin). -
Configuring the compilation to use the existing directory structure.
There’s a good chance the Ant build does not conform to the standard Gradle directory structure, so you need to tell Gradle where to find the source files and where to place the compiled classes so
packagecan find them. -
Updating task dependencies.
compileJavamust depend onprepare,packagemust depend oncompileJavarather thanant_build, andassemblemust depend onpackagerather than the standard Gradlejartask.
Applying the plugin is as simple as inserting a plugins {} block at the beginning of the Gradle build script, i.e. before ant.importBuild().
Here’s how to apply the Java Library Plugin:
plugins {
    `java-library`
}plugins {
id 'java-library'
}To rename the build task, use the variant of AntBuilder.importBuild() that accepts a transformer, like this:
ant.importBuild("build.xml") { oldTargetName ->
    if (oldTargetName == "build") "ant_build" else oldTargetName  (1)
}ant.importBuild('build.xml') { String oldTargetName ->
return oldTargetName == 'build' ? 'ant_build' : oldTargetName (1)
}| 1 | Renames the build target to ant_build and leaves all other targets unchanged |
Configuring a different path for the sources is described in Building Java & JVM projects. You can change the output directory for the compiled classes in a similar way.
If, for example, the original Ant build stores these paths in Ant properties; src.dir for the Java source files and classes.dir for the output.
Here’s how you would configure Gradle to use those paths:
sourceSets {
    main {
        java.setSrcDirs(listOf(ant.properties["src.dir"]))
        java.destinationDirectory = file(ant.properties["classes.dir"] ?: layout.buildDirectory.dir("classes"))
    }
}sourceSets {
main {
java {
srcDirs = [ ant.properties['src.dir'] ]
destinationDirectory = file(ant.properties['classes.dir'])
}
}
}You should eventually switch to the standard directory structure for your type of project so that you will be able to remove this customization.
The last step is straightforward and involves using the Task.dependsOn property and Task.dependsOn() method to detach and link tasks. The property is appropriate for replacing dependencies, while the method is the preferred way to add to the existing dependencies.
Here is the required task dependency configuration for the example scenario, which should come after the Ant build import:
tasks {
    compileJava {
        dependsOn("prepare")  (1)
    }
    named("package") {
        setDependsOn(listOf(compileJava))  (2)
    }
    assemble {
        setDependsOn(listOf("package"))  (3)
    }
}compileJava.dependsOn 'prepare' (1)
tasks.named('package') { dependsOn = [ 'compileJava' ] } (2)
assemble.dependsOn = [ 'package' ] (3)| 1 | Makes compilation depend on the prepare task |
| 2 | Detaches package from the ant_build task and makes it depend on compileJava |
| 3 | Detaches assemble from the standard Gradle jar task and makes it depend on package instead |
These four steps will successfully replace the old Ant compilation with the Gradle implementation. Even this small migration will give you the advantage of Gradle’s incremental Java compilation for faster builds.
| This is one example of a staged migration. It may make more sense to include resource processing — such as properties files — and packaging with the compilation in this stage. |
One important question you will have to ask yourself is how many tasks to migrate in each stage. The more you can migrate in one go the better, but risk comes with the number of custom steps within the Ant build that will be affected by the changes.
For example, if the Ant build follows a fairly standard approach for compilation, static resources, packaging and unit tests, then it is probably worth migrating all of those together. But if the build performs some extra processing on the compiled classes, or does something unique when processing the static resources, it is probably worth splitting those tasks into separate stages.
Managing dependencies
Ant builds typically take one of two approaches to dealing with binary dependencies (such as libraries):
-
Storing them with the project in a local "lib" directory
-
Using Apache Ivy to manage them
They each require a different technique for the migration to Gradle, but you will find the process straightforward in either case. Let’s look at each case, in detail, in the following sections.
Serving dependencies from a directory
When you are attempting to migrate a build that stores its dependencies on the filesystem, either locally or on the network, you should consider whether you want to eventually move to managed dependencies using remote repositories. That’s because you can incorporate filesystem dependencies into a Gradle build in one of two ways:
-
Define a flat-directory repository and use standard dependency declarations
-
Attach the files directly to the appropriate dependency configurations (file dependencies)
It’s easier to migrate to managed dependencies served from Maven, or Ivy-compatible repositories, if you take the first approach, but doing so requires all your files to conform to the naming convention "<moduleName>-<version>.<extension>".
If you store your dependencies in the standard Maven repository layout — <repoDir>/<group>/<module>/<version> — then you can define a custom Maven repository with a file:// URL.
|
To demonstrate the two techniques, consider a project that has the following library JARs in its libs directory:
libs
├── our-custom.jar
├── awesome-framework-2.0.jar
└── utility-library-1.0.jar
The file our-custom.jar has no version number, so it has to be added as a file dependency.
The other two JARs match the required naming convention and can be declared as normal module dependencies that are retrieved from a flat-directory repository.
The following sample build script demonstrates how you can incorporate all of these libraries into a build:
repositories {
    flatDir {
        name = "libs dir"
        dir(file("libs"))  (1)
    }
}

dependencies {
    implementation(files("libs/our-custom.jar"))  (2)
    implementation(":awesome-framework:2.0")     (3)
    implementation(":utility-library:1.0")  (3)
}repositories {
flatDir {
name = 'libs dir'
dir file('libs') (1)
}
}
dependencies {
implementation files('libs/our-custom.jar') (2)
implementation ':awesome-framework:2.0' (3)
implementation ':utility-library:1.0' (3)
}| 1 | Specifies the path to the directory containing the JAR files |
| 2 | Declares a file dependency for the un-versioned JAR |
| 3 | Declares dependencies using standard dependency coordinates — note that no group is specified, but each identifier has a leading :, implying an empty group |
The above sample will add our-custom.jar, awesome-framework-2.0.jar and utility-library-1.0.jar to the implementation configuration, which is used to compile the project’s code.
|
You can also specify a group in these module dependencies, even though they don’t actually have a group. That’s because the flat-directory repository simply ignores this information. Then, if you add a normal Maven or Ivy-compatible repository at a later date, Gradle will download the module dependencies that are declared with a group from that repository rather than the flat-directory one. |
Migrating Ivy dependencies
Apache Ivy is a standalone dependency management tool that is widely used with Ant. It works similarly to Gradle. In fact, they both allow you to:
-
Define your own configurations
-
Extend configurations from one another
-
Attach dependencies to configurations
-
Resolve dependencies from Ivy-compatible repositories
-
Publish artifacts to Ivy-compatible repositories
The most notable difference is that Gradle has standard configurations for specific types of projects.
For example, the Java Plugin defines configurations like implementation, testImplementation and runtimeOnly.
You are able to define your own dependency configurations if needed.
As such, it’s typically straightforward to migrate from Ivy to Gradle:
-
Transcribe the dependency declarations from your module descriptors into the dependencies {} block of your Gradle build script, ideally using the standard configurations provided by any plugins you apply.
-
Transcribe any configuration declarations from your module descriptors into the configurations {} block of the build script for any custom configurations that can’t be replaced by Gradle’s standard ones.
-
Transcribe the resolvers from your Ivy settings file into the repositories {} block of the build script.
See the chapters on Managing Dependency Configurations, Declaring Dependencies and Declaring Repositories for more information.
Ivy provides several Ant tasks that handle Ivy’s process for fetching dependencies. The basic steps of that process consist of:
-
Configure — applies the configuration defined in the Ivy settings file
-
Resolve — locates the declared dependencies and downloads them to the cache if necessary
-
Retrieve — copies the cached dependencies to another directory
Gradle’s process is similar, but you don’t have to explicitly invoke the first two steps as it performs them automatically. The third step doesn’t happen at all — unless you create a task to do it — because Gradle typically uses the files in the dependency cache directly in classpaths and as the source for assembling application packages.
Let’s look in more detail at how Ivy’s steps map to Gradle:
- Configuration
-
Most of Gradle’s dependency-related configuration is baked into the build script, as you’ve seen with elements like the
dependencies {}block. Another particularly important configuration element is resolutionStrategy, which can be accessed from dependency configurations. This provides many of the features you might get from Ivy’s conflict managers and is a powerful way to control transitive dependencies and caching.Some Ivy configuration options have no equivalent in Gradle. For example, there are no lock strategies because Gradle guarantees that its dependency cache is concurrency safe. There are no "latest strategies" methodology because it’s simpler to have a reliable, single strategy for conflict resolution. If the "wrong" version is picked, you can override it using forced versions or other resolution options.
See the chapter on controlling transitive dependencies for more information.
- Resolution
-
At the beginning of the build, Gradle will automatically resolve any dependencies that you have declared and download them to its cache. Gradle searches the repositories for those dependencies, with the search order defined by the order in which the repositories are declared.
It’s worth noting that Gradle supports the same dynamic version syntax as Ivy, so you can still use conventions like
1.0.+. You can also use the speciallatest.integrationandlatest.releaselabels. If you decide to use such dynamic and changing dependencies, you can configure the caching behavior for them via resolutionStrategy.You might also want to consider dependency locking if you’re using dynamic and/or changing dependencies. It’s a way to make the build more reliable and ensures reproducibility.
- Retrieval
-
As mentioned, Gradle does not automatically copy files from the dependency cache. Its standard tasks typically use the files directly. If you want to copy the dependencies to a local directory, you can use a Copy task like this in your build script:
Example 6. Copying dependencies to a local directorybuild.gradle.ktstasks.register<Copy>("retrieveRuntimeDependencies") { into(layout.buildDirectory.dir("libs")) from(configurations.runtimeClasspath) }build.gradletasks.register('retrieveRuntimeDependencies', Copy) { into layout.buildDirectory.dir('libs') from configurations.runtimeClasspath }A configuration is also a file collection, hence why it can be used in the
from()configuration. You can use a similar technique to attach a configuration to a compilation task or one that produces documentation. See the chapter on Working with Files for more examples and information on Gradle’s file API.
Publishing artifacts
Projects that use Ivy to manage dependencies often also use it for publishing JARs and other artifacts to repositories. If you’re migrating such a build, then you’ll be glad to know that Gradle has built-in support for publishing artifacts to Ivy-compatible repositories.
Before you attempt to migrate this particular aspect of your build, read the Publishing chapter to learn about Gradle’s publishing model. The chapter examples are based on Maven repositories but the same model is used for Ivy repositories.
The basic migration process looks like this:
-
Apply the Ivy Publish Plugin to your build
-
Configure at least one publication, representing what will be published (including additional artifacts if desired)
Once that’s all done, you will be able to generate an Ivy module descriptor for each publication and publish them to one or more repositories.
Let’s say you have defined a publication named "myLibrary" and a repository named "myRepo". Ivy’s Ant tasks would then map to the Gradle tasks like this:
-
<deliver>→generateDescriptorFileForMyLibraryPublication -
<publish>→publishMyLibraryPublicationToMyRepoRepository
There is also a convenient publish task that publishes all publications to all repositories.
If you want to limit publications to specific repositories, check out the relevant section of the Publishing chapter.
Ivy will, by default, automatically replace dynamic versions of dependencies with the resolved "static" versions when it generates the module descriptor. Gradle does not mimic this behavior, declared dependency versions are left unchanged.
You can replicate the default Ivy behavior by using the Nebula Ivy Resolved Plugin. Alternatively, you can customize the descriptor file so that it contains the versions you want.
Dealing with custom Ant tasks
One of the advantages of Ant is that it’s fairly easy to create a custom task and incorporate it into a build. If you have such tasks, then there are two main options for migrating them to a Gradle build:
-
Using the custom Ant task from the Gradle build
-
Rewriting the task as a custom Gradle task type
The first option is typically quick and easy. If you want to integrate the task into incremental build, you must use the incremental build runtime API. You also often have to work with Ant paths and filesets, which can be inconvenient.
The second option is preferable long term. Gradle task types tend to be simpler than Ant tasks because they don’t have to work with an XML-based interface. You also gain the benefits of Gradle’s rich APIs. This approach enables the type-safe incremental build API based on typed properties.
Working with files
Ant has many tasks for working with files, most of which have Gradle equivalents. As with other areas of the Ant to Gradle migration, you can use those Ant tasks from within your Gradle build. However, we strongly recommend migrating to native Gradle constructs where possible so that the build benefits from:
-
Easier integration with other parts of the build, such as dependency configurations
-
More idiomatic build scripts
It can be convenient to use Ant tasks that have no direct equivalents, such as <checksum> and <chown>.
However, in the long term, it may be better to convert these to native Gradle task types that make use of standard Java APIs or third-party libraries.
Here are the most common file-related elements used by Ant builds, along with the Gradle equivalents:
You can see several examples of Gradle’s file API and learn more about it in the Working with Files chapter.
Ant makes use of the concepts of path-like structures and filesets to enable users to work with collections of files and directories.
Gradle has a simpler, more powerful model based on FileCollections and FileTrees that can be treated as objects from within the build.
Both types allow filtering based on Ant’s glob syntax, e.g. **/books_*.
You can learn more about these types and other aspects of Gradle’s file API in the Working with Files chapter.
You can construct Ant paths and filesets from within your build via the ant object if you need to interact with an Ant task that requires them.
The chapter on Ant integration has examples that use both <path> and <fileset>.
There is also a method on FileCollection that will convert a file collection to a fileset or similar Ant type.
Migrating Ant properties
Ant makes use of a properties map to store values that can be reused throughout the build. The big downsides to this approach are that property values are all strings and the properties themselves behave like global variables.
Sometimes you will want to make use of an Ant task directly from your Gradle build and that task requires one or more Ant properties to be set.
If that’s the case, you can easily set those properties via the ant object, as described in the Using Ant from Gradle chapter.
Gradle does use something similar in the form of project properties, which are a reasonable way to parameterize a build.
These can be set from the command line, in the gradle.properties file, or via specially named system properties and environment variables.
If you have existing Ant properties files, you can copy their contents into the project’s gradle.properties file.
Just be aware that:
-
Properties set in
gradle.propertiesdo not override extra project properties defined in the build script with the same name -
Imported Ant tasks will not automatically "see" the Gradle project properties — you must copy them into the Ant properties map for that to happen
Another important factor to understand is that a Gradle build script works with an object-oriented API and it’s often best to use the properties of tasks, source sets, and other objects where possible. For example, this build script fragment creates tasks for packaging Javadoc documentation as a JAR and unpacking it, linking tasks via their properties:
val tmpDistDir = layout.buildDirectory.dir("dist")

tasks.register<Jar>("javadocJarArchive") {
    from(tasks.javadoc)  (1)
    archiveClassifier = "javadoc"
}

tasks.register<Copy>("unpackJavadocs") {
    from(zipTree(tasks.named<Jar>("javadocJarArchive").get().archiveFile))  (2)
    into(tmpDistDir)  (3)
}def tmpDistDir = layout.buildDirectory.dir('dist')
tasks.register('javadocJarArchive', Jar) {
from javadoc (1)
archiveClassifier = 'javadoc'
}
tasks.register('unpackJavadocs', Copy) {
from zipTree(javadocJarArchive.archiveFile) (2)
into tmpDistDir (3)
}| 1 | Packages all javadoc's output files — equivalent to from javadoc.destinationDir |
| 2 | Uses the location of the Javadoc JAR held by the javadocJar task |
| 3 | Uses an project property called tmpDistDir to define the location of the 'dist' directory |
As you can see from the example with tmpDistDir, there is often a need to define paths through properties, which is why Gradle also provides extra properties that can be attached to the project, tasks, and some other types of objects.
Migrating multi-project builds
Multi-project builds are a particular challenge to migrate because there is no standard approach in Ant for structuring them or handling inter-project dependencies.
Fortunately, Gradle’s multi-project support can handle fairly diverse project structures and it provides much more robust and helpful support than Ant for constructing and maintaining multi-project builds.
The ant.importBuild() method also handles <ant> and <antcall> tasks transparently, which allows for a phased migration.
The following steps highlight a suggested method for migrating a multi-project build:
-
Start by learning how Gradle configures multi-project builds.
-
Create a Gradle build script in each project of the build, setting their contents to this line:
ant.importBuild 'build.xml'ant.importBuild("build.xml")Replace
build.xmlwith the path to the actual Ant build file that corresponds to the project. If there is no corresponding Ant build file, leave the Gradle build script empty. Even if your build is not be suitable for this migration approach, continue with these steps to see if there is still a way to do a phased migration. -
Create a settings file that includes all the projects that now have a Gradle build script.
-
Implement inter-project dependencies.
Some projects in your multi-project build will depend on artifacts produced by one or more other projects in that build. Such projects need to ensure that the projects they depend on have produced their artifacts and that the paths to those artifacts are known.
Ensuring the production of the required artifacts typically means calling into other projects' builds via the
<ant>task. This unfortunately bypasses the Gradle build, negating any changes you make to the Gradle build scripts. You will need to replace targets that use<ant>tasks with Gradle task dependencies.For example, your web project depends on a "util" library that’s part of the same build. The Ant build file for "web" might have a target like this:
web/build.xml<target name="buildRequiredProjects"> <ant dir="${root.dir}/util" target="build"/> (1) </target>1 root.dirwould have to be defined by the buildThis can be replaced by an inter-project task dependency in the corresponding Gradle build script, as demonstrated in the following example that assumes the "web" project’s "compile" task is requires "util" to be built beforehand:
web/build.gradle.ktsant.importBuild("build.xml") tasks { named<Task>("compile") { setDependsOn(listOf(":util:build")) } }web/build.gradleant.importBuild 'build.xml' compile.dependsOn = [ ':util:build' ]This is not as robust or powerful as Gradle’s project dependencies, but it solves the immediate problem without big changes to the build. Just be careful to remove or override any dependencies on tasks that delegate to other subprojects, like the
buildRequiredProjectstask. -
Identify the projects that have no dependencies on other projects and migrate them to idiomatic Gradle builds scripts.
Follow the advice in the rest of this guide to migrate individual project builds. As mentioned, you should use Gradle standard plugins where possible. This may mean that you need to add an extra copy task to each build that copies the generated artifacts to the location expected by the rest of the Ant builds.
-
Migrate projects when they depend solely on projects with fully migrated Gradle builds.
At this point, you should be able to switch to using proper project dependencies attached to the appropriate dependency configurations.
-
Clean up projects once no part of the Ant build depends on them.
We mentioned in step 5 that you might need to add copy tasks to satisfy the requirements of dependent Ant builds. Once those builds have been migrated, such build logic will no longer be needed and should be removed.
At the end of the process you should have a Gradle build that you are confident works as it should, with much less build logic than before.
Further reading
This chapter has covered the major topics that are specific to migrating Ant builds to Gradle. All that remain are a few other areas that may be useful following a migration:
-
Learn how to configure Gradle’s build environment, including the JVM settings used to run it
-
Learn how to structure your builds effectively
-
Configure Gradle’s logging and use it from your builds
As a final note, this guide has only touched on a few of Gradle’s features and we encourage you to learn about the rest from the other chapters of the User Manual.