Publishing a project as module
The vast majority of software projects build something that aims to be consumed in some way. It could be a library that other software projects use or it could be an application for end users. Publishing is the process by which the thing being built is made available to consumers.
In Gradle, that process looks like this:
Each of the these steps is dependent on the type of repository to which you want to publish artifacts. The two most common types are Maven-compatible and Ivy-compatible repositories, or Maven and Ivy repositories for short.
As of Gradle 6.0, the Gradle Module Metadata will always be published alongside the Ivy XML or Maven POM metadata file.
Gradle makes it easy to publish to these types of repository by providing some prepackaged infrastructure in the form of the Maven Publish Plugin and the Ivy Publish Plugin. These plugins allow you to configure what to publish and perform the publishing with a minimum of effort.
Let’s take a look at those steps in more detail:
- What to publish
-
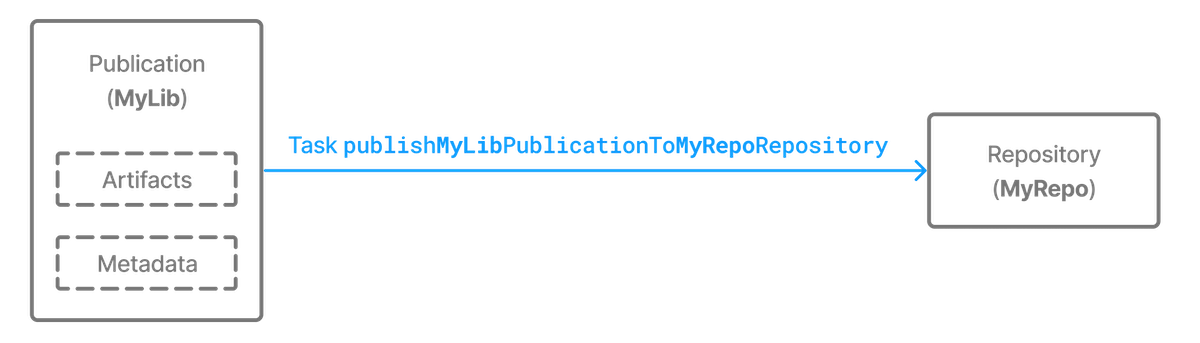
Gradle needs to know what files and information to publish so that consumers can use your project. This is typically a combination of artifacts and metadata that Gradle calls a publication. Exactly what a publication contains depends on the type of repository it’s being published to.
For example, a publication destined for a Maven repository includes:
-
One or more artifacts — typically built by the project,
-
The Gradle Module Metadata file which will describe the variants of the published component,
-
The Maven POM file will identify the primary artifact and its dependencies. The primary artifact is typically the project’s production JAR and secondary artifacts might consist of "-sources" and "-javadoc" JARs.
In addition, Gradle will publish checksums for all of the above, and signatures when configured to do so. From Gradle 6.0 onwards, this includes
SHA256andSHA512checksums. -
- Where to publish
-
Gradle needs to know where to publish artifacts so that consumers can get hold of them. This is done via repositories, which store and make available all sorts of artifact. Gradle also needs to interact with the repository, which is why you must provide the type of the repository and its location.
- How to publish
-
Gradle automatically generates publishing tasks for all possible combinations of publication and repository, allowing you to publish any artifact to any repository. If you’re publishing to a Maven repository, the tasks are of type PublishToMavenRepository, while for Ivy repositories the tasks are of type PublishToIvyRepository.
What follows is a practical example that demonstrates the entire publishing process.
Setting up basic publishing
The first step in publishing, irrespective of your project type, is to apply the appropriate publishing plugin. As mentioned in the introduction, Gradle supports both Maven and Ivy repositories via the following plugins:
These provide the specific publication and repository classes needed to configure publishing for the corresponding repository type. Since Maven repositories are the most commonly used ones, they will be the basis for this example and for the other samples in the chapter. Don’t worry, we will explain how to adjust individual samples for Ivy repositories.
Let’s assume we’re working with a simple Java library project, so only the following plugins are applied:
plugins {
    `java-library`
    `maven-publish`
}plugins {
id 'java-library'
id 'maven-publish'
}Once the appropriate plugin has been applied, you can configure the publications and repositories. For this example, we want to publish the project’s production JAR file — the one produced by the jar task — to a custom Maven repository. We do that with the following publishing {} block, which is backed by PublishingExtension:
group = "org.example"
version = "1.0"

publishing {
    publications {
        create<MavenPublication>("myLibrary") {
            from(components["java"])
        }
    }

    repositories {
        maven {
            name = "myRepo"
            url = uri(layout.buildDirectory.dir("repo"))
        }
    }
}group = 'org.example'
version = '1.0'
publishing {
publications {
myLibrary(MavenPublication) {
from components.java
}
}
repositories {
maven {
name = 'myRepo'
url = layout.buildDirectory.dir("repo")
}
}
}This defines a publication called "myLibrary" that can be published to a Maven repository by virtue of its type: MavenPublication.
This publication consists of just the production JAR artifact and its metadata, which combined are represented by the java component of the project.
Components are the standard way of defining a publication. They are provided by plugins, usually of the language or platform variety. For example, the Java Plugin defines the components.java SoftwareComponent, while the War Plugin defines components.web.
|
The example also defines a file-based Maven repository with the name "myRepo". Such a file-based repository is convenient for a sample, but real-world builds typically work with HTTPS-based repository servers, such as Maven Central or an internal company server.
| You may define one, and only one, repository without a name. This translates to an implicit name of "Maven" for Maven repositories and "Ivy" for Ivy repositories. All other repository definitions must be given an explicit name. |
In combination with the project’s group and version, the publication and repository definitions provide everything that Gradle needs to publish the project’s production JAR. Gradle will then create a dedicated publishMyLibraryPublicationToMyRepoRepository task that does just that. Its name is based on the template publishPubNamePublicationToRepoNameRepository. See the appropriate publishing plugin’s documentation for more details on the nature of this task and any other tasks that may be available to you.
You can either execute the individual publishing tasks directly, or you can execute publish, which will run all the available publishing tasks. In this example, publish will just run publishMyLibraryPublicationToMavenRepository.
|
Basic publishing to an Ivy repository is very similar: you simply use the Ivy Publish Plugin, replace There are differences between the two types of repository, particularly around the extra metadata that each support — for example, Maven repositories require a POM file while Ivy ones have their own metadata format — so see the plugin chapters for comprehensive information on how to configure both publications and repositories for whichever repository type you’re working with. |
That’s everything for the basic use case. However, many projects need more control over what gets published, so we look at several common scenarios in the following sections.
Suppressing validation errors
Gradle performs validation of generated module metadata.
In some cases, validation can fail, indicating that you most likely have an error to fix, but you may have done something intentionally.
If this is the case, Gradle will indicate the name of the validation error you can disable on the GenerateModuleMetadata tasks:
tasks.withType<GenerateModuleMetadata>().configureEach {
    // The value 'enforced-platform' is provided in the validation
    // error message you got
    suppressedValidationErrors.add("enforced-platform")
}tasks.withType(GenerateModuleMetadata).configureEach {
// The value 'enforced-platform' is provided in the validation
// error message you got
suppressedValidationErrors.add('enforced-platform')
}