The Java Library Plugin
The Java Library plugin expands the capabilities of the Java Plugin (java) by providing specific knowledge about Java libraries.
In particular, a Java library exposes an API to consumers (i.e., other projects using the Java or the Java Library plugin).
All the source sets, tasks and configurations exposed by the Java plugin are implicitly available when using this plugin.
Usage
To use the Java Library plugin, include the following in your build script:
plugins {
    `java-library`
}plugins {
id 'java-library'
}API and implementation separation
The key difference between the standard Java plugin and the Java Library plugin is that the latter introduces the concept of an API exposed to consumers. A library is a Java component meant to be consumed by other components. It’s a very common use case in multi-project builds, but also as soon as you have external dependencies.
The plugin exposes two configurations that can be used to declare dependencies: api and implementation.
The api configuration should be used to declare dependencies which are exported by the library API, whereas the implementation configuration should be used to declare dependencies which are internal to the component.
dependencies {
    api("org.apache.httpcomponents:httpclient:4.5.7")
    implementation("org.apache.commons:commons-lang3:3.5")
}dependencies {
api 'org.apache.httpcomponents:httpclient:4.5.7'
implementation 'org.apache.commons:commons-lang3:3.5'
}Dependencies appearing in the api configurations will be transitively exposed to consumers of the library, and as such will appear on the compile classpath of consumers. Dependencies found in the implementation configuration will, on the other hand, not be exposed to consumers, and therefore not leak into the consumers' compile classpath. This comes with several benefits:
-
dependencies do not leak into the compile classpath of consumers anymore, so you will never accidentally depend on a transitive dependency
-
faster compilation thanks to reduced classpath size
-
less recompilations when implementation dependencies change: consumers would not need to be recompiled
-
cleaner publishing: when used in conjunction with the new
maven-publishplugin, Java libraries produce POM files that distinguish exactly between what is required to compile against the library and what is required to use the library at runtime (in other words, don’t mix what is needed to compile the library itself and what is needed to compile against the library).
The compile and runtime configurations have been removed with Gradle 7.0.
Please refer to the upgrade guide how to migrate to implementation and api configurations`.
|
If your build consumes a published module with POM metadata, the Java and Java Library plugins both honor api and implementation separation through the scopes used in the POM.
Meaning that the compile classpath only includes Maven compile scoped dependencies, while the runtime classpath adds the Maven runtime scoped dependencies as well.
This often does not have an effect on modules published with Maven, where the POM that defines the project is directly published as metadata.
There, the compile scope includes both dependencies that were required to compile the project (i.e. implementation dependencies) and dependencies required to compile against the published library (i.e. API dependencies).
For most published libraries, this means that all dependencies belong to the compile scope.
If you encounter such an issue with an existing library, you can consider a component metadata rule to fix the incorrect metadata in your build.
However, as mentioned above, if the library is published with Gradle, the produced POM file only puts api dependencies into the compile scope and the remaining implementation dependencies into the runtime scope.
If your build consumes modules with Ivy metadata, you might be able to activate api and implementation separation as described here if all modules follow a certain structure.
Separating compile and runtime scope of modules is active by default in Gradle 5.0+.
In Gradle 4.6+, you need to activate it by adding enableFeaturePreview('IMPROVED_POM_SUPPORT') in settings.gradle.
|
Recognizing API and implementation dependencies
This section will help you identify API and Implementation dependencies in your code using simple rules of thumb. The first of these is:
-
Prefer the
implementationconfiguration overapiwhen possible
This keeps the dependencies off of the consumer’s compilation classpath. In addition, the consumers will immediately fail to compile if any implementation types accidentally leak into the public API.
So when should you use the api configuration? An API dependency is one that contains at least one type that is exposed in the library binary interface, often referred to as its ABI (Application Binary Interface). This includes, but is not limited to:
-
types used in super classes or interfaces
-
types used in public method parameters, including generic parameter types (where public is something that is visible to compilers. I.e. , public, protected and package private members in the Java world)
-
types used in public fields
-
public annotation types
By contrast, any type that is used in the following list is irrelevant to the ABI, and therefore should be declared as an implementation dependency:
-
types exclusively used in method bodies
-
types exclusively used in private members
-
types exclusively found in internal classes (future versions of Gradle will let you declare which packages belong to the public API)
The following class makes use of a couple of third-party libraries, one of which is exposed in the class’s public API and the other is only used internally. The import statements don’t help us determine which is which, so we have to look at the fields, constructors and methods instead:
Example: Making the difference between API and implementation
// The following types can appear anywhere in the code
// but say nothing about API or implementation usage
import org.apache.commons.httpclient.*;
import org.apache.commons.httpclient.methods.*;
import org.apache.commons.lang3.exception.ExceptionUtils;
import java.io.IOException;
import java.io.UnsupportedEncodingException;

public class HttpClientWrapper {

    private final HttpClient client; // private member: implementation details

    // HttpClient is used as a parameter of a public method
    // so "leaks" into the public API of this component
    public HttpClientWrapper(HttpClient client) {
        this.client = client;
    }

    // public methods belongs to your API
    public byte[] doRawGet(String url) {
        GetMethod method = new GetMethod(url);
        try {
            int statusCode = doGet(method);
            return method.getResponseBody();

        } catch (Exception e) {
            ExceptionUtils.rethrow(e); // this dependency is internal only
        } finally {
            method.releaseConnection();
        }
        return null;
    }

    // GetMethod is used in a private method, so doesn't belong to the API
    private int doGet(GetMethod method) throws Exception {
        int statusCode = client.executeMethod(method);
        if (statusCode != HttpStatus.SC_OK) {
            System.err.println("Method failed: " + method.getStatusLine());
        }
        return statusCode;
    }
}
The public constructor of HttpClientWrapper uses HttpClient as a parameter, so it is exposed to consumers and therefore belongs to the API. Note that HttpGet and HttpEntity are used in the signature of a private method, and so they don’t count towards making HttpClient an API dependency.
On the other hand, the ExceptionUtils type, coming from the commons-lang library, is only used in a method body (not in its signature), so it’s an implementation dependency.
Therefore, we can deduce that httpclient is an API dependency, whereas commons-lang is an implementation dependency. This conclusion translates into the following declaration in the build script:
dependencies {
    api("commons-httpclient:commons-httpclient:3.1")
    implementation("org.apache.commons:commons-lang3:3.5")
}dependencies {
api 'commons-httpclient:commons-httpclient:3.1'
implementation 'org.apache.commons:commons-lang3:3.5'
}Dependency configurations
The role of each configuration is described in the following tables.
Declarable (Bucket) Configurations
| Configuration name | Role | Description |
|---|---|---|
|
Declarable |
This configuration is used to declare annotation processors, ensuring they are available during the compile phase for code generation. |
|
Declarable |
This is where you declare dependencies which are transitively exported to consumers, for compile time and runtime. |
|
Declarable |
This is where you declare dependencies which are purely internal and not meant to be exposed to consumers (they are still exposed to consumers at runtime). |
|
Declarable |
This is where you declare dependencies which are required at compile time, but not at runtime. This typically includes dependencies which are shaded when found at runtime. |
|
Declarable |
This is where you declare dependencies which are required at compile time by your module and consumers, but not at runtime. This typically includes dependencies which are shaded when found at runtime. |
|
Declarable |
This is where you declare dependencies which are only required at runtime, and not at compile time. |
|
Declarable |
This is where you declare dependencies which are used to compile tests. |
|
Declarable |
This is where you declare dependencies which are only required at test compile time, but should not leak into the runtime. This typically includes dependencies which are shaded when found at runtime. |
|
Declarable |
This is where you declare dependencies which are only required at test runtime, and not at test compile time. |
Consumable Configurations
| Configuration name | Role | Description |
|---|---|---|
|
Consumable |
This configuration is meant to be used by consumers to retrieve all the elements necessary to compile against this library. |
|
Consumable |
This configuration is meant to be used by consumers to retrieve all the elements necessary to run this library. |
Resolvable Configurations
| Configuration name | Role | Description |
|---|---|---|
|
Resolvable |
This configuration contains the compile classpath of this library and is therefore used when invoking the Java compiler to compile it. |
|
Resolvable |
This configuration contains the runtime classpath of this library. |
|
Resolvable |
This configuration contains the test compile classpath of this library. |
|
Resolvable |
This configuration contains the test runtime classpath of this library. |
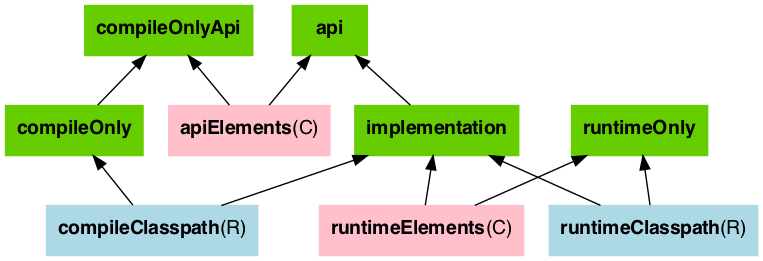
The following graph describes how configurations are setup when the Java Library plugin is in use. You can use this legend to interpret the colors:
-
The configurations in blue are the ones a user should use to declare dependencies.
-
The configurations in purple are the ones used when a component compiles, or runs against the library.
-
The configurations in green are internal to the component, for its own use.
-
The tasks in grey.
And the next graph describes the test configurations setup:

Building Modules for the Java Module System
Since Java 9, Java itself offers a module system that allows for strict encapsulation during compile and runtime.
You can turn a Java library into a Java Module by creating a module-info.java file in the main/java source folder.
src
└── main
    └── java
        └── module-info.java
In the module info file, you declare a module name, which packages of your module you want to export and which other modules you require.
module org.gradle.sample {
    requires com.google.gson;          // real module
    requires org.apache.commons.lang3; // automatic module
    // commons-cli-1.4.jar is not a module and cannot be required
}
To tell the Java compiler that a Jar is a module, as opposed to a traditional Java library, Gradle needs to place it on the so called module path. It is an alternative to the classpath, which is the traditional way to tell the compiler about compiled dependencies. Gradle will automatically put a Jar of your dependencies on the module path, instead of the classpath, if these three things are true:
-
java.modularity.inferModulePathis not turned off -
We are actually building a module (as opposed to a traditional library) which we expressed by adding the
module-info.javafile. (Another option is to add theAutomatic-Module-NameJar manifest attribute as described further down.) -
The Jar our module depends on is itself a module, which Gradles decides based on the presence of a
module-info.class— the compiled version of the module descriptor — in the Jar. (Or, alternatively, the presence of anAutomatic-Module-Nameattribute the Jar manifest)
Declaring module dependencies
There is a direct relationship to the dependencies you declare in the build file and the module dependencies you declare in the module-info.java file.
Ideally the declarations should be in sync as seen in the following table.
| Java Module Directive | Gradle Configuration | Purpose |
|---|---|---|
|
|
Declaring implementation dependencies |
|
|
Declaring API dependencies |
|
|
Declaring compile only dependencies |
|
|
Declaring compile only API dependencies |
Gradle currently does not automatically check if the dependency declarations are in sync. This may be added in future versions.
For more details on declaring module dependencies, please refer to documentation on the Java Module System.
Declaring package visibility and services
The Java module system supports additional more fine granular encapsulation concepts than Gradle itself currently does. For example, you explicitly need to declare which packages are part of your API and which are only visible inside your module. Some of these capabilities might be added to Gradle itself in future versions. For now, please refer to documentation on the Java Module System to learn how to use these features in Java Modules.
Declaring module versions
Java Modules also have a version that is encoded as part of the module identity in the module-info.class file.
This version can be inspected when a module is running.
version = "1.2"

tasks.compileJava {
    // use the project's version or define one directly
    options.javaModuleVersion = provider { version as String }
}version = '1.2'
tasks.named('compileJava') {
// use the project's version or define one directly
options.javaModuleVersion = provider { version }
}Using libraries that are not modules
You probably want to use external libraries, like OSS libraries from Maven Central, in your modular Java project.
Some libraries, in their newer versions, are already full modules with a module descriptor.
For example, com.google.code.gson:gson:2.8.9 that has the module name com.google.gson.
Others, like org.apache.commons:commons-lang3:3.10, may not offer a full module descriptor but will at least contain an Automatic-Module-Name entry in their manifest file to define the module’s name (org.apache.commons.lang3 in the example).
Such modules, that only have a name as module description, are called automatic module that export all their packages and can read all modules on the module path.
A third case are traditional libraries that provide no module information at all — for example commons-cli:commons-cli:1.4.
Gradle puts such libraries on the classpath instead of the module path.
The classpath is then treated as one module (the so called unnamed module) by Java.
dependencies {
    implementation("com.google.code.gson:gson:2.13.1")      // real module
    implementation("org.apache.commons:commons-lang3:3.10") // automatic module
    implementation("commons-cli:commons-cli:1.4")           // plain library
}dependencies {
implementation 'com.google.code.gson:gson:2.13.1' // real module
implementation 'org.apache.commons:commons-lang3:3.10' // automatic module
implementation 'commons-cli:commons-cli:1.4' // plain library
}module org.gradle.sample.lib {
requires com.google.gson; // real module
requires org.apache.commons.lang3; // automatic module
// commons-cli-1.4.jar is not a module and cannot be required
}While a real module cannot directly depend on the unnamed module (only by adding command line flags), automatic modules can also see the unnamed module. Thus, if you cannot avoid to rely on a library without module information, you can wrap that library in an automatic module as part of your project. How you do that is described in the next section.
Another way to deal with non-modules is to enrich existing Jars with module descriptors yourself using artifact transforms.
Disabling Java Module support
In rare cases, you might want to disable the built-in Java Module support and define the module path by other means.
To achieve this, you can disable the functionality to automatically put any Jar on the module path.
Then Gradle puts Jars with module information on the classpath, even if you have a module-info.java in your source set.
This corresponds to the behaviour of Gradle versions <7.0.
To make this work, you need to set modularity.inferModulePath = false on the Java extension (for all tasks) or on individual tasks.
java {
    modularity.inferModulePath = false
}

tasks.compileJava {
    modularity.inferModulePath = false
}java {
modularity.inferModulePath = false
}
tasks.named('compileJava') {
modularity.inferModulePath = false
}Building an automatic module
If you can, you should always write complete module-info.java descriptors for your modules.
Still, there are a few cases where you might consider to (initally) only provide a module name for an automatic module:
-
You are working on a library that is not a module but you want to make it usable as such in the next release. Adding an
Automatic-Module-Nameis a good first step (most popular OSS libraries on Maven central have done it by now). -
As discussed in the previous section, an automatic module can be used as an adapter between your real modules and a traditional library on the classpath.
To turn a normal Java project into an automatic module, just add the manifest entry with the module name:
tasks.jar {
    manifest {
        attributes("Automatic-Module-Name" to "org.gradle.sample")
    }
}tasks.named('jar') {
manifest {
attributes('Automatic-Module-Name': 'org.gradle.sample')
}
}| === You can define an automatic module as part of a multi-project that otherwise defines real modules (e.g. as an adapter to another library). While this works fine in the Gradle build, such automatic module projects are not correctly recognized by IDEA/Eclipse at the moment. You can work around it by manually adding the Jar built for the automatic module to the dependencies of the project that does not find it in the IDE’s UI. === |
Using classes instead of jar for compilation
A feature of the java-library plugin is that projects which consume the library only require the classes folder for compilation, instead of the full JAR.
This enables lighter inter-project dependencies as resources processing (processResources task) and archive construction (jar task) are no longer executed when only Java code compilation is performed during development.
| The usage or not of the classes output instead of the JAR is a consumer decision. For example, Groovy consumers will request classes and processed resources as these may be needed for executing AST transformation as part of the compilation process. |
Increased memory usage for consumers
An indirect consequence is that up-to-date checking will require more memory, because Gradle will snapshot individual class files instead of a single jar.
This may lead to increased memory consumption for large projects, with the benefit of having the compileJava task up-to-date in more cases (e.g. changing resources no longer changes the input for compileJava tasks of upstream projects)
Significant build performance drop on Windows for huge multi-projects
Another side effect of the snapshotting of individual class files, only affecting Windows systems, is that the performance can significantly drop when processing a very large amount of class files on the compile classpath.
This only concerns very large multi-projects where a lot of classes are present on the classpath by using many api dependencies.
To mitigate this, you can set the org.gradle.java.compile-classpath-packaging system property to true to change the behavior of the Java Library plugin to use jars instead of class folders for everything on the compile classpath.
Note, since this has other performance impacts and potentially side effects, by triggering all jar tasks at compile time, it is only recommended to activate this if you suffer from the described performance issue on Windows.
Distributing a library
Aside from publishing a library to a component repository, you may sometimes need to package a library and its dependencies in a distribution deliverable. The Java Library Distribution Plugin is there to help you do just that.