Using Plugins
- Benefits of plugins
- Plugin distribution
- Types of plugins
- Using plugins
- Resolving plugins
- 1. Applying plugins using the
plugins{}block - 2. Applying plugins from the
buildSrcdirectory - 3. Applying plugins using the
buildscript{}block - 4. Applying script plugins using the legacy
apply()method - Plugin Management
- Legacy Plugin Application
- Using a Version Catalog
Much of Gradle’s functionality is delivered via plugins, including core plugins distributed with Gradle, third-party plugins, and script plugins defined within builds.
Plugins introduce new tasks (e.g., JavaCompile), domain objects (e.g., SourceSet), conventions (e.g., locating Java source at src/main/java), and extend core or other plugin objects.
Plugins in Gradle are essential for automating common build tasks, integrating with external tools or services, and tailoring the build process to meet specific project needs. They also serve as the primary mechanism for organizing build logic.
Benefits of plugins
Writing many tasks and duplicating configuration blocks in build scripts can get messy. Plugins offer several advantages over adding logic directly to the build script:
-
Promotes Reusability: Reduces the need to duplicate similar logic across projects.
-
Enhances Modularity: Allows for a more modular and organized build script.
-
Encapsulates Logic: Keeps imperative logic separate, enabling more declarative build scripts.
Plugin distribution
You can leverage plugins from Gradle and the Gradle community or create your own.
Plugins are available in three ways:
-
Core plugins - Gradle develops and maintains a set of Core Plugins.
-
Community plugins - Gradle plugins shared in a remote repository such as Maven or the Gradle Plugin Portal.
-
Local plugins - Gradle enables users to create custom plugins using APIs.
Types of plugins
Plugins can be implemented as binary plugins, precompiled script plugins, or script plugins:
- Binary Plugins
-
Binary plugins are compiled plugins typically written in Java or Kotlin DSL that are packaged as JAR files. They are applied to a project using the
plugins {}block. They offer better performance and maintainability compared to script plugins or precompiled script plugins. - Precompiled Script Plugins
-
Precompiled script plugins are Groovy DSL or Kotlin DSL scripts compiled and distributed as Java class files packaged in a library. They are applied to a project using the
plugins {}block. They provide a way to reuse complex logic across projects and allow for better organization of build logic. - Script Plugins
-
Script plugins are Groovy DSL or Kotlin DSL scripts that are applied directly to a Gradle build script using the
apply from:syntax. They are applied inline within a build script to add functionality or customize the build process. They are simple to use.
A plugin often starts as a script plugin (because they are easy to write). Then, as the code becomes more valuable, it’s migrated to a binary plugin that can be easily tested and shared between multiple projects or organizations.
Using plugins
To use the build logic encapsulated in a plugin, Gradle needs to perform two steps.
First, it needs to resolve the plugin, and then it needs to apply the plugin to the target, usually a Project.
-
Resolving a plugin means finding the correct version of the JAR that contains a given plugin and adding it to the script classpath. Once a plugin is resolved, its API can be used in a build script. Script plugins are self-resolving in that they are resolved from the specific file path or URL provided when applying them. Core binary plugins provided as part of the Gradle distribution are automatically resolved.
-
Applying a plugin means executing the plugin’s Plugin.apply(T) on a project.
The plugins DSL is recommended to resolve and apply plugins in one step.
Resolving plugins
Gradle provides the core plugins (e.g., JavaPlugin, GroovyPlugin, MavenPublishPlugin, etc.) as part of its distribution, which means they are automatically resolved.
Core plugins are applied in a build script using the plugin name:
plugins {
    id «plugin name»
}
For example:
plugins {
    id("java")
}
Non-core plugins must be resolved before they can be applied. Non-core plugins are identified by a unique ID and a version in the build file:
plugins {
    id «plugin id» version «plugin version»
}
And the location of the plugin must be specified in the settings file:
pluginManagement {
    repositories {
        gradlePluginPortal()
        maven {
            url 'https://maven.example.com/plugins'
        }
    }
}
There are additional considerations for resolving and applying plugins:
| # | To | Use | For example: |
|---|---|---|---|
Apply a core, community or local plugin to a specific project. |
|
||
Apply common core, community or local plugin to multiple subprojects. |
|
||
Apply a core, community or local plugin needed for the build script itself. |
|
||
Apply a local script plugins. |
|
1. Applying plugins using the plugins{} block
The plugin DSL provides a concise and convenient way to declare plugin dependencies.
The plugins block configures an instance of PluginDependenciesSpec:
plugins {
    application                                     // by name
    java                                            // by name
    id("java")                                      // by id - recommended
    id("org.jetbrains.kotlin.jvm") version "1.9.0"  // by id - recommended
}
Core Gradle plugins are unique in that they provide short names, such as java for the core JavaPlugin.
To apply a core plugin, the short name can be used:
plugins {
    java
}plugins {
id 'java'
}All other binary plugins must use the fully qualified form of the plugin id (e.g., com.github.foo.bar).
To apply a community plugin from Gradle plugin portal, the fully qualified plugin id, a globally unique identifier, must be used:
plugins {
    id("org.springframework.boot") version "3.3.1"
}plugins {
id 'org.springframework.boot' version '3.3.1'
}See PluginDependenciesSpec for more information on using the Plugin DSL.
Limitations of the plugins DSL
The plugins DSL provides a convenient syntax for users and the ability for Gradle to determine which plugins are used quickly. This allows Gradle to:
-
Optimize the loading and reuse of plugin classes.
-
Provide editors with detailed information about the potential properties and values in the build script.
However, the DSL requires that plugins be defined statically.
There are some key differences between the plugins {} block mechanism and the "traditional" apply() method mechanism.
There are also some constraints and possible limitations.
Constrained Syntax
The plugins {} block does not support arbitrary code.
It is constrained to be idempotent (produce the same result every time) and side effect-free (safe for Gradle to execute at any time).
The form is:
plugins {
    id(«plugin id»)                             (1)
    id(«plugin id») version «plugin version»    (2)
}| 1 | for core Gradle plugins or plugins already available to the build script |
| 2 | for binary Gradle plugins that need to be resolved |
plugins {
    id «plugin id»                            (1)
    id «plugin id» version «plugin version»   (2)
}| 1 | for core Gradle plugins or plugins already available to the build script |
| 2 | for binary Gradle plugins that need to be resolved |
Where «plugin id» and «plugin version» are a string.
Where «plugin id» and «plugin version» must be constant, literal strings.
The plugins{} block must also be a top-level statement in the build script.
It cannot be nested inside another construct (e.g., an if-statement or for-loop).
Only in build scripts and settings file
The plugins{} block can only be used in a project’s build script build.gradle(.kts) and the settings.gradle(.kts) file.
It must appear before any other block.
It cannot be used in script plugins or init scripts.
Applying plugins to all subprojects
Suppose you have a multi-project build, you probably want to apply plugins to some or all of the subprojects in your build but not to the root project.
While the default behavior of the plugins{} block is to immediately resolve and apply the plugins, you can use the apply false syntax to tell Gradle not to apply the plugin to the current project. Then, use the plugins{} block without the version in subprojects' build scripts:
include("hello-a")
include("hello-b")
include("goodbye-c")plugins {
id("com.example.hello") version "1.0.0" apply false
id("com.example.goodbye") version "1.0.0" apply false
}plugins {
id("com.example.hello")
}plugins {
id("com.example.hello")
}plugins {
id("com.example.goodbye")
}include 'hello-a'
include 'hello-b'
include 'goodbye-c'plugins {
id 'com.example.hello' version '1.0.0' apply false
id 'com.example.goodbye' version '1.0.0' apply false
}plugins {
id 'com.example.hello'
}plugins {
id 'com.example.hello'
}plugins {
id 'com.example.goodbye'
}You can also encapsulate the versions of external plugins by composing the build logic using your own convention plugins.
2. Applying plugins from the buildSrc directory
buildSrc is an optional directory at the Gradle project root that contains build logic (i.e., plugins) used in building the main project.
You can apply plugins that reside in a project’s buildSrc directory as long as they have a defined ID.
The following example shows how to tie the plugin implementation class my.MyPlugin, defined in buildSrc, to the id "my-plugin":
plugins {
    `java-gradle-plugin`
}

gradlePlugin {
    plugins {
        create("myPlugins") {
            id = "my-plugin"
            implementationClass = "my.MyPlugin"
        }
    }
}plugins {
id 'java-gradle-plugin'
}
gradlePlugin {
plugins {
myPlugins {
id = 'my-plugin'
implementationClass = 'my.MyPlugin'
}
}
}The plugin can then be applied by ID:
plugins {
    id("my-plugin")
}plugins {
id 'my-plugin'
}3. Applying plugins using the buildscript{} block
The buildscript block is used for:
-
global
dependenciesandrepositoriesrequired for building the project (applied in the subprojects). -
declaring which plugins are available for use in the build script (in the
build.gradle(.kts)file itself).
So when you want to use a library in the build script itself, you must add this library on the script classpath using buildScript:
import org.apache.commons.codec.binary.Base64

buildscript {
    repositories {  // this is where the plugins are located
        mavenCentral()
        google()
    }
    dependencies { // these are the plugins that can be used in subprojects or in the build file itself
        classpath group: 'commons-codec', name: 'commons-codec', version: '1.2' // used in the task below
        classpath 'com.android.tools.build:gradle:4.1.0' // used in subproject
    }
}

tasks.register('encode') {
    doLast {
        def byte[] encodedString = new Base64().encode('hello world\n'.getBytes())
        println new String(encodedString)
    }
}
And you can apply the globally declared dependencies in the subproject that needs it:
plugins {
    id 'com.android.application'
}
Binary plugins published as external jar files can be added to a project by adding the plugin to the build script classpath and then applying the plugin.
External jars can be added to the build script classpath using the buildscript{} block as described in External dependencies for the build script:
buildscript {
    repositories {
        gradlePluginPortal()
    }
    dependencies {
        classpath("org.springframework.boot:spring-boot-gradle-plugin:3.3.1")
    }
}

apply(plugin = "org.springframework.boot")buildscript {
repositories {
gradlePluginPortal()
}
dependencies {
classpath 'org.springframework.boot:spring-boot-gradle-plugin:3.3.1'
}
}
apply plugin: 'org.springframework.boot'4. Applying script plugins using the legacy apply() method
A script plugin is an ad-hoc plugin, typically written and applied in the same build script. It is applied using the legacy application method:
class MyPlugin : Plugin<Project> {
    override fun apply(project: Project) {
        println("Plugin ${this.javaClass.simpleName} applied on ${project.name}")
    }
}

apply<MyPlugin>()
Let’s take a rudimentary example of a plugin written in a file called other.gradle located in the same directory as the build.gradle file:
public class Other implements Plugin<Project> {
    @Override
    void apply(Project project) {
        // Does something
    }
}
First, import the external file using:
apply from: 'other.gradle'Then you can apply it:
apply plugin: OtherScript plugins are automatically resolved and can be applied from a script on the local filesystem or remotely:
apply(from = "other.gradle.kts")apply from: 'other.gradle'Filesystem locations are relative to the project directory, while remote script locations are specified with an HTTP URL. Multiple script plugins (of either form) can be applied to a given target.
Plugin Management
The pluginManagement{} block is used to configure repositories for plugin resolution and to define version constraints for plugins that are applied in the build scripts.
The pluginManagement{} block can be used in a settings.gradle(.kts) file, where it must be the first block in the file:
pluginManagement {
    plugins {
    }
    resolutionStrategy {
    }
    repositories {
    }
}
rootProject.name = "plugin-management"pluginManagement {
plugins {
}
resolutionStrategy {
}
repositories {
}
}
rootProject.name = 'plugin-management'The block can also be used in Initialization Script:
settingsEvaluated {
    pluginManagement {
        plugins {
        }
        resolutionStrategy {
        }
        repositories {
        }
    }
}settingsEvaluated { settings ->
settings.pluginManagement {
plugins {
}
resolutionStrategy {
}
repositories {
}
}
}Custom Plugin Repositories
By default, the plugins{} DSL resolves plugins from the public Gradle Plugin Portal.
Many build authors would also like to resolve plugins from private Maven or Ivy repositories because they contain proprietary implementation details or to have more control over what plugins are available to their builds.
To specify custom plugin repositories, use the repositories{} block inside pluginManagement{}:
pluginManagement {
    repositories {
        maven(url = "./maven-repo")
        gradlePluginPortal()
        ivy(url = "./ivy-repo")
    }
}pluginManagement {
repositories {
maven {
url './maven-repo'
}
gradlePluginPortal()
ivy {
url './ivy-repo'
}
}
}This tells Gradle to first look in the Maven repository at ../maven-repo when resolving plugins and then to check the Gradle Plugin Portal if the plugins are not found in the Maven repository.
If you don’t want the Gradle Plugin Portal to be searched, omit the gradlePluginPortal() line.
Finally, the Ivy repository at ../ivy-repo will be checked.
Plugin Version Management
A plugins{} block inside pluginManagement{} allows all plugin versions for the build to be defined in a single location.
Plugins can then be applied by id to any build script via the plugins{} block.
One benefit of setting plugin versions this way is that the pluginManagement.plugins{} does not have the same constrained syntax as the build script plugins{} block.
This allows plugin versions to be taken from gradle.properties, or loaded via another mechanism.
Managing plugin versions via pluginManagement:
pluginManagement {
  val helloPluginVersion: String by settings
  plugins {
    id("com.example.hello") version "${helloPluginVersion}"
  }
}plugins {
id("com.example.hello")
}helloPluginVersion=1.0.0pluginManagement {
plugins {
id 'com.example.hello' version "${helloPluginVersion}"
}
}plugins {
id 'com.example.hello'
}helloPluginVersion=1.0.0The plugin version is loaded from gradle.properties and configured in the settings script, allowing the plugin to be added to any project without specifying the version.
Plugin Resolution Rules
Plugin resolution rules allow you to modify plugin requests made in plugins{} blocks, e.g., changing the requested version or explicitly specifying the implementation artifact coordinates.
To add resolution rules, use the resolutionStrategy{} inside the pluginManagement{} block:
pluginManagement {
    resolutionStrategy {
        eachPlugin {
            if (requested.id.namespace == "com.example") {
                useModule("com.example:sample-plugins:1.0.0")
            }
        }
    }
    repositories {
        maven {
            url = uri("./maven-repo")
        }
        gradlePluginPortal()
        ivy {
            url = uri("./ivy-repo")
        }
    }
}pluginManagement {
resolutionStrategy {
eachPlugin {
if (requested.id.namespace == 'com.example') {
useModule('com.example:sample-plugins:1.0.0')
}
}
}
repositories {
maven {
url './maven-repo'
}
gradlePluginPortal()
ivy {
url './ivy-repo'
}
}
}This tells Gradle to use the specified plugin implementation artifact instead of its built-in default mapping from plugin ID to Maven/Ivy coordinates.
Custom Maven and Ivy plugin repositories must contain plugin marker artifacts and the artifacts that implement the plugin. Read Gradle Plugin Development Plugin for more information on publishing plugins to custom repositories.
See PluginManagementSpec for complete documentation for using the pluginManagement{} block.
Plugin Marker Artifacts
Since the plugins{} DSL block only allows for declaring plugins by their globally unique plugin id and version properties, Gradle needs a way to look up the coordinates of the plugin implementation artifact.
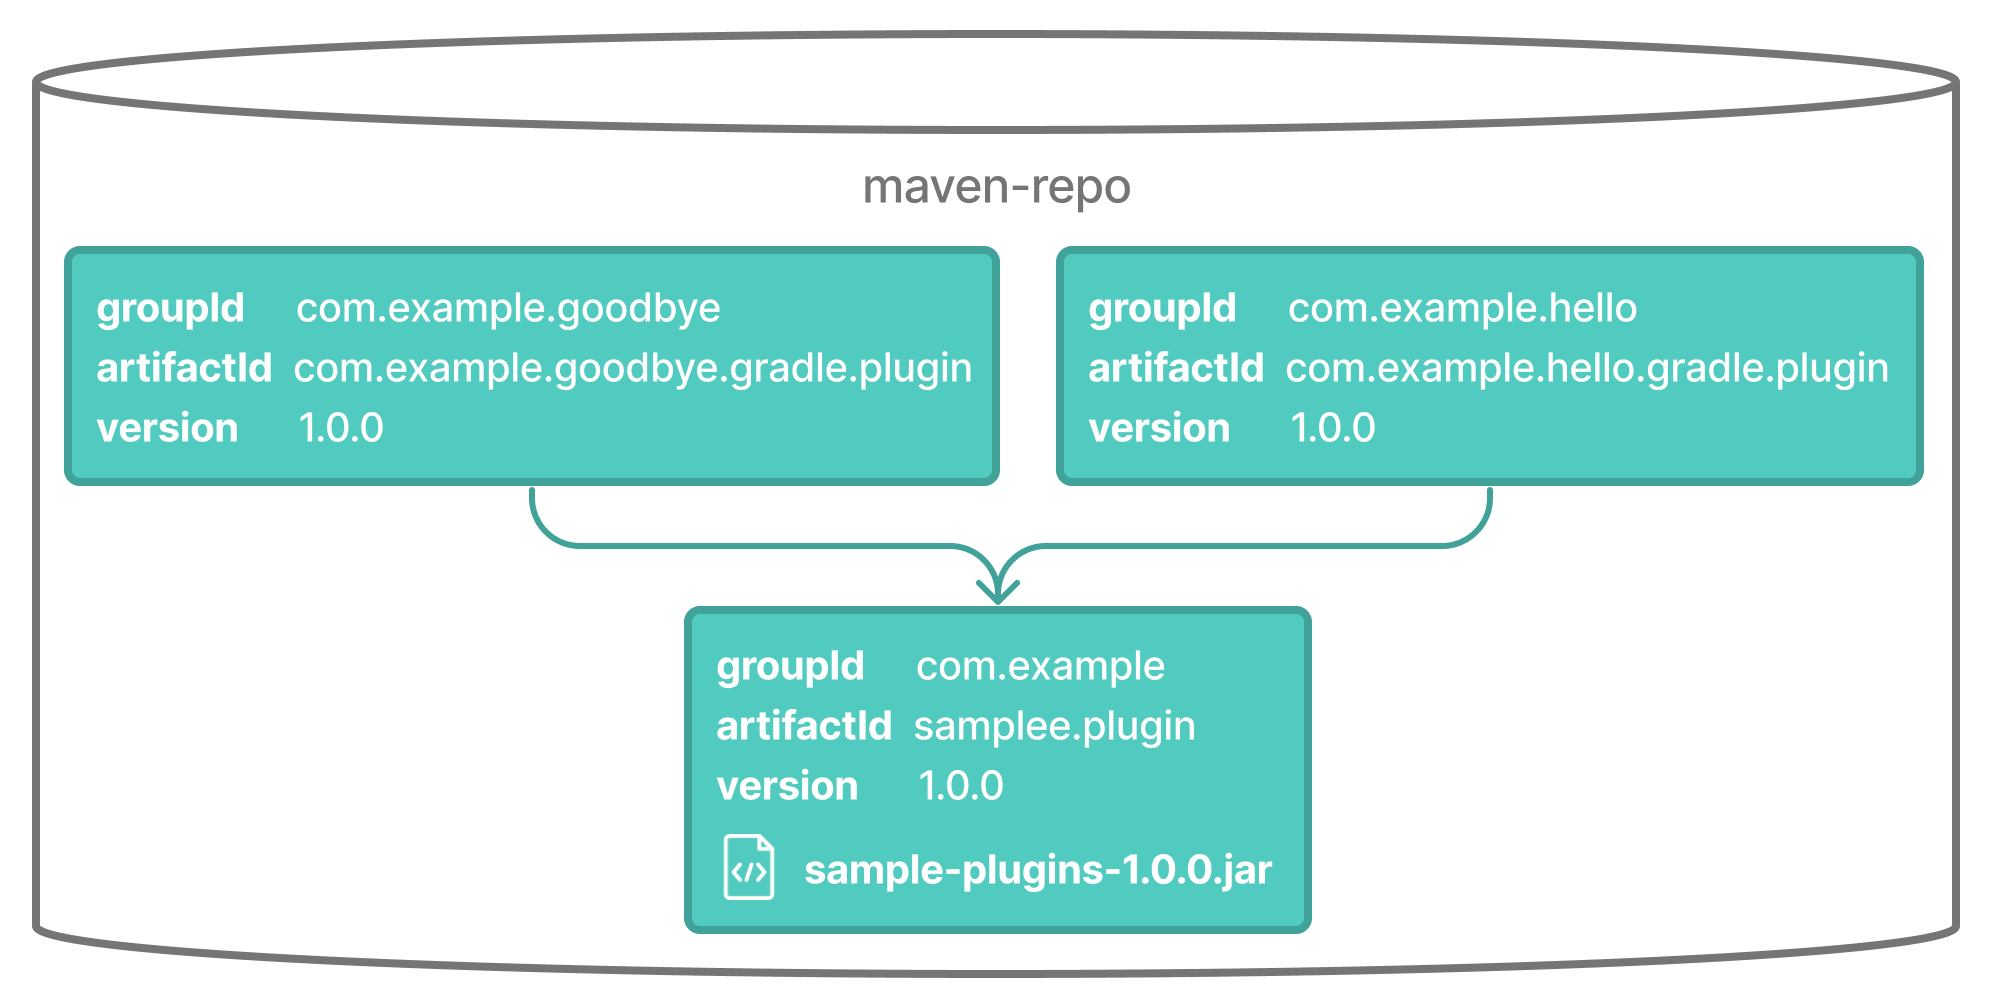
To do so, Gradle will look for a Plugin Marker Artifact with the coordinates plugin.id:plugin.id.gradle.plugin:plugin.version.
This marker needs to have a dependency on the actual plugin implementation.
Publishing these markers is automated by the java-gradle-plugin.
For example, the following complete sample from the sample-plugins project shows how to publish a com.example.hello plugin and a com.example.goodbye plugin to both an Ivy and Maven repository using the combination of the java-gradle-plugin, the maven-publish plugin, and the ivy-publish plugin.
plugins {
    `java-gradle-plugin`
    `maven-publish`
    `ivy-publish`
}

group = "com.example"
version = "1.0.0"

gradlePlugin {
    plugins {
        create("hello") {
            id = "com.example.hello"
            implementationClass = "com.example.hello.HelloPlugin"
        }
        create("goodbye") {
            id = "com.example.goodbye"
            implementationClass = "com.example.goodbye.GoodbyePlugin"
        }
    }
}

publishing {
    repositories {
        maven {
            url = uri(layout.buildDirectory.dir("maven-repo"))
        }
        ivy {
            url = uri(layout.buildDirectory.dir("ivy-repo"))
        }
    }
}plugins {
id 'java-gradle-plugin'
id 'maven-publish'
id 'ivy-publish'
}
group 'com.example'
version '1.0.0'
gradlePlugin {
plugins {
hello {
id = 'com.example.hello'
implementationClass = 'com.example.hello.HelloPlugin'
}
goodbye {
id = 'com.example.goodbye'
implementationClass = 'com.example.goodbye.GoodbyePlugin'
}
}
}
publishing {
repositories {
maven {
url layout.buildDirectory.dir("maven-repo")
}
ivy {
url layout.buildDirectory.dir("ivy-repo")
}
}
}Running gradle publish in the sample directory creates the following Maven repository layout (the Ivy layout is similar):
Legacy Plugin Application
With the introduction of the plugins DSL, users should have little reason to use the legacy method of applying plugins. It is documented here in case a build author cannot use the plugin DSL due to restrictions in how it currently works.
apply(plugin = "java")apply plugin: 'java'Plugins can be applied using a plugin id. In the above case, we are using the short name "java" to apply the JavaPlugin.
Rather than using a plugin id, plugins can also be applied by simply specifying the class of the plugin:
apply<JavaPlugin>()apply plugin: JavaPluginThe JavaPlugin symbol in the above sample refers to the JavaPlugin.
This class does not strictly need to be imported as the org.gradle.api.plugins package is automatically imported in all build scripts (see Default imports).
Furthermore, one needs to append the ::class suffix to identify a class literal in Kotlin instead of .class in Java.
Furthermore, it is unnecessary to append .class to identify a class literal in Groovy as it is in Java.
Using a Version Catalog
When a project uses a version catalog, plugins can be referenced via aliases when applied.
Let’s take a look at a simple Version Catalog:
[versions]
intellij-plugin = "1.6"

[plugins]
jetbrains-intellij = { id = "org.jetbrains.intellij", version.ref = "intellij-plugin" }
Then a plugin can be applied to any build script using the alias method:
plugins {
    alias(libs.plugins.jetbrains.intellij)
}
jetbrains-intellij is available as the Gradle generated safe accessor: jetbrains.intellij.
|
Next Step: Learn how to write Plugins >>