Building native software
- Features
- Supported languages
- Tool chain support
- Tool chain installation
- Native software model
- Parallel Compilation
- Building a library
- Building an executable
- Assembling or building dependents
- Example: Sample build
- Dependent components report
- Example: Dependent components report
- Example: Dependent components report
- Example: Report of components that depends on the operators component
- Example: Report of components that depends on the operators component, including test suites
- Assembling dependents
- Example: Assemble components that depends on the passing/static binary of the operators component
- Building dependents
- Example: Build components that depends on the passing/static binary of the operators component
- Tasks
- Finding out more about your project
- Language support
- Configuring the compiler, assembler and linker
- Windows Resources
- Library Dependencies
- Precompiled Headers
- Native Binary Variants
- Build types
- Example: Defining build types
- Example: Configuring debug binaries
- Platform
- Example: Defining platforms
- Flavor
- Example: Defining flavors
- Selecting the build types, platforms and flavors for a component
- Example: Targeting a component at particular platforms
- Building all possible variants
- Example: Building all possible variants
- Tool chains
- Visual Studio IDE integration
- CUnit support
- GoogleTest support
| The software model is being retired and the plugins mentioned in this chapter will eventually be deprecated and removed. We recommend new projects looking to build C++ applications and libraries use the newer replacement plugins. |
The native software plugins add support for building native software components, such as executables or shared libraries, from code written in C++, C and other languages. While many excellent build tools exist for this space of software development, Gradle offers developers its trademark power and flexibility together with dependency management practices more traditionally found in the JVM development space.
The native software plugins make use of the Gradle software model.
Features
The native software plugins provide:
-
Support for building native libraries and applications on Windows, Linux, macOS and other platforms.
-
Support for several source languages.
-
Support for building different variants of the same software, for different architectures, operating systems, or for any purpose.
-
Incremental parallel compilation, precompiled headers.
-
Dependency management between native software components.
-
Unit test execution.
-
Generate Visual studio solution and project files.
-
Deep integration with various tool chain, including discovery of installed tool chains.
Supported languages
The following source languages are currently supported:
-
C
-
C++
-
Objective-C
-
Objective-C++
-
Assembly
-
Windows resources
Tool chain support
Gradle offers the ability to execute the same build using different tool chains. When you build a native binary, Gradle will attempt to locate a tool chain installed on your machine that can build the binary. You can fine tune exactly how this works, see Tool chain support for details.
The following tool chains are supported:
| Operating System | Tool Chain | Notes |
|---|---|---|
Linux |
||
Linux |
||
macOS |
XCode |
Uses the Clang tool chain bundled with XCode. |
Windows |
Windows XP and later, Visual C++ 2010/2012/2013/2015/2017/2019. |
|
Windows |
Windows XP and later. |
|
Windows |
Windows XP and later. |
The following tool chains are unofficially supported. They generally work fine, but are not tested continuously:
| Operating System | Tool Chain | Notes |
|---|---|---|
macOS |
GCC from Macports |
|
macOS |
Clang from Macports |
|
UNIX-like |
||
UNIX-like |
Tool chain installation
| Note that if you are using GCC then you currently need to install support for C++, even if you are not building from C++ source. This restriction will be removed in a future Gradle version. |
To build native software, you will need to have a compatible tool chain installed:
Windows
To build on Windows, install a compatible version of Visual Studio. The native plugins will discover the Visual Studio installations and select the latest version. There is no need to mess around with environment variables or batch scripts. This works fine from a Cygwin shell or the Windows command-line.
Alternatively, you can install Cygwin with GCC or MinGW. Clang is currently not supported.
macOS
To build on macOS, you should install XCode. The native plugins will discover the XCode installation using the system PATH.
The native plugins also work with GCC and Clang bundled with Macports. To use one of the Macports tool chains, you will need to make the tool chain the default using the port select command and add Macports to the system PATH.
Linux
To build on Linux, install a compatible version of GCC or Clang. The native plugins will discover GCC or Clang using the system PATH.
Native software model
The native software model builds on the base Gradle software model.
To build native software using Gradle, your project should define one or more native components. Each component represents either an executable or a library that Gradle should build. A project can define any number of components. Gradle does not define any components by default.
For each component, Gradle defines a source set for each language that the component can be built from. A source set is essentially just a set of source directories containing source files. For example, when you apply the c plugin and define a library called helloworld, Gradle will define, by default, a source set containing the C source files in the src/helloworld/c directory. It will use these source files to build the helloworld library. This is described in more detail below.
For each component, Gradle defines one or more binaries as output. To build a binary, Gradle will take the source files defined for the component, compile them as appropriate for the source language, and link the result into a binary file. For an executable component, Gradle can produce executable binary files. For a library component, Gradle can produce both static and shared library binary files. For example, when you define a library called helloworld and build on Linux, Gradle will, by default, produce libhelloworld.so and libhelloworld.a binaries.
In many cases, more than one binary can be produced for a component. These binaries may vary based on the tool chain used to build, the compiler/linker flags supplied, the dependencies provided, or additional source files provided. Each native binary produced for a component is referred to as a variant. Binary variants are discussed in detail below.
Parallel Compilation
Gradle uses the single build worker pool to concurrently compile and link native components, by default. No special configuration is required to enable concurrent building.
By default, the worker pool size is determined by the number of available processors on the build machine (as reported to the build JVM). To explicitly set the number of workers use the --max-workers command-line option or org.gradle.workers.max system property. There is generally no need to change this setting from its default.
The build worker pool is shared across all build tasks. This means that when using parallel project execution, the maximum number of concurrent individual compilation operations does not increase. For example, if the build machine has 4 processing cores and 10 projects are compiling in parallel, Gradle will only use 4 total workers, not 40.
Building a library
To build either a static or shared native library, you define a library component in the components container. The following sample defines a library called hello:
Example: Defining a library component
model {
    components {
        hello(NativeLibrarySpec)
    }
}
A library component is represented using NativeLibrarySpec. Each library component can produce at least one shared library binary (SharedLibraryBinarySpec) and at least one static library binary (StaticLibraryBinarySpec).
Building an executable
To build a native executable, you define an executable component in the components container. The following sample defines an executable called main:
Example: Defining executable components
model {
    components {
        main(NativeExecutableSpec) {
            sources {
               c.lib library: "hello"
            }
        }
    }
}
An executable component is represented using NativeExecutableSpec. Each executable component can produce at least one executable binary (NativeExecutableBinarySpec).
For each component defined, Gradle adds a FunctionalSourceSet with the same name. Each of these functional source sets will contain a language-specific source set for each of the languages supported by the project.
Assembling or building dependents
Sometimes, you may need to assemble (compile and link) or build (compile, link and test) a component or binary and its dependents (things that depend upon the component or binary). The native software model provides tasks that enable this capability. First, the dependent components report gives insight about the relationships between each component. Second, the build and assemble dependents tasks allow you to assemble or build a component and its dependents in one step.
In the following example, the build file defines OpenSSL as a dependency of libUtil and libUtil as a dependency of LinuxApp and WindowsApp. Test suites are treated similarly. Dependents can be thought of as reverse dependencies.
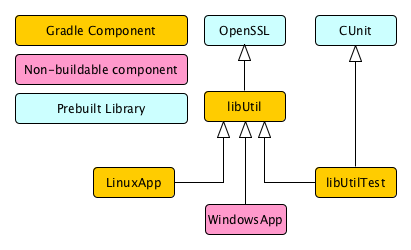
By following the dependencies backwards, you can see LinuxApp and WindowsApp are dependents of libUtil.
When libUtil is changed, Gradle will need to recompile or relink LinuxApp and WindowsApp.
|
When you assemble dependents of a component, the component and all of its dependents are compiled and linked, including any test suite binaries. Gradle’s up-to-date checks are used to only compile or link if something has changed. For instance, if you have changed source files in a way that do not affect the headers of your project, Gradle will be able to skip compilation for dependent components and only need to re-link with the new library. Tests are not run when assembling a component.
When you build dependents of a component, the component and all of its dependent binaries are compiled, linked and checked. Checking components means running any check task including executing any test suites, so tests are run when building a component.
In the following sections, we will demonstrate the usage of the assembleDependents*, buildDependents* and dependentComponents tasks with a sample build that contains a CUnit test suite. The build script for the sample is the following:
Example: Sample build
plugins {
    id 'c'
    id 'cunit-test-suite'
}

model {
    flavors {
        passing
        failing
    }
    platforms {
        x86 {
            if (operatingSystem.macOsX) {
                architecture "x64"
            } else {
                architecture "x86"
            }
        }
    }
    components {
        operators(NativeLibrarySpec) {
            targetPlatform "x86"
        }
    }
    testSuites {
        operatorsTest(CUnitTestSuiteSpec) {
            testing $.components.operators
        }
    }
}
Dependent components report
Gradle provides a report that you can run from the command-line that shows a graph of components in your project and components that depend upon them. The following is an example of running gradle dependentComponents on the sample project:
Example: Dependent components report
$ ./gradlew dependentComponents> Task :dependentComponents
------------------------------------------------------------
Root project 'cunit'
------------------------------------------------------------
operators - Components that depend on native library 'operators'
+--- operators:failingSharedLibrary
+--- operators:failingStaticLibrary
+--- operators:passingSharedLibrary
\--- operators:passingStaticLibrary
Some test suites were not shown, use --test-suites or --all to show them.
BUILD SUCCESSFUL in 0s
1 actionable task: 1 executed| See DependentComponentsReport API documentation for more details. |
By default, non-buildable binaries and test suites are hidden from the report. The dependentComponents task provides options that allow you to see all dependents by using the --all option:
Example: Dependent components report
$ ./gradlew dependentComponents --all> Task :dependentComponents
------------------------------------------------------------
Root project 'cunit'
------------------------------------------------------------
operators - Components that depend on native library 'operators'
+--- operators:failingSharedLibrary
+--- operators:failingStaticLibrary
| \--- operatorsTest:failingCUnitExe (t)
+--- operators:passingSharedLibrary
\--- operators:passingStaticLibrary
\--- operatorsTest:passingCUnitExe (t)
operatorsTest - Components that depend on Cunit test suite 'operatorsTest'
+--- operatorsTest:failingCUnitExe (t)
\--- operatorsTest:passingCUnitExe (t)
(t) - Test suite binary
BUILD SUCCESSFUL in 0s
1 actionable task: 1 executedHere is the corresponding report for the operators component, showing dependents of all its binaries:
Example: Report of components that depends on the operators component
$ ./gradlew dependentComponents --component operators> Task :dependentComponents
------------------------------------------------------------
Root project 'cunit'
------------------------------------------------------------
operators - Components that depend on native library 'operators'
+--- operators:failingSharedLibrary
+--- operators:failingStaticLibrary
+--- operators:passingSharedLibrary
\--- operators:passingStaticLibrary
Some test suites were not shown, use --test-suites or --all to show them.
BUILD SUCCESSFUL in 0s
1 actionable task: 1 executedHere is the corresponding report for the operators component, showing dependents of all its binaries, including test suites:
Example: Report of components that depends on the operators component, including test suites
$ ./gradlew dependentComponents --test-suites --component operators> Task :dependentComponents
------------------------------------------------------------
Root project 'cunit'
------------------------------------------------------------
operators - Components that depend on native library 'operators'
+--- operators:failingSharedLibrary
+--- operators:failingStaticLibrary
| \--- operatorsTest:failingCUnitExe (t)
+--- operators:passingSharedLibrary
\--- operators:passingStaticLibrary
\--- operatorsTest:passingCUnitExe (t)
(t) - Test suite binary
BUILD SUCCESSFUL in 0s
1 actionable task: 1 executedFurthermore, the --non-binaries option shows non-buildable binaries in the report, --no-non-buildable hides them.
Similarly, the --test-suites option shows test suites and --no-test-suites hides them.
The option --no-all hides both non-buildable binaries and test suites from the report.
Assembling dependents
For each NativeBinarySpec, Gradle will create a task named assembleDependents${component.name}${binary.variant} that assembles (compile and link) the binary and all of its dependent binaries.
For each NativeComponentSpec, Gradle will create a task named assembleDependents${component.name} that assembles all the binaries of the component and all of their dependent binaries.
For example, to assemble the dependents of the "passing" flavor of the "static" library binary of the "operators" component, you would run the assembleDependentsOperatorsPassingStaticLibrary task:
Example: Assemble components that depends on the passing/static binary of the operators component
$ ./gradlew assembleDependentsOperatorsPassingStaticLibrary --max-workers=1> Task :compileOperatorsTestPassingCUnitExeOperatorsC
> Task :operatorsTestCUnitLauncher
> Task :compileOperatorsTestPassingCUnitExeOperatorsTestC
> Task :compileOperatorsTestPassingCUnitExeOperatorsTestCunitLauncher
> Task :linkOperatorsTestPassingCUnitExe
> Task :operatorsTestPassingCUnitExe
> Task :assembleDependentsOperatorsTestPassingCUnitExe
> Task :compileOperatorsPassingStaticLibraryOperatorsC
> Task :createOperatorsPassingStaticLibrary
> Task :operatorsPassingStaticLibrary
> Task :assembleDependentsOperatorsPassingStaticLibrary
BUILD SUCCESSFUL in 0s
7 actionable tasks: 7 executedIn the output above, the targeted binary gets assembled as well as the test suite binary that depends on it.
You can also assemble all of the dependents of a component (i.e. of all its binaries/variants) using the corresponding component task, e.g. assembleDependentsOperators. This is useful if you have many combinations of build types, flavors and platforms and want to assemble all of them.
Building dependents
For each NativeBinarySpec, Gradle will create a task named buildDependents${component.name}${binary.variant} that builds (compile, link and check) the binary and all of its dependent binaries.
For each NativeComponentSpec, Gradle will create a task named buildDependents${component.name} that builds all the binaries of the component and all of their dependent binaries.
For example, to build the dependents of the "passing" flavor of the "static" library binary of the "operators" component, you would run the buildDependentsOperatorsPassingStaticLibrary task:
Example: Build components that depends on the passing/static binary of the operators component
$ ./gradlew buildDependentsOperatorsPassingStaticLibrary --max-workers=1> Task :compileOperatorsTestPassingCUnitExeOperatorsC
> Task :operatorsTestCUnitLauncher
> Task :compileOperatorsTestPassingCUnitExeOperatorsTestC
> Task :compileOperatorsTestPassingCUnitExeOperatorsTestCunitLauncher
> Task :linkOperatorsTestPassingCUnitExe
> Task :operatorsTestPassingCUnitExe
> Task :installOperatorsTestPassingCUnitExe
> Task :runOperatorsTestPassingCUnitExe
> Task :checkOperatorsTestPassingCUnitExe
> Task :buildDependentsOperatorsTestPassingCUnitExe
> Task :compileOperatorsPassingStaticLibraryOperatorsC
> Task :createOperatorsPassingStaticLibrary
> Task :operatorsPassingStaticLibrary
> Task :buildDependentsOperatorsPassingStaticLibrary
BUILD SUCCESSFUL in 0s
9 actionable tasks: 9 executedIn the output above, the targeted binary as well as the test suite binary that depends on it are built and the test suite has run.
You can also build all of the dependents of a component (i.e. of all its binaries/variants) using the corresponding component task, e.g. buildDependentsOperators.
Tasks
For each NativeBinarySpec that can be produced by a build, a single lifecycle task is constructed that can be used to create that binary, together with a set of other tasks that do the actual work of compiling, linking or assembling the binary.
${component.name}Executable-
- Component Type
- Native Binary Type
- Location of created binary
-
${project.layout.buildDirectory}/exe/${component.name}/${component.name}
${component.name}SharedLibrary-
- Component Type
- Native Binary Type
- Location of created binary
-
${project.layout.buildDirectory}/libs/${component.name}/shared/lib${component.name}.so
${component.name}StaticLibrary-
- Component Type
- Native Binary Type
- Location of created binary
-
${project.layout.buildDirectory}/libs/${component.name}/static/${component.name}.a
Check tasks
For each NativeBinarySpec that can be produced by a build, a single check task is constructed that can be used to assemble and check that binary.
check${component.name}Executable-
- Component Type
- Native Binary Type
check${component.name}SharedLibrary-
- Component Type
- Native Binary Type
check${component.name}StaticLibrary-
- Component Type
- Native Binary Type
The built-in check task depends on all the check tasks for binaries in the project. Without either CUnit or GoogleTest plugins, the binary check task only depends on the lifecycle task that assembles the binary, see Native tasks.
When the CUnit or GoogleTest plugins are applied, the task that executes the test suites for a component are automatically wired to the appropriate check task.
You can also add custom check tasks as follows:
Example: Adding a custom check task
plugins {
    id "cpp"
}
// You don't need to apply the plugin below if you're already using CUnit or GoogleTest support
apply plugin: TestingModelBasePlugin

tasks.register('myCustomCheck') {
    doLast {
        println 'Executing my custom check'
    }
}

model {
    components {
        hello(NativeLibrarySpec) {
            binaries.all {
                // Register our custom check task to all binaries of this component
                checkedBy $.tasks.myCustomCheck
            }
        }
    }
}
Now, running check or any of the check tasks for the hello binaries will run the custom check task:
Example: Running checks for a given binary
$ ./gradlew checkHelloSharedLibrary> Task :myCustomCheck
Executing my custom check
> Task :checkHelloSharedLibrary
BUILD SUCCESSFUL in 0s
1 actionable task: 1 executedWorking with shared libraries
For each executable binary produced, the cpp plugin provides an install${binary.name} task, which creates a development install of the executable, along with the shared libraries it requires. This allows you to run the executable without needing to install the shared libraries in their final locations.
Finding out more about your project
Gradle provides a report that you can run from the command-line that shows some details about the components and binaries that your project produces. To use this report, just run gradle components. Below is an example of running this report for one of the sample projects:
Example: The components report
$ ./gradlew components> Task :components
------------------------------------------------------------
Root project 'cpp'
------------------------------------------------------------
Native library 'hello'
----------------------
Source sets
C++ source 'hello:cpp'
srcDir: src/hello/cpp
Binaries
Shared library 'hello:sharedLibrary'
build using task: :helloSharedLibrary
build type: build type 'debug'
flavor: flavor 'default'
target platform: platform 'current'
tool chain: Tool chain 'clang' (Clang)
shared library file: build/libs/hello/shared/libhello.dylib
Static library 'hello:staticLibrary'
build using task: :helloStaticLibrary
build type: build type 'debug'
flavor: flavor 'default'
target platform: platform 'current'
tool chain: Tool chain 'clang' (Clang)
static library file: build/libs/hello/static/libhello.a
Native executable 'main'
------------------------
Source sets
C++ source 'main:cpp'
srcDir: src/main/cpp
Binaries
Executable 'main:executable'
build using task: :mainExecutable
install using task: :installMainExecutable
build type: build type 'debug'
flavor: flavor 'default'
target platform: platform 'current'
tool chain: Tool chain 'clang' (Clang)
executable file: build/exe/main/main
Note: currently not all plugins register their components, so some components may not be visible here.
BUILD SUCCESSFUL in 0s
1 actionable task: 1 executedLanguage support
Presently, Gradle supports building native software from any combination of source languages listed below. A native binary project will contain one or more named FunctionalSourceSet instances (e.g. 'main', 'test', etc), each of which can contain LanguageSourceSets containing source files, one for each language.
-
C
-
C++
-
Objective-C
-
Objective-C++
-
Assembly
-
Windows resources
C++ sources
C++ language support is provided by means of the 'cpp' plugin.
Example: The 'cpp' plugin
plugins {
    id 'cpp'
}
C++ sources to be included in a native binary are provided via a CppSourceSet, which defines a set of C++ source files and optionally a set of exported header files (for a library). By default, for any named component the CppSourceSet contains .cpp source files in src/${name}/cpp, and header files in src/${name}/headers.
While the cpp plugin defines these default locations for each CppSourceSet, it is possible to extend or override these defaults to allow for a different project layout.
Example: C++ source set
sources {
    cpp {
        source {
            srcDir "src/source"
            include "**/*.cpp"
        }
    }
}
For a library named 'main', header files in src/main/headers are considered the "public" or "exported" headers. Header files that should not be exported should be placed inside the src/main/cpp directory (though be aware that such header files should always be referenced in a manner relative to the file including them).
C sources
C language support is provided by means of the 'c' plugin.
Example: The 'c' plugin
plugins {
    id 'c'
}
C sources to be included in a native binary are provided via a CSourceSet, which defines a set of C source files and optionally a set of exported header files (for a library). By default, for any named component the CSourceSet contains .c source files in src/${name}/c, and header files in src/${name}/headers.
While the c plugin defines these default locations for each CSourceSet, it is possible to extend or override these defaults to allow for a different project layout.
Example: C source set
sources {
    c {
        source {
            srcDir "src/source"
            include "**/*.c"
        }
        exportedHeaders {
            srcDir "src/include"
        }
    }
}
For a library named 'main', header files in src/main/headers are considered the "public" or "exported" headers. Header files that should not be exported should be placed inside the src/main/c directory (though be aware that such header files should always be referenced in a manner relative to the file including them).
Assembler sources
Assembly language support is provided by means of the 'assembler' plugin.
Example: The 'assembler' plugin
plugins {
    id 'assembler'
}
Assembler sources to be included in a native binary are provided via a AssemblerSourceSet, which defines a set of Assembler source files. By default, for any named component the AssemblerSourceSet contains .s source files under src/${name}/asm.
Objective-C sources
Objective-C language support is provided by means of the 'objective-c' plugin.
Example: The 'objective-c' plugin
plugins {
    id 'objective-c'
}
Objective-C sources to be included in a native binary are provided via a ObjectiveCSourceSet, which defines a set of Objective-C source files. By default, for any named component the ObjectiveCSourceSet contains .m source files under src/${name}/objectiveC.
Objective-C++ sources
Objective-C++ language support is provided by means of the 'objective-cpp' plugin.
Example: The 'objective-cpp' plugin
plugins {
    id 'objective-cpp'
}
Objective-C++ sources to be included in a native binary are provided via a ObjectiveCppSourceSet, which defines a set of Objective-C++ source files. By default, for any named component the ObjectiveCppSourceSet contains .mm source files under src/${name}/objectiveCpp.
Configuring the compiler, assembler and linker
Each binary to be produced is associated with a set of compiler and linker settings, which include command-line arguments as well as macro definitions. These settings can be applied to all binaries, an individual binary, or selectively to a group of binaries based on some criteria.
Example: Settings that apply to all binaries
model {
    binaries {
        all {
            // Define a preprocessor macro for every binary
            cppCompiler.define "NDEBUG"

            // Define toolchain-specific compiler and linker options
            if (toolChain in Gcc) {
                cppCompiler.args "-O2", "-fno-access-control"
                linker.args "-Xlinker", "-S"
            }
            if (toolChain in VisualCpp) {
                cppCompiler.args "/Zi"
                linker.args "/DEBUG"
            }
        }
    }
}
Each binary is associated with a particular NativeToolChain, allowing settings to be targeted based on this value.
It is easy to apply settings to all binaries of a particular type:
Example: Settings that apply to all shared libraries
// For any shared library binaries built with Visual C++,
// define the DLL_EXPORT macro
model {
    binaries {
        withType(SharedLibraryBinarySpec) {
            if (toolChain in VisualCpp) {
                cCompiler.args "/Zi"
                cCompiler.define "DLL_EXPORT"
            }
        }
    }
}
Furthermore, it is possible to specify settings that apply to all binaries produced for a particular executable or library component:
Example: Settings that apply to all binaries produced for the 'main' executable component
model {
    components {
        main(NativeExecutableSpec) {
            targetPlatform "x86"
            binaries.all {
                if (toolChain in VisualCpp) {
                    sources {
                        platformAsm(AssemblerSourceSet) {
                            source.srcDir "src/main/asm_i386_masm"
                        }
                    }
                    assembler.args "/Zi"
                } else {
                    sources {
                        platformAsm(AssemblerSourceSet) {
                            source.srcDir "src/main/asm_i386_gcc"
                        }
                    }
                    assembler.args "-g"
                }
            }
        }
    }
}
The example above will apply the supplied configuration to all executable binaries built.
Similarly, settings can be specified to target binaries for a component that are of a particular type: e.g. all shared libraries for the main library component.
Example: Settings that apply only to shared libraries produced for the 'main' library component
model {
    components {
        main(NativeLibrarySpec) {
            binaries.withType(SharedLibraryBinarySpec) {
                // Define a preprocessor macro that only applies to shared libraries
                cppCompiler.define "DLL_EXPORT"
            }
        }
    }
}
Windows Resources
When using the VisualCpp tool chain, Gradle is able to compile Window Resource (rc) files and link them into a native binary. This functionality is provided by the 'windows-resources' plugin.
Example: The 'windows-resources' plugin
plugins {
    id 'windows-resources'
}
Windows resources to be included in a native binary are provided via a WindowsResourceSet, which defines a set of Windows Resource source files. By default, for any named component the WindowsResourceSet contains .rc source files under src/${name}/rc.
As with other source types, you can configure the location of the windows resources that should be included in the binary.
Example: Configuring the location of Windows resource sources
sources {
    rc {
        source {
            srcDirs "src/hello/rc"
        }
        exportedHeaders {
            srcDirs "src/hello/headers"
        }
    }
}
You are able to construct a resource-only library by providing Windows Resource sources with no other language sources, and configure the linker as appropriate:
Example: Building a resource-only dll
model {
    components {
        helloRes(NativeLibrarySpec) {
            binaries.all {
                rcCompiler.args "/v"
                linker.args "/noentry", "/machine:x86"
            }
            sources {
                rc {
                    source {
                        srcDirs "src/hello/rc"
                    }
                    exportedHeaders {
                        srcDirs "src/hello/headers"
                    }
                }
            }
        }
    }
}
The example above also demonstrates the mechanism of passing extra command-line arguments to the resource compiler. The rcCompiler extension is of type PreprocessingTool.
Library Dependencies
Dependencies for native components are binary libraries that export header files. The header files are used during compilation, with the compiled binary dependency being used during linking and execution. Header files should be organized into subdirectories to prevent clashes of commonly named headers. For instance, if your mylib project has a logging.h header, it will make it less likely the wrong header is used if you include it as "mylib/logging.h" instead of "logging.h".
Dependencies within the same project
A set of sources may depend on header files provided by another binary component within the same project. A common example is a native executable component that uses functions provided by a separate native library component.
Such a library dependency can be added to a source set associated with the executable component:
Example: Providing a library dependency to the source set
sources {
    cpp {
        lib library: "hello"
    }
}
Alternatively, a library dependency can be provided directly to the NativeExecutableBinarySpec for the executable.
Example: Providing a library dependency to the binary
model {
    components {
        hello(NativeLibrarySpec) {
            sources {
                c {
                    source {
                        srcDir "src/source"
                        include "**/*.c"
                    }
                    exportedHeaders {
                        srcDir "src/include"
                    }
                }
            }
        }
        main(NativeExecutableSpec) {
            sources {
                cpp {
                    source {
                        srcDir "src/source"
                        include "**/*.cpp"
                    }
                }
            }
            binaries.all {
                // Each executable binary produced uses the 'hello' static library binary
                lib library: 'hello', linkage: 'static'
            }
        }
    }
}
Project Dependencies
For a component produced in a different Gradle project, the notation is similar.
Example: Declaring project dependencies
plugins {
    id 'cpp'
}

model {
    components {
        main(NativeLibrarySpec)
    }

    // For any shared library binaries built with Visual C++,
    // define the DLL_EXPORT macro
    binaries {
        withType(SharedLibraryBinarySpec) {
            if (toolChain in VisualCpp) {
                cppCompiler.define "DLL_EXPORT"
            }
        }
    }
}plugins {
id 'cpp'
}
model {
components {
main(NativeExecutableSpec) {
sources {
cpp {
lib project: ':lib', library: 'main'
}
}
}
}
}Precompiled Headers
Precompiled headers are a performance optimization that reduces the cost of compiling widely used headers multiple times. This feature precompiles a header such that the compiled object file can be reused when compiling each source file rather than recompiling the header each time. This support is available for C, C++, Objective-C, and Objective-C++ builds.
To configure a precompiled header, first a header file needs to be defined that includes all of the headers that should be precompiled. It must be specified as the first included header in every source file where the precompiled header should be used. It is assumed that this header file, and any headers it contains, make use of header guards so that they can be included in an idempotent manner. If header guards are not used in a header file, it is possible the header could be compiled more than once and could potentially lead to a broken build.
Example: Creating a precompiled header file
#ifndef PCH_H
#define PCH_H
#include <iostream>
#include "hello.h"
#endif
Example: Including a precompiled header file in a source file
#include "pch.h"

void LIB_FUNC Greeter::hello () {
    std::cout << "Hello world!" << std::endl;
}
Precompiled headers are specified on a source set. Only one precompiled header file can be specified on a given source set and will be applied to all source files that declare it as the first include. If a source files does not include this header file as the first header, the file will be compiled in the normal manner (without making use of the precompiled header object file). The string provided should be the same as that which is used in the "#include" directive in the source files.
Example: Configuring a precompiled header
model {
    components {
        hello(NativeLibrarySpec) {
            sources {
                cpp {
                    preCompiledHeader "pch.h"
                }
            }
        }
    }
}
A precompiled header must be included in the same way for all files that use it. Usually, this means the header file should exist in the source set "headers" directory or in a directory included on the compiler include path.
Native Binary Variants
For each executable or library defined, Gradle is able to build a number of different native binary variants. Examples of different variants include debug vs release binaries, 32-bit vs 64-bit binaries, and binaries produced with different custom preprocessor flags.
Binaries produced by Gradle can be differentiated on build type, platform, and flavor. For each of these 'variant dimensions', it is possible to specify a set of available values as well as target each component at one, some or all of these. For example, a plugin may define a range of support platforms, but you may choose to only target Windows-x86 for a particular component.
Build types
A build type determines various non-functional aspects of a binary, such as whether debug information is included, or what optimisation level the binary is compiled with. Typical build types are 'debug' and 'release', but a project is free to define any set of build types.
Example: Defining build types
model {
    buildTypes {
        debug
        release
    }
}
If no build types are defined in a project, then a single, default build type called 'debug' is added.
For a build type, a Gradle project will typically define a set of compiler/linker flags per tool chain.
Example: Configuring debug binaries
model {
    binaries {
        all {
            if (toolChain in Gcc && buildType == buildTypes.debug) {
                cppCompiler.args "-g"
            }
            if (toolChain in VisualCpp && buildType == buildTypes.debug) {
                cppCompiler.args '/Zi'
                cppCompiler.define 'DEBUG'
                linker.args '/DEBUG'
            }
        }
    }
}| At this stage, it is completely up to the build script to configure the relevant compiler/linker flags for each build type. Future versions of Gradle will automatically include the appropriate debug flags for any 'debug' build type, and may be aware of various levels of optimisation as well. |
Platform
An executable or library can be built to run on different operating systems and cpu architectures, with a variant being produced for each platform. Gradle defines each OS/architecture combination as a NativePlatform, and a project may define any number of platforms. If no platforms are defined in a project, then a single, default platform 'current' is added.
|
Presently, a |
Example: Defining platforms
model {
    platforms {
        x86 {
            architecture "x86"
        }
        x64 {
            architecture "x86_64"
        }
        itanium {
            architecture "ia-64"
        }
    }
}
For a given variant, Gradle will attempt to find a NativeToolChain that is able to build for the target platform. Available tool chains are searched in the order defined. See the tool chains section below for more details.
Flavor
Each component can have a set of named flavors, and a separate binary variant can be produced for each flavor. While the build type and target platform variant dimensions have a defined meaning in Gradle, each project is free to define any number of flavors and apply meaning to them in any way.
An example of component flavors might differentiate between 'demo', 'paid' and 'enterprise' editions of the component, where the same set of sources is used to produce binaries with different functions.
Example: Defining flavors
model {
    flavors {
        english
        french
    }
    components {
        hello(NativeLibrarySpec) {
            binaries.all {
                if (flavor == flavors.french) {
                    cppCompiler.define "FRENCH"
                }
            }
        }
    }
}
In the example above, a library is defined with a 'english' and 'french' flavor. When compiling the 'french' variant, a separate macro is defined which leads to a different binary being produced.
If no flavor is defined for a component, then a single default flavor named 'default' is used.
Selecting the build types, platforms and flavors for a component
For a default component, Gradle will attempt to create a native binary variant for each and every combination of buildType and flavor defined for the project. It is possible to override this on a per-component basis, by specifying the set of targetBuildTypes and/or targetFlavors. By default, Gradle will build for the default platform, see above, unless specified explicitly on a per-component basis by specifying a set of targetPlatforms.
Example: Targeting a component at particular platforms
model {
    components {
        hello(NativeLibrarySpec) {
            targetPlatform "x86"
            targetPlatform "x64"
        }
        main(NativeExecutableSpec) {
            targetPlatform "x86"
            targetPlatform "x64"
            sources {
                cpp.lib library: 'hello', linkage: 'static'
            }
        }
    }
}
Here you can see that the TargetedNativeComponent.targetPlatform(java.lang.String) method is used to specify a platform that the NativeExecutableSpec named main should be built for.
A similar mechanism exists for selecting TargetedNativeComponent.targetBuildTypes(java.lang.String…) and TargetedNativeComponent.targetFlavors(java.lang.String…).
Building all possible variants
When a set of build types, target platforms, and flavors is defined for a component, a NativeBinarySpec model element is created for every possible combination of these. However, in many cases it is not possible to build a particular variant, perhaps because no tool chain is available to build for a particular platform.
If a binary variant cannot be built for any reason, then the NativeBinarySpec associated with that variant will not be buildable. It is possible to use this property to create a task to generate all possible variants on a particular machine.
Example: Building all possible variants
model {
    tasks {
        buildAllExecutables(Task) {
            dependsOn $.binaries.findAll { it.buildable }
        }
    }
}
Tool chains
A single build may utilize different tool chains to build variants for different platforms. To this end, the core 'native-binary' plugins will attempt to locate and make available supported tool chains. However, the set of tool chains for a project may also be explicitly defined, allowing additional cross-compilers to be configured as well as allowing the install directories to be specified.
Example: Defining tool chains
toolChains {
    visualCpp(VisualCpp) {
        // Specify the installDir if Visual Studio cannot be located
        // installDir "C:/Apps/Microsoft Visual Studio 10.0"
    }
    gcc(Gcc) {
        // Uncomment to use a GCC install that is not in the PATH
        // path "/usr/bin/gcc"
    }
    clang(Clang)
}
Each tool chain implementation allows for a certain degree of configuration (see the API documentation for more details).
Using tool chains
It is not necessary or possible to specify the tool chain that should be used to build. For a given variant, Gradle will attempt to locate a NativeToolChain that is able to build for the target platform. Available tool chains are searched in the order defined.
When a platform does not define an architecture or operating system, the default target of the tool chain is assumed.
So if a platform does not define a value for operatingSystem, Gradle will find the first available tool chain that can build for the specified architecture.
|
The core Gradle tool chains are able to target the following architectures out of the box. In each case, the tool chain will target the current operating system. See the next section for information on cross-compiling for other operating systems.
| Tool Chain | Architectures |
|---|---|
GCC |
x86, x86_64, arm64 (macOS & linux Only) |
Clang |
x86, x86_64, arm64 (macOS & linux only) |
Visual C++ |
x86, x86_64, ia-64 |
So for GCC running on linux, the supported target platforms are 'linux/x86' and 'linux/x86_64'. For GCC running on Windows via Cygwin, platforms 'windows/x86' and 'windows/x86_64' are supported. (The Cygwin POSIX runtime is not yet modelled as part of the platform, but will be in the future.)
If no target platforms are defined for a project, then all binaries are built to target a default platform named 'current'. This default platform does not specify any architecture or operatingSystem value, hence using the default values of the first available tool chain.
Gradle provides a hook that allows the build author to control the exact set of arguments passed to a tool chain executable. This enables the build author to work around any limitations in Gradle, or assumptions that Gradle makes. The arguments hook should be seen as a 'last-resort' mechanism, with preference given to truly modelling the underlying domain.
Example: Reconfigure tool arguments
toolChains {
    visualCpp(VisualCpp) {
        eachPlatform {
            cppCompiler.withArguments { args ->
                args << "-DFRENCH"
            }
        }
    }
    clang(Clang) {
        eachPlatform {
            cCompiler.withArguments { args ->
                Collections.replaceAll(args, "CUSTOM", "-DFRENCH")
            }
            linker.withArguments { args ->
                args.remove "CUSTOM"
            }
            staticLibArchiver.withArguments { args ->
                args.remove "CUSTOM"
            }
        }
    }
}Example: Defining target platforms
toolChains {
    gcc(Gcc) {
        target("arm"){
            cppCompiler.withArguments { args ->
                args << "-m32"
            }
            linker.withArguments { args ->
                args << "-m32"
            }
        }
        target("sparc")
    }
}
model {
    platforms {
        arm {
            architecture "arm"
        }
        sparc {
            architecture "sparc"
        }
    }
    components {
        main(NativeExecutableSpec) {
            targetPlatform "arm"
            targetPlatform "sparc"
        }
    }
}
Visual Studio IDE integration
Gradle has the ability to generate Visual Studio project and solution files for the native components defined in your build. This ability is added by the visual-studio plugin. For a multi-project build, all projects with native components (and the root project) should have this plugin applied.
When the visual-studio plugin is applied to the root project, a task named visualStudio is created, which will generate a Visual Studio solution file containing all components in the build. This solution will include a Visual Studio project for each component, as well as configuring each component to build using Gradle.
A task named openVisualStudio is also created by the visual-studio plugin when the project is the root project. This task generates the Visual Studio solution and then opens the solution in Visual Studio. This means you can simply run gradlew openVisualStudio from the root project to generate and open the Visual Studio solution in one convenient step.
The content of the generated visual studio files can be modified via API hooks, provided by the visualStudio extension. Take a look at the 'visual-studio' sample, or see VisualStudioExtension.getProjects() and VisualStudioRootExtension.getSolution() in the API documentation for more details.
CUnit support
The Gradle cunit plugin provides support for compiling and executing CUnit tests in your native-binary project. For each NativeExecutableSpec and NativeLibrarySpec defined in your project, Gradle will create a matching CUnitTestSuiteSpec component, named ${component.name}Test.
CUnit sources
Gradle will create a CSourceSet named 'cunit' for each CUnitTestSuiteSpec component in the project. This source set should contain the cunit test files for the component under test. Source files can be located in the conventional location (src/${component.name}Test/cunit) or can be configured like any other source set.
Gradle initialises the CUnit test registry and executes the tests, utilising some generated CUnit launcher sources. Gradle will expect and call a function with the signature void gradle_cunit_register() that you can use to configure the actual CUnit suites and tests to execute.
Example: Registering CUnit tests
#include <CUnit/Basic.h>
#include "gradle_cunit_register.h"
#include "test_operators.h"

int suite_init(void) {
    return 0;
}

int suite_clean(void) {
    return 0;
}

void gradle_cunit_register() {
    CU_pSuite pSuiteMath = CU_add_suite("operator tests", suite_init, suite_clean);
    CU_add_test(pSuiteMath, "test_plus", test_plus);
    CU_add_test(pSuiteMath, "test_minus", test_minus);
}
Due to this mechanism, your CUnit sources may not contain a main method since this will clash with the method provided by Gradle.
|
Building CUnit executables
A CUnitTestSuiteSpec component has an associated NativeExecutableSpec or NativeLibrarySpec component. For each NativeBinarySpec configured for the main component, a matching CUnitTestSuiteBinarySpec will be configured on the test suite component. These test suite binaries can be configured in a similar way to any other binary instance:
Example: Configuring CUnit tests
model {
    binaries {
        withType(CUnitTestSuiteBinarySpec) {
            lib library: "cunit", linkage: "static"

            if (flavor == flavors.failing) {
                cCompiler.define "PLUS_BROKEN"
            }
        }
    }
}| Both the CUnit sources provided by your project and the generated launcher require the core CUnit headers and libraries. Presently, this library dependency must be provided by your project for each CUnitTestSuiteBinarySpec. |
Running CUnit tests
For each CUnitTestSuiteBinarySpec, Gradle will create a task to execute this binary, which will run all of the registered CUnit tests. Test results will be found in the ${build.dir}/test-results directory.
Example: Running CUnit tests
plugins {
    id 'c'
    id 'cunit-test-suite'
}

model {
    flavors {
        passing
        failing
    }
    platforms {
        x86 {
            if (operatingSystem.macOsX) {
                architecture "x64"
            } else {
                architecture "x86"
            }
        }
    }
    repositories {
        libs(PrebuiltLibraries) {
            cunit {
                headers.srcDir "libs/cunit/2.1-2/include"
                binaries.withType(StaticLibraryBinary) {
                    staticLibraryFile =
                        file("libs/cunit/2.1-2/lib/" +
                             findCUnitLibForPlatform(targetPlatform))
                }
            }
        }
    }
    components {
        operators(NativeLibrarySpec) {
            targetPlatform "x86"
        }
    }
    testSuites {
        operatorsTest(CUnitTestSuiteSpec) {
            testing $.components.operators
        }
    }
}
model {
    binaries {
        withType(CUnitTestSuiteBinarySpec) {
            lib library: "cunit", linkage: "static"

            if (flavor == flavors.failing) {
                cCompiler.define "PLUS_BROKEN"
            }
        }
    }
}
$ ./gradlew -q runOperatorsTestFailingCUnitExeThere were test failures:
1. /home/user/gradle/samples/src/operatorsTest/c/test_plus.c:6 - plus(0, -2) == -2
2. /home/user/gradle/samples/src/operatorsTest/c/test_plus.c:7 - plus(2, 2) == 4
FAILURE: Build failed with an exception.
* What went wrong:
Execution failed for task ':runOperatorsTestFailingCUnitExe'.
> There were failing tests. See the results at: file:///home/user/gradle/samples/build/test-results/operatorsTest/failing/
* Try:
> Run with --stacktrace option to get the stack trace.
> Run with --info or --debug option to get more log output.
> Run with --scan to get full insights from a Build Scan (powered by Develocity).
> Get more help at https://help.gradle.org.
BUILD FAILED in 0s|
The current support for CUnit is quite rudimentary. Plans for future integration include:
|
GoogleTest support
The Gradle google-test plugin provides support for compiling and executing GoogleTest tests in your native-binary project. For each NativeExecutableSpec and NativeLibrarySpec defined in your project, Gradle will create a matching GoogleTestTestSuiteSpec component, named ${component.name}Test.
GoogleTest sources
Gradle will create a CppSourceSet named 'cpp' for each GoogleTestTestSuiteSpec component in the project. This source set should contain the GoogleTest test files for the component under test. Source files can be located in the conventional location (src/${component.name}Test/cpp) or can be configured like any other source set.
Building GoogleTest executables
A GoogleTestTestSuiteSpec component has an associated NativeExecutableSpec or NativeLibrarySpec component. For each NativeBinarySpec configured for the main component, a matching GoogleTestTestSuiteBinarySpec will be configured on the test suite component. These test suite binaries can be configured in a similar way to any other binary instance:
Example: Registering GoogleTest tests
model {
    binaries {
        withType(GoogleTestTestSuiteBinarySpec) {
            lib library: "googleTest", linkage: "static"

            if (flavor == flavors.failing) {
                cppCompiler.define "PLUS_BROKEN"
            }

            if (targetPlatform.operatingSystem.linux) {
                cppCompiler.args '-pthread'
                linker.args '-pthread'

                if (toolChain instanceof Gcc || toolChain instanceof Clang) {
                    // Use C++03 with the old ABIs, as this is what the googletest binaries were built with
                    cppCompiler.args '-std=c++03', '-D_GLIBCXX_USE_CXX11_ABI=0'
                    linker.args '-std=c++03'
                }
            }
        }
    }
}| The GoogleTest sources provided by your project require the core GoogleTest headers and libraries. Presently, this library dependency must be provided by your project for each GoogleTestTestSuiteBinarySpec. |
Running GoogleTest tests
For each GoogleTestTestSuiteBinarySpec, Gradle will create a task to execute this binary, which will run all of the registered GoogleTest tests. Test results will be found in the ${build.dir}/test-results directory.
|
The current support for GoogleTest is quite rudimentary. Plans for future integration include:
|